Fitting the Show Cover
Putting on the visible fabric: centering and marking, stapling opposites first, keeping the grain straight, making neat corners and pleats, finishing edges with gimp or welting, and closing the bottom with cambric.
- 4 min
- 6 steps
- 3 questions
- Lesson 22 of 26
In this lesson
- Prepare
- Centers and opposites
- Corners
- Finishing edges
- The dust cover
- What to take from this
Picking up where you left off.
Prepare
- Cut the cover generously, with the grain (or pattern) square to the seat, and mark the center of each edge with a notch or chalk.
- Mark the centers of the frame rails too.
- Cut and fit welt before you start if the design uses it (see Welting and Cushions).
Centers and opposites
The same method as the muslin, from the Montana bulletin 1:
- Center the cover on the seat, aligning center marks.
- Tack or staple the front center, then pull the back center firmly and fasten.
- Fasten the left center, then pull the right center and fasten.
- Work outward from the centers in pairs, moving to the opposite side before advancing, toward the corners.
- Stop a couple of inches short of each corner.
Pull with the grain in opposite directions at once, strongest toward the line of fastening, and use many small tacks or staples close together 1. Tack partway (or staple temporarily) until the fit is right 1.
Place the cover’s fastenings just below the muslin’s tacks 1, or on the underside of the rail if the edge will be covered by welting or a band.
Check often: the grain should run straight, a pattern should stay centered, and the crown should be even. A diagonal ripple means one side has more pull than its opposite; correct it before the corners.
Quick check
Working opposites keeps tension balanced so the grain stays straight and the pattern centered.
Corners
Corners show skill:
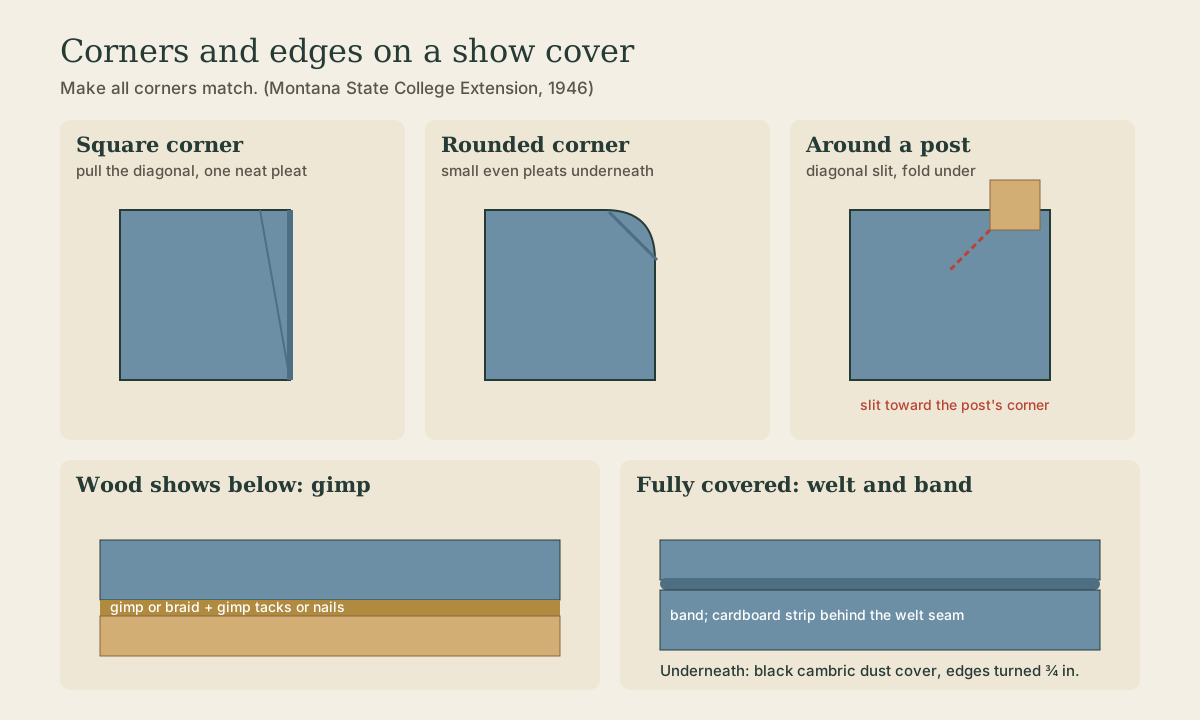
- Square corners: pull the corner straight down the diagonal and fasten. Fold the fullness on each side into a single neat pleat (or a pair of mirrored pleats), cut excess bulk away underneath, and fasten.
- Rounded corners: gather the fullness into small, even pleats on the underside.
- Around legs or posts: cut a diagonal slit toward the corner of the post, fold the fabric under so it fits snugly without showing wood, and fasten close 1.
Make all corners match; the eye catches any difference.
Finishing edges
How the edge is finished depends on the frame 1:
- Exposed wood below the upholstery: fasten the cover just below the muslin tacks, trim close, and cover the raw edge with gimp or braid, fastened with gimp tacks or evenly spaced decorative nails.
- Fully covered frame: sew welting around the top edge, then attach a band (boxing) of fabric below it, using a strip of cardboard tacked behind the welt seam to give a straight, crisp line (back-tacking), pad the band lightly, turn it down, and fasten it underneath 1.
Quick check
Gimp hides the staples or tacks and raw edge where the cover meets show wood.
Quick check
The cambric gives a finished look and keeps stuffing particles from falling out.
What to take from this
Cut with the grain, mark centers, and fasten opposite centers first, working outward in pairs and pulling with the grain using many small fasteners. Stop short of corners, then pleat them neatly and identically. Finish exposed-wood edges with gimp or decorative nails, or welting plus a back-tacked band on covered frames, and close the bottom with cambric.
Lesson complete
Nice work.
Sources for this lesson
- 1Margaret Huston Tuller. Simple Upholstery Methods (Bulletin 198, revised). Montana Extension Service, Montana State College. 1946. verifiedA sprung footstool step by step - webbing stretcher, 3-, 8-, and 12-ounce tacks, 3 1/2-inch webbing interlaced, springs sewn at intersections, 8-way tying with clove hitches, burlap, edge roll, hair and cotton padding, muslin, cover, welt, cambric; plus retying 'broken springs' and renewing webbing.