Stripping and Frame Repair
Taking an old piece down safely: documenting each layer, ripping out tacks without splitting the rails, deciding what to keep, and gluing loose joints and filling tack-riddled rails before new upholstery goes on.
- 4 min
- 5 steps
- 3 questions
- Lesson 14 of 26
In this lesson
- Decide first
- Document first
- Stripping
- Frame repair
- What to take from this
Picking up where you left off.
Decide first
Before stripping, decide what the piece deserves:
- Antique or valuable: original upholstery can be historically significant and is often worth keeping or conserving rather than replacing. Conservators treat old stuffing and covers as part of the object 1.
- Sound but worn: re-cover only, using the old cover as a pattern 2.
- Sagging or lumpy: retie springs or renew webbing from underneath without stripping the top 2.
- Failed throughout: complete reupholstery - strip to the frame, repair, and rebuild 2.
Document first
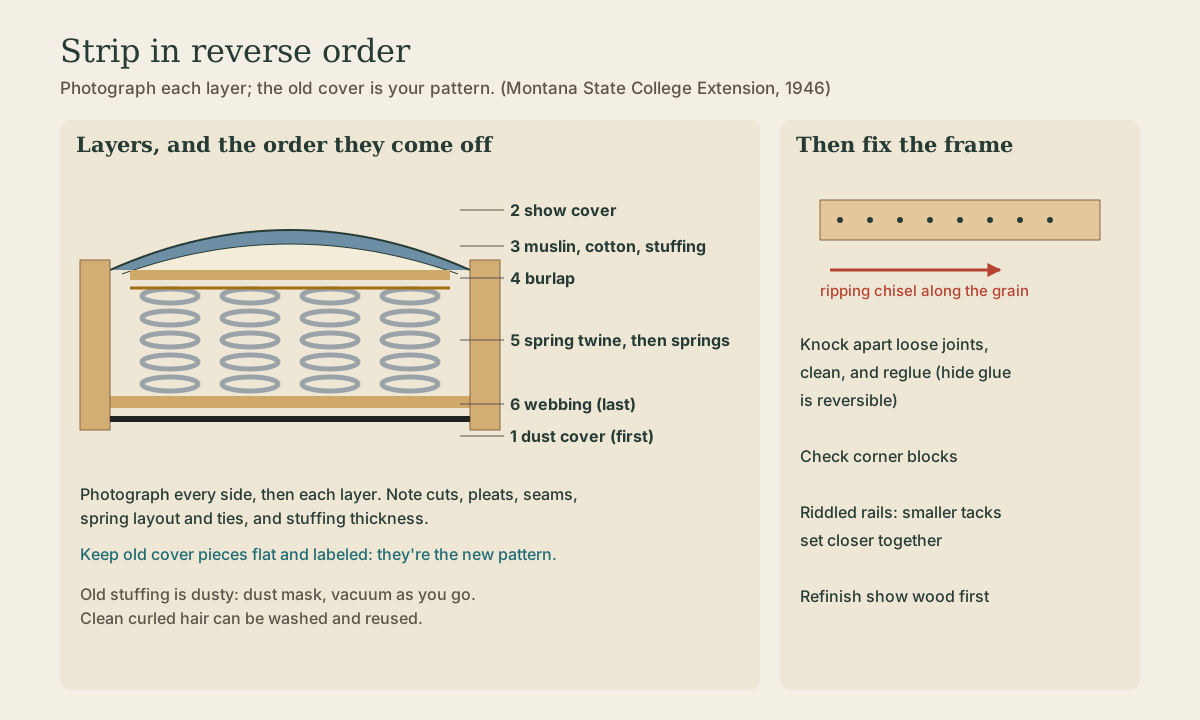
Photograph every side before you start, then each layer as it comes off. Note:
- How the cover was cut, pulled, and pleated at corners.
- Where seams and welting run.
- How the springs were placed and tied.
- What stuffings were used and how thick.
Keep the old cover pieces flat and labeled; they’re patterns for the new one. The 1946 Montana bulletin calls observing how each step of the original was made “an excellent practice” 2.
Quick check
The Montana bulletin advises observing how each step of the original was made, which makes reupholstering easier.
Stripping
Work from the outside in, in reverse order of building:
- Dust cover off the bottom.
- Show cover: remove gimp or welting, then tacks or staples.
- Muslin, batting, stuffing: lift off and bag; old stuffing is dusty, so wear a dust mask and vacuum as you go. Clean curled horsehair can be washed and reused 2.
- Burlap, then cut the spring ties and remove springs.
- Webbing last.
Removing tacks: set a ripping chisel against the tack head and tap it with a mallet, driving along the grain of the rail so you don’t split off slivers. Staples come out with a staple lifter and pliers. Remove every old tack and staple; leftovers deflect new ones and snag fabric.
Quick check
Working with the grain avoids levering off slivers of the rail.
Frame repair
With the frame bare, fix it now, because once it’s covered you can’t:
- Loose joints: knock them apart, clean out old glue, and reglue (hide glue is traditional and reversible). Don’t just inject glue into a loose joint; it rarely holds.
- Corner blocks: check that the glued and screwed blocks inside each corner are tight; replace missing ones. The Montana bulletin specifies corner blocks or metal plates to reinforce a footstool frame 2.
- Cracked rails: glue and clamp, or splice in new wood.
- Tack-riddled rails: old holes weaken the wood, so reupholstery usually calls for smaller tacks set closer together 2. Where a rail is badly riddled, glue in thin wood strips or fill holes with glued slivers and plane flush.
- Exposed wood: refinish show wood before upholstering, so finish doesn’t get on new fabric 2.
Quick check
The bulletin notes reupholstery usually needs smaller tacks, more of them, because old holes have weakened the frame.
What to take from this
Decide first whether to conserve, re-cover, repair from underneath, or fully reupholster. Photograph and keep every layer as you strip in reverse order, and save the old cover as a pattern. Rip tacks out along the grain, remove them all, and repair the frame while it’s bare: reglue loose joints, tighten corner blocks, fix cracks, fill riddled rails, and refinish show wood before any new upholstery goes on.
Lesson complete
Nice work.
Sources for this lesson
- 1Conserve O Gram 7/4 — Upholstered Furniture: Agents of Deterioration. U.S. National Park Service. 1993. verifiedGovernment conservation guide describing the composite build of upholstered furniture, historic fillings, coil springs, show covers, and interactions among materials.
- 2Margaret Huston Tuller. Simple Upholstery Methods (Bulletin 198, revised). Montana Extension Service, Montana State College. 1946. verifiedA sprung footstool step by step - webbing stretcher, 3-, 8-, and 12-ounce tacks, 3 1/2-inch webbing interlaced, springs sewn at intersections, 8-way tying with clove hitches, burlap, edge roll, hair and cotton padding, muslin, cover, welt, cambric; plus retying 'broken springs' and renewing webbing.