Coil Springs: Setting, Sewing, and Tying
Choosing springs, sewing them to the webbing intersections, and the eight-way tie with clove hitches that locks them upright into a crowned, unified bed - the heart of traditional seating.
- 4 min
- 4 steps
- 3 questions
- Lesson 16 of 26
In this lesson
- Choosing springs
- Setting and sewing
- Tying eight ways
- What to take from this
Picking up where you left off.
Choosing springs
The Montana bulletin’s footstool uses six strong springs, the same size top and bottom 1:
- Springs should be about twice the height of the frame they sit in, if they’re strong; weaker springs should be taller or doubled 1. They’re compressed when tied, which gives the seat its spring.
- Test each one: press it with your palm on a flat surface. A good spring doesn’t let its end coils meet, doesn’t buckle sideways, and pushes back strongly 1.
- Match old salvaged springs for size and stretch any mashed coils back into shape 1.
Quick check
Springs about twice the box height are compressed when tied; weaker springs should be taller or doubled.
Setting and sewing
- Set one spring at the center of each webbing intersection 1.
- If the wire ends are loose, the end curving downward is the top. Turn springs so the wire ends land near, but not exactly at, the points that will be tied 1.
- Sew each spring to the webbing with a large straight needle and doubled flax mattress twine, three stitches per spring, each pulled tight over the bottom wire 1.
- Run long stitches underneath from spring to spring so the sewing is continuous; start and end with a surgeon’s knot 1.
Tying eight ways
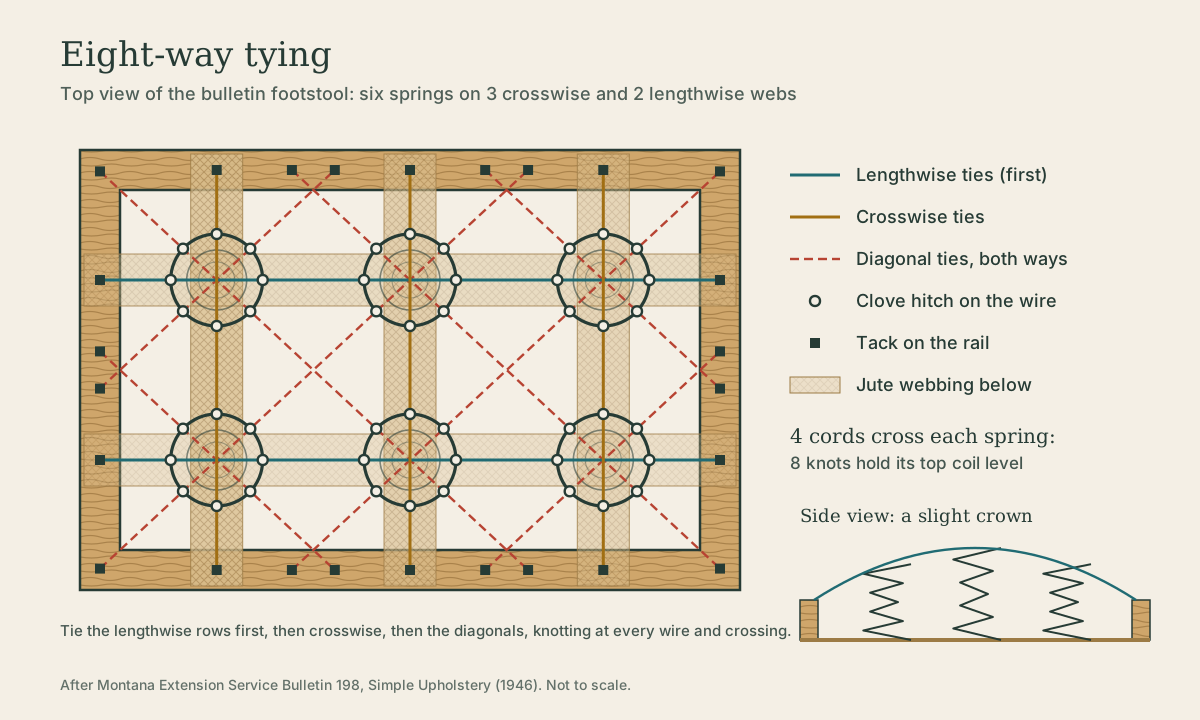
Eight-way tying crosses every spring with four cords - lengthwise, crosswise, and both diagonals - knotting each spring at eight points, so the springs stand upright and move as one bed 1.
Cut the twine: for each row, measure across the tops of the springs and cut 1 1/2 to 2 times that distance - “once and a half and a little bit more” 1. The final set of diagonals, which knot over every crossing, takes about twice the distance 1.
Anchor: drive two 12-ounce tacks partway into the top of the rail opposite each row (and at each diagonal), just far enough apart for two thicknesses of twine. Loop the twine around both, then drive them home 1.
Tie the first row 1:
- Start with the center row. Push the first spring down so the edge of its top coil nearest the rail sits about 1 inch lower than the far edge: the outer springs lean slightly toward the frame, which crowns the seat.
- Tie a clove hitch over the near edge of the top coil, then across the top to the far edge and tie another.
- Move to the next spring, compress it to match, keeping the spacing at the top the same as at the bottom, and tie it the same way.
- With a helper pressing the row into shape, anchor the far end around its tacks.
The clove hitch matters: it can’t slip, and it won’t pull out even if the twine wears through somewhere else 1.
Check the curve of that center row before driving the last tack; it sets the shape for every other row. Leave the loose twine ends long inside the frame so knots can be retied if needed 1.
Repeat for the other crosswise rows, the lengthwise rows, and the diagonals in one direction. The final diagonals knot over every wire and every crossing of cords, including the crossings at each spring’s center. The rule: knot at every wire and twine that won’t be crossed again 1.
When done, the seat should be slightly crowned, with every spring standing erect 1.
Playback is optional. If the player is unavailable, open the video at its source.
Quick check
Each spring is held by its own locked knots, so one worn spot doesn’t release the row.
Quick check
‘Once and a half and a little bit more.’ The final diagonals, which knot over every crossing, need about twice the distance.
What to take from this
Use strong springs about twice the frame depth that don’t buckle under your palm. Sew each to a webbing intersection with three tight stitches of mattress twine. Tie eight ways - lengthwise, crosswise, and both diagonals - with spring twine cut 1 1/2 to 2 times the span, anchored on paired 12-ounce tacks, using clove hitches that can’t slip. Tie the center row first to set a gentle crown, and finish with diagonals knotted over every crossing.
Lesson complete
Nice work.
Sources for this lesson
- 1Margaret Huston Tuller. Simple Upholstery Methods (Bulletin 198, revised). Montana Extension Service, Montana State College. 1946. verifiedA sprung footstool step by step - webbing stretcher, 3-, 8-, and 12-ounce tacks, 3 1/2-inch webbing interlaced, springs sewn at intersections, 8-way tying with clove hitches, burlap, edge roll, hair and cotton padding, muslin, cover, welt, cambric; plus retying 'broken springs' and renewing webbing.