Jute Webbing
The foundation of a traditional seat: strips of webbing interlaced across the frame bottom, stretched tight and tacked in a double row with folded ends, spaced so springs land on the intersections.
- 4 min
- 6 steps
- 3 questions
- Lesson 15 of 26
In this lesson
- What webbing does
- Layout
- Tacking and stretching
- Tension
- Renewing webbing
- What to take from this
Picking up where you left off.
What webbing does
In a traditional seat, webbing stretched across the bottom of the frame carries the springs, and through them, the sitter 1. In an unsprung seat or a back, webbing across the top of the frame carries the stuffing directly. Its quality and tension decide how long the seat lasts: closely woven webbing of good fiber holds; loose, sized webbing stretches and sags 1.
Layout
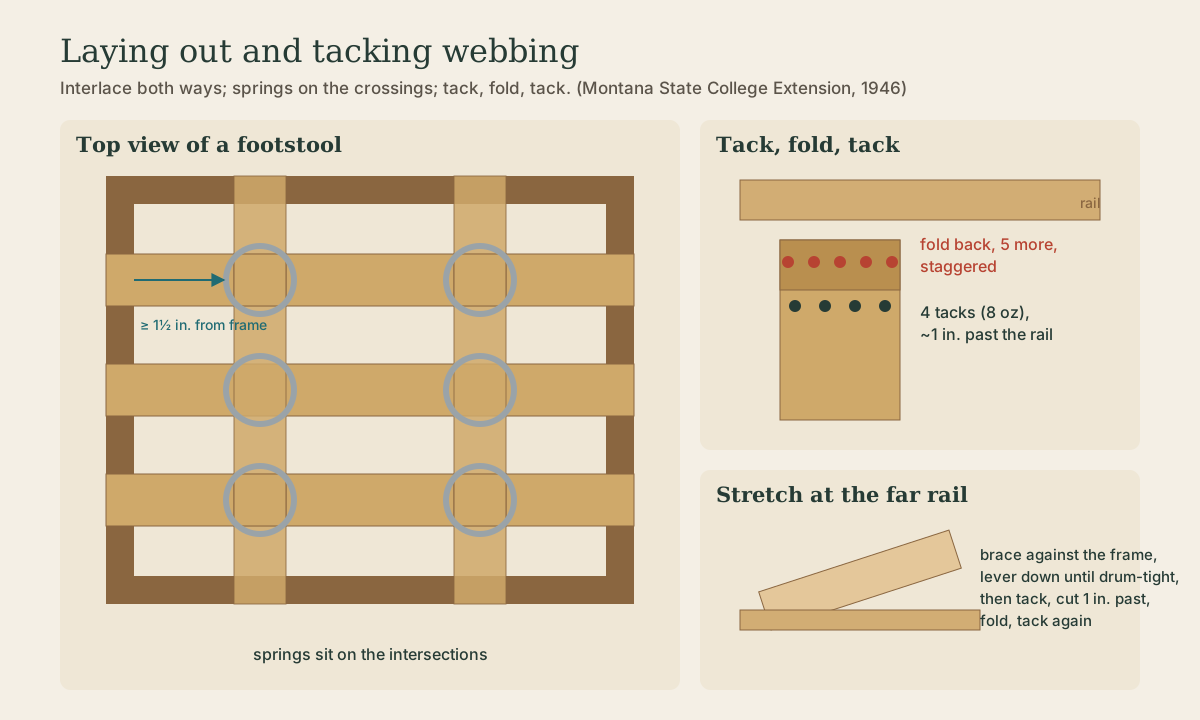
On the Montana bulletin’s footstool, three strips run crosswise and two lengthwise 1. The general rules:
- Strips run both ways and are interlaced in a basket weave (over, under) so they act as one sheet 1.
- Springs sit on the intersections, so plan the strip spacing from the spring layout.
- Leave the spaces between the outer strips and the frame wider than the spaces between strips 1.
- Keep at least 1 1/2 inches between the edge of a spring and the inside of the frame 1.
- For seats without springs, space strips closely, with gaps no wider than the webbing.
Quick check
Springs are sewn at the intersections, and need clearance from the frame so they don’t rub.
Quick check
Interlacing makes the webbing act as one sheet and share the load.
Tacking and stretching
Following the bulletin’s method 1:
- Start with the center strip, working off the roll so there’s no waste.
- Let about 1 inch extend past the rail, and tack it with four 8-ounce tacks across the webbing.
- Fold the end back over the tacks and secure the fold with five more tacks. Stagger the two rows so tacks don’t split the rail or hit each other.
- Keep the fold back from the outer edge of the rail so the bottom line stays neat.
- At the opposite rail, use the webbing stretcher: brace its padded end against the side of the frame below the rail, push the webbing over its teeth, and lever the handle down until the webbing is drum-tight.
- Tack with four tacks, cut the webbing 1 inch past them, fold over, and tack five more.
- Add the remaining crosswise strips, then weave the lengthwise strips through before tacking them the same way.
If the end is too short to grip with the stretcher, sew a scrap of webbing or folded burlap to it temporarily with mattress twine, stretch, tack, and remove the scrap 1.
Quick check
The Montana bulletin uses four 8-ounce tacks, then folds the end back and adds five more, staggered so the rail doesn’t split.
Tension
Tight webbing is the goal: it should sound like a drum when tapped and barely deflect under hand pressure. Loose webbing lets springs sink and tilt. Pull every strip to the same tension so the seat doesn’t develop a low spot.
Renewing webbing
Sagging webbing under an otherwise good seat can be replaced from underneath without disturbing the top: turn the piece over, remove the dust cover and old webbing tacks, cut the twine holding the springs, stretch new webbing, and sew the springs back on from below with a curved needle 1. Use smaller tacks set closer together than on a new frame, since old holes have weakened the wood 1.
What to take from this
Webbing is the seat’s foundation: close-woven jute or linen, interlaced both ways, spaced so springs sit on the intersections at least 1 1/2 inches from the frame. Tack each end with a row of tacks, fold it back, and tack a staggered second row; stretch drum-tight with a webbing stretcher. Saggy webbing can be renewed from underneath with smaller, closer tacks.
Lesson complete
Nice work.
Sources for this lesson
- 1Margaret Huston Tuller. Simple Upholstery Methods (Bulletin 198, revised). Montana Extension Service, Montana State College. 1946. verifiedA sprung footstool step by step - webbing stretcher, 3-, 8-, and 12-ounce tacks, 3 1/2-inch webbing interlaced, springs sewn at intersections, 8-way tying with clove hitches, burlap, edge roll, hair and cotton padding, muslin, cover, welt, cambric; plus retying 'broken springs' and renewing webbing.