Lab Layout and Unidirectional Workflow
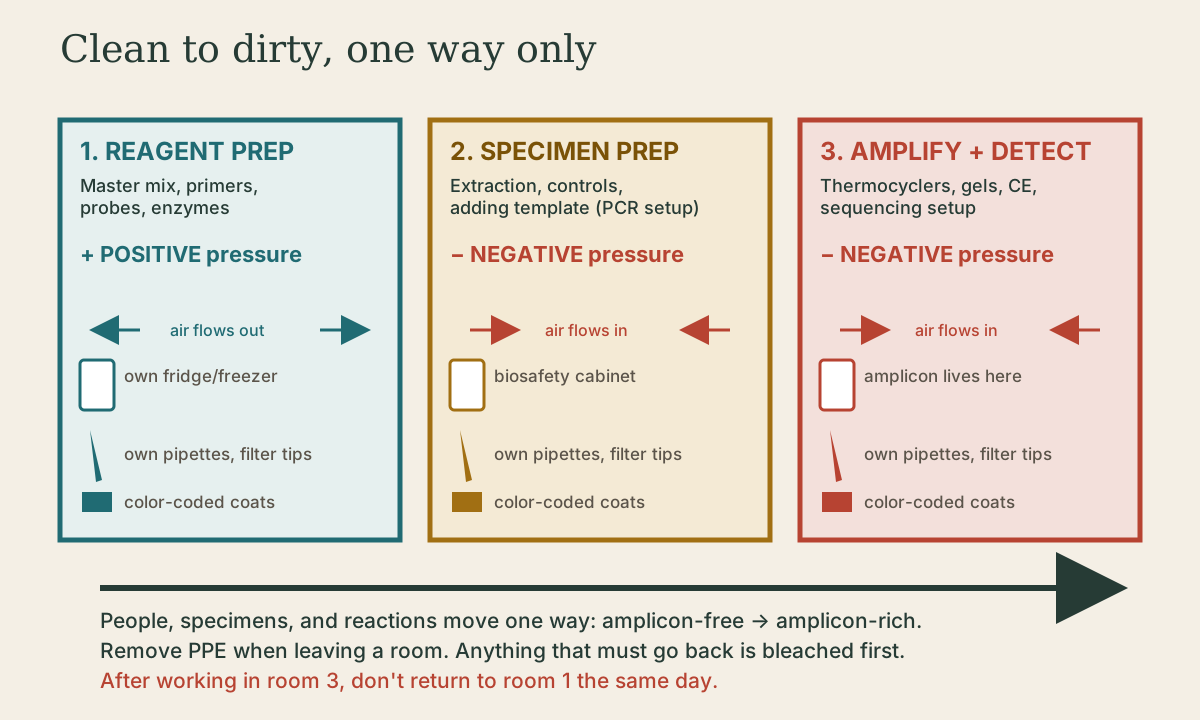
Three separate areas - reagent prep, specimen prep, and amplification/detection - with work moving one way from clean to dirty, dedicated equipment in each, and air pressure set to keep amplicon out of the clean rooms.
- 4 min
- 6 steps
- 3 questions
- Lesson 36 of 60
In this lesson
- Three areas
- Dedicated everything
- One-way movement
- Run order and bench habits
- At the bench
- What to take from this
Picking up where you left off.
Three areas
The core design principle, set out in CLSI MM19 and reflected in the CAP Molecular Pathology checklist, is physical separation of the stages of a test into at least three areas 1:
- Reagent preparation: master mix, primers, probes, and enzymes are prepared and aliquoted. No specimens, no controls, no amplified product ever enter. Often a dead-air box or PCR workstation with UV.
- Specimen preparation: extraction, handling of patient specimens and control material, and adding template to the reaction mix (PCR setup). Often in a class II biosafety cabinet.
- Amplification and detection (post-amp): thermocyclers, gels, capillary electrophoresis, sequencing setup - anywhere amplified product exists or tubes are opened after amplification.
Areas should be physically separate rooms, preferably at a distance from one another 1.
Air pressure reinforces the separation 1:
- Reagent prep: positive (air flows out, nothing drifts in).
- Specimen prep: negative.
- Post-amplification: negative (amplicon stays in).
A lab without three rooms can use two areas (a clean area with laminar-flow hoods for reagents, specimens, and setup, and a separate post-amp area), or dedicated benches with biosafety cabinets, or closed sample-to-answer instruments that make separation less critical 1.
Quick check
Reagent prep must stay free of template and amplicon, so air flows out of it. Specimen prep and post-amplification rooms are negative to keep their contaminants in.
Dedicated everything
- refrigerator and freezer (manual defrost - frost-free cycles warm the contents),
- pipettes and aerosol-barrier (filtered) tips or positive-displacement pipettes,
- centrifuge, vortexer, timers, tube racks,
- color-coded lab coats, gloves, safety glasses,
- cleaning supplies, and even pens and paper.
Color coding makes misplaced equipment obvious. Nothing is borrowed between areas without decontamination.
One-way movement
Work moves from amplicon-free to amplicon-rich: reagent prep, then specimen prep, then post-amp 1. The rule applies to:
- Specimens and reactions, obviously.
- People, including cleaning staff. Remove PPE before leaving an area. Avoid going backward; once you’ve worked in post-amp, don’t return to reagent prep that day.
- Supplies: reusable items that must move backward are bleached first.
Quick check
Movement is one-way. People, specimens, and supplies flow from clean to dirty; anything that must go backward has to be decontaminated (bleached), and people should not re-enter clean areas after post-amp work the same day.
Run order and bench habits
The CAP carryover requirement (MOL.35350) spells out practices: separate pre- and post-amplification areas, frequent glove changes, dedicated pipettes with barrier tips, minimal aerosols, and setup in the order patient samples, then positive controls, then negative controls including the no-template control 1. The NTC goes last so it has every chance to pick up contamination present in the run.
Good habits from the Wisconsin State Lab of Hygiene 2:
- Open one specimen at a time.
- Change gloves often, and whenever you touch something questionable.
- Aliquot reagents to avoid repeated freeze-thaw and to limit the loss when a vial is contaminated.
- Store clean reagents separately from controls.
- Use a single-use bench pad for each run.
- Don’t load cartridges where cultures are handled.
At the bench
Sketch your own lab’s floor plan and trace a specimen from accessioning to report. Mark each room’s pressure, where each pipette set lives, and every point where an amplified product could be opened. Any route that crosses back from post-amp to a clean area is a contamination risk to fix.
What to take from this
Separate reagent prep, specimen prep, and amplification/detection, with positive pressure in reagent prep and negative in the other two. Give each area its own color-coded equipment and barrier-tip pipettes. Move people, specimens, and supplies one way from clean to dirty, decontaminating anything that must go back. Set up patients, then positive controls, then negative controls with the NTC last.
Practice
Setting the NTC up last means it’s exposed to every opportunity for contamination in the run - if it stays negative, the run is clean. Positives come after patients so their high-copy material isn’t opened before patient tubes.
Lesson complete
Nice work.
Sources for this lesson
- 1Rachel Lee. Molecular Laboratory Design and QA/QC Considerations. Association of Public Health Laboratories (NBS Molecular Training Workshop). 2020. verifiedThree areas with positive pressure in reagent prep and negative in sample prep and post-amp; CAP MOL.35350 carryover and run order; fresh 10% bleach then ethanol and water; monthly wipe tests; MOL.49520 thermocycler checks annually; MOL.34516 cut-off verification each lot or 6 months; control types.
- 2Dean A. Jobe, Erik Reisdorf. PCR Contamination and Laboratory Best Practices. Wisconsin State Laboratory of Hygiene and Gundersen Health System. 2018. verifiedSigns of contamination (rising positivity for rare targets, more high-Ct positives, out-of-season positives, positive environmental swabs); bleach, HCl, UV, and UNG; wipe testing with a wet polyester swab.