Capstone Brief & Current-State Evidence
The capstone runs one real project from start to finish: making a woodshop's dust collection automatic, so each machine's blast gate opens and the collector starts whenever that machine runs. This lesson covers why that's a good-sized project, logging two weeks of machine starts before designing anything, writing a brief with a bounded scope and a problem statement that doesn't name a solution, and trying the cheap fix first.
- 5 min
- 5 steps
- 3 questions
- Lesson 73 of 78
In this lesson
- The project
- Log the work before designing anything
- Write the brief
- Try the cheap fix first
- Gate 1
Picking up where you left off.
The project
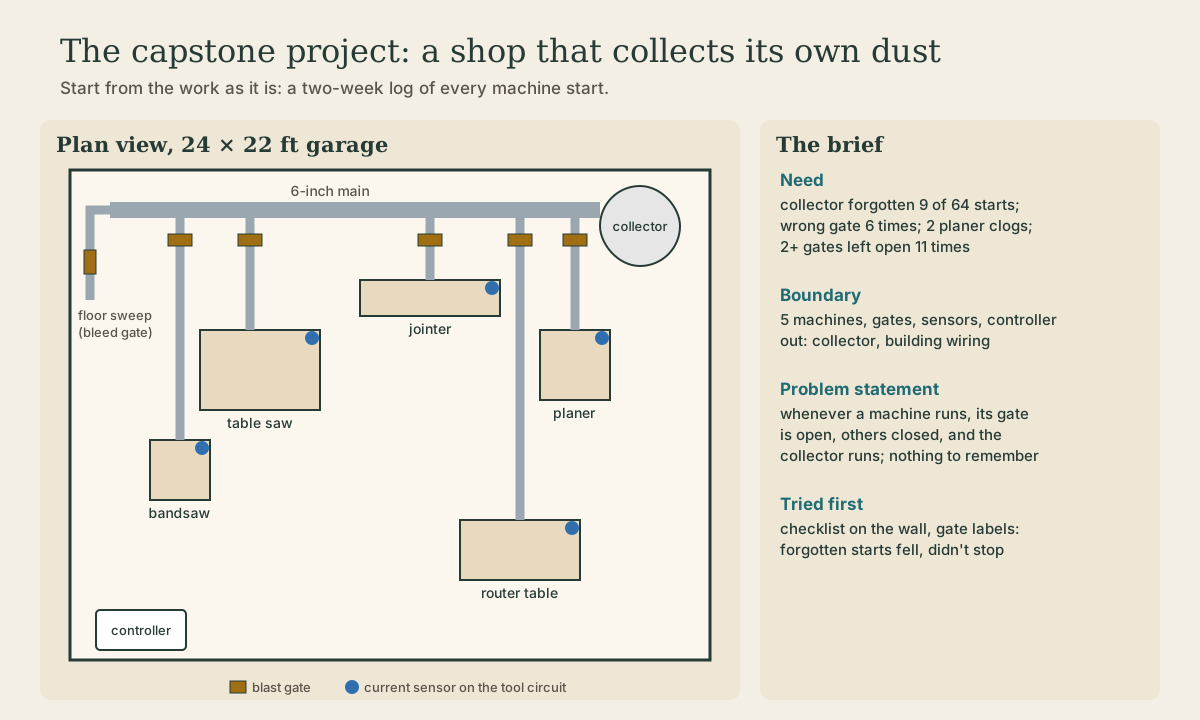
Every lesson in this capstone follows one project from first observation to a working, tested system: automatic dust collection for a woodshop. The shop has a dust collector in one corner, a 6-inch main along the back wall, and gated drops to five machines. Right now a person has to walk over, open the right blast gate, close the others, and switch the collector on, every time, then remember to switch it off. The automated version senses which machine is running, opens that machine’s gate, confirms it’s open, starts the collector, and shuts everything down a few seconds after the machine stops.
It’s a good capstone because it’s small enough to finish and test completely, but it touches everything the earlier courses covered:
- Fluids: airflow, duct velocity, and why gate position matters (the next lesson).
- Mechanisms: an actuator with enough stroke and force to move a dusty slide.
- Sensing and electronics: current transformers, signal conditioning, an analog-to-digital converter.
- Control: a state machine with timeouts and a fault path.
- Safety: new hazards the automation itself creates, such as a collector that now starts on its own.
- Testing: bench, installed, and long-term evidence that it works.
It’s also safe to build at home if one boundary holds: the DIY part stays low voltage. Anything that switches line voltage to a motor is a bought, listed device rated for that motor. The controller only tells it when.
Log the work before designing anything
Before sketching a single part, measure the problem. For two weeks, every time a machine starts, note on a clipboard by the door:
- which machine;
- whether the collector was on before the cut started;
- whether the right gate was open, and whether any other gates were left open;
- any clog, and how long clearing it took.
Suppose the log shows 64 machine starts: the collector was forgotten 9 times, the wrong gate (or no gate) was open 6 times, two or more gates were left open 11 times, and the planer clogged its hose twice. That’s a problem on roughly a quarter of starts. Those numbers are the baseline every later test gets compared against.
The “gates left open” count matters more than it looks. A small-shop collector moves far less air than its rating, and air divides among every open gate, so each extra open gate starves the one you’re using 1. The next lesson puts numbers on that.
Quick check
Without a baseline, ‘it works better now’ is a feeling, not a result.
Write the brief
One page, in plain sentences:
- Need: the baseline numbers above, and why they matter (fine dust escaping, clogs, wasted time).
- Boundary: in scope are the five machines’ gates, current sensors, a controller, and the signal that starts the collector. Out of scope are the collector itself, the duct layout, and the building wiring. Writing down what’s out keeps the project from growing.
- Problem statement: Whenever a machine runs, its gate is open, the others are closed, and the collector runs, with nothing to remember. It doesn’t say “Arduino” or “servo.” A problem statement that names a purchase has already skipped the design.
- Constraints: line voltage only through listed devices; the shop must still work by hand if the controller fails; total cost comparable to a better collector filter.
- Unknowns: how much force a dusty gate slide takes; whether the current sensors can tell a tool idling from one that’s off; how much air reaches each drop.
MIT’s design courses treat the notebook as part of the engineering: dated observations, sketches, calculations, rejected ideas, and test results in one place 2. Start one now, and put the log and brief on its first pages.
Playback is optional. If the player is unavailable, open the video at its source.
Quick check
It names the outcome and leaves the solution open, so a cheaper fix can still win.
Try the cheap fix first
Before automating, try the simplest change that might make the project unnecessary. Here, that’s a laminated checklist at the collector switch, a label on each gate, and a rule: close every gate when you finish. Log another week.
Suppose forgotten starts drop from 9 to 4 over the same number of starts, but don’t reach zero, and gates are still left open. The cheap fix helped, which is worth knowing, and it left a real residual problem. That’s the evidence that justifies designing more. If the checklist had driven the count to zero, the right capstone outcome would be to stop and keep the checklist.
Quick check
Gate 1 asks whether a simple change makes the project unnecessary.
Gate 1
The project moves to requirements only when:
- the need is measured, not just felt (the log);
- the scope has a written boundary;
- at least one non-automation fix was tried and its result recorded;
- the line-voltage boundary is set: DIY electronics stay low voltage.
Write one more line for later: unplugging is still the way to make any cord-and-plug machine safe to work on, the same exception OSHA’s lockout rule makes for cord-and-plug equipment under the worker’s exclusive control 3. An automatic collector makes that habit more important, as the safety lesson shows.
Lesson complete
Nice work.
Sources for this lesson
- 1Bill Pentz. Dust Collection Ducting. Bill Pentz Cyclone and Dust Collection Research. verifiedSmall-shop stationary tools need about 350 CFM to collect visible chips and about 1000 CFM for good fine-dust collection. Design air speed about 4000 FPM in vertical runs and 3000 FPM in horizontal runs (3800 minimum vertical, 2800 horizontal; 4500 for large chips). A 1.5 hp collector rated 1100 CFM maximum actually moves about 785 CFM through 6-inch duct, 550 through 5-inch, and 350 through 4-inch. Doubling airflow takes about four times the static pressure and much more horsepower. Thin 30-gauge duct can collapse if the system starts with no blast gates open. Static charge on PVC can shock you but experts find it insufficient to cause an explosion in hobby systems.
- 2Design and Manufacturing I. MIT OpenCourseWare. verifiedProject-centered course on electromechanical design, machine elements, experiments, drawings, modeling, fabrication, and technical review.
- 329 CFR 1910.147 - The Control of Hazardous Energy (Lockout/Tagout). Occupational Safety and Health Administration. verifiedU.S. general-industry minimum performance requirements for controlling unexpected energization, startup, and release of stored energy during service and maintenance.