Breaking Down a Deer
Turning a carcass into meals: boning out instead of sawing, the order of work, backstraps and tenderloins, separating the hindquarter into round and sirloin muscles, shoulders, neck, and trim, removing silverskin and fat, grinding with added fat, and wrapping, labeling, and freezing.
- 4 min
- 6 steps
- 3 questions
- Lesson 42 of 55
In this lesson
- Bone it out
- The order of work
- Hindquarter and shoulder
- Trim, grind, and wrap
- Try it
- What to take from this
Picking up where you left off.
Bone it out
Cutting a deer at home is mostly following seams between muscles with a boning knife, not sawing. Boning out is cleaner, avoids bone dust and marrow on the meat, and limits sawing through bone, especially the spine, which Wisconsin DATCP recommends 1 and which also reduces contact with spinal tissue in CWD areas 2. Wear gloves and work on a clean, sanitized table 3.
Tools: a 6-in. boning knife, a steel and stone, a large cutting board, food-grade tubs for cuts, trim, and scrap, paper towels, freezer paper or a vacuum sealer, a marker, and a grinder if you’ll make burger. Keep the meat cold the whole time; work in batches from the refrigerator.
The order of work
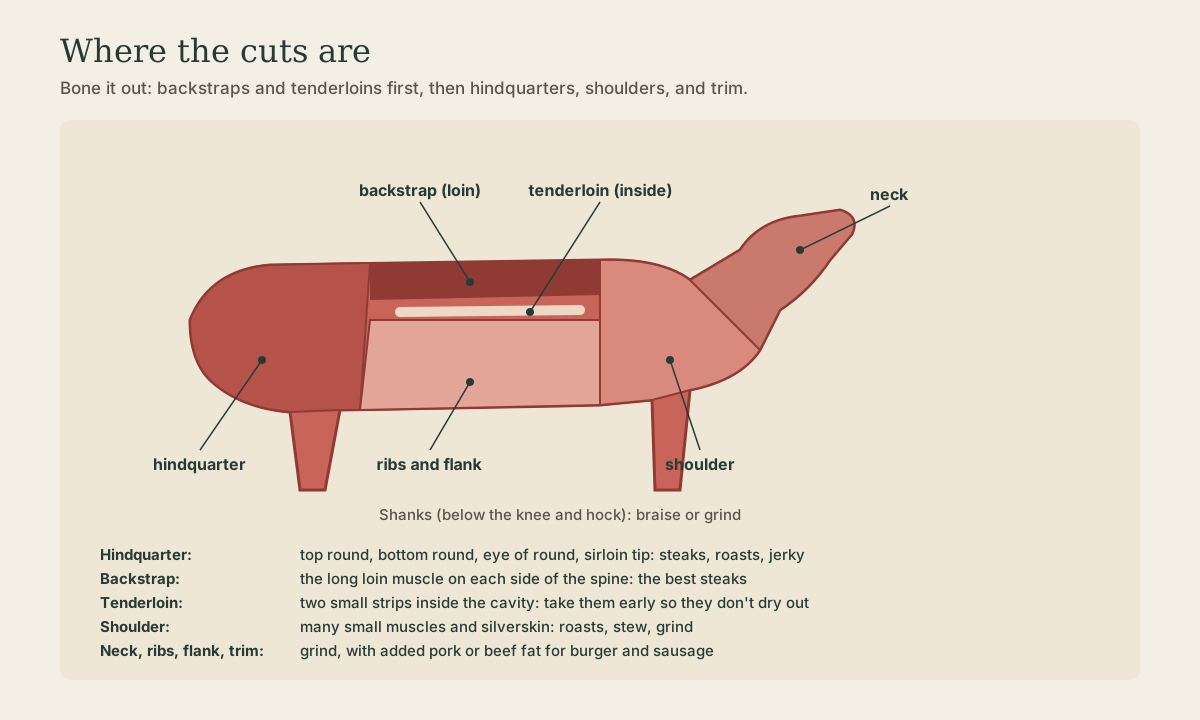
- Tenderloins: the two small strips inside the body cavity along the underside of the spine. Take them early, even right after field dressing, since they dry out on a hanging carcass.
- Backstraps (loins): the long muscles along each side of the spine on the outside. Cut down along the spine from hip to neck, then along the ribs, and peel each out in one piece. These are the prized steaks.
- Front shoulders: there’s no bone joint holding the shoulder to the body. Lift the leg and cut through the muscle between shoulder blade and ribs, and it comes free.
- Hindquarters: cut along the pelvis and through the ball-and-socket hip joint to remove each leg.
- Neck, ribs, and flank: trim off the meat between and over the ribs, the flank, and the neck for grind or stew.
Playback is optional. If the player is unavailable, open the video at its source.
Quick check
They’re small, tender strips under the spine; take them out soon after field dressing.
Hindquarter and shoulder
Hindquarter: the biggest, best muscles. Follow the natural seams with your fingers and the knife tip to separate the top round, bottom round, eye of round, and sirloin tip, plus the rump on the top of the hip. Each makes steaks, roasts, or jerky. Trim off the shank below for braising or grind.
Shoulder: many small muscles wrapped in silverskin. Small whole muscles make good pot roasts; the rest goes to stew meat and grind.
Playback is optional. If the player is unavailable, open the video at its source.
Trim, grind, and wrap
- Silverskin and fat: trim off the shiny connective tissue and the fat. Venison fat has a strong, gamey flavor 3 and goes rancid in the freezer.
- Grind: chill the trim nearly to freezing, grind through a coarse plate, then fine. For burger and sausage, add pork or beef fat, about 1 part fat to 2-3 parts venison; don’t use deer fat 3. Cook ground venison and sausage to 165 °F 3 (see Sausage Making).
- Package in meal-size portions, wrapped tightly with all air pressed out, in heavy freezer paper, heavy foil, freezer bags, or vacuum bags 1. Label each package with cut and date 1.
- Freeze at 0 °F or below, spacing packages so they freeze fast; well-wrapped venison keeps 9-12 months 1, ground venison about 6-9 months 3.
- Thaw in the refrigerator or microwave, not on the counter, and don’t refreeze thawed meat 1.
Quick check
Grind with pork or beef fat instead.
Quick check
Ground venison holds quality for about 6-9 months.
Try it
On your next deer, or a lamb leg from the butcher for practice, bone out one hindquarter along its seams into top round, bottom round, eye of round, and sirloin tip. Weigh each muscle and the trim, and note which cuts you’d make into steaks, roasts, jerky, or grind.
What to take from this
Bone out a deer rather than sawing it, especially through the spine. Take the tenderloins first, then the backstraps, shoulders, and hindquarters, and trim the neck, ribs, and flank for grind. Separate the hindquarter along its seams into the rounds and sirloin tip, trim silverskin and gamey fat, grind with added pork or beef fat, and freeze tightly wrapped, labeled, meal-size packages at 0 °F for up to about a year.
Lesson complete
Nice work.
Sources for this lesson
- 1Caring for Venison in Warm Weather (DFS-MB-023). Wisconsin Department of Agriculture, Trade and Consumer Protection. 2013. verifiedField-dress immediately; ice or snow in sealed bags above 40 °F; don't carry deer on the hood or roof or in a trunk; chill the carcass surface to 40 °F within 24 hours; gloves; discard if organs smell offensive or show green discharge or black blood; food-grade bags, not trash bags; aging 32-36 °F, never above 40 °F, no longer than 2 weeks, hide on, only if clean and not gut-shot; don't freeze before rigor; limit sawing through bone, especially the spine; freeze at 0 °F, 9-12 months; thaw in the refrigerator.
- 2Chronic Wasting Disease (CWD). National Prion Disease Pathology Surveillance Center, Case Western Reserve University. verifiedCWD is a fatal prion disease of deer, elk, reindeer, sika deer, and moose with no treatment or vaccine; no human transmission documented, though prion incubation can last decades; test before eating and don't eat positives; don't handle sick or dead animals; gloves; minimize contact with brain and spinal tissue; dedicated tools; individual processing.
- 3Margie P. Memmott, Brian A. Nummer, Charlotte P. Brennand. Venison. Utah State University Extension. 2017. verifiedRefrigerate the skinned carcass within 3-4 hours if air is above 45 °F; age at 34-36 °F in a clean, dry place; aging optional for sausage; trim venison fat for its strong flavor; sausage with pork or beef fat, cooked to 165 °F; jerky by hot-cure or vinegar methods dried at 145 °F; pressure-can only; frozen cuts 1 year, ground 6-9 months.