Pressure Canning
Canning vegetables, meat, and venison safely: dial- versus weighted-gauge canners and their care, the step-by-step process with venting and natural cooling, altitude pressures, a worked green bean example, venison, and the mistakes that cause underprocessing.
- 6 min
- 9 steps
- 3 questions
- Lesson 24 of 55
In this lesson
- The canner
- The steps
- Why each step matters
- Altitude
- Worked example: green beans
- Venison and meat
- Mistakes that cause underprocessing
- Try it
- What to take from this
Picking up where you left off.
The canner
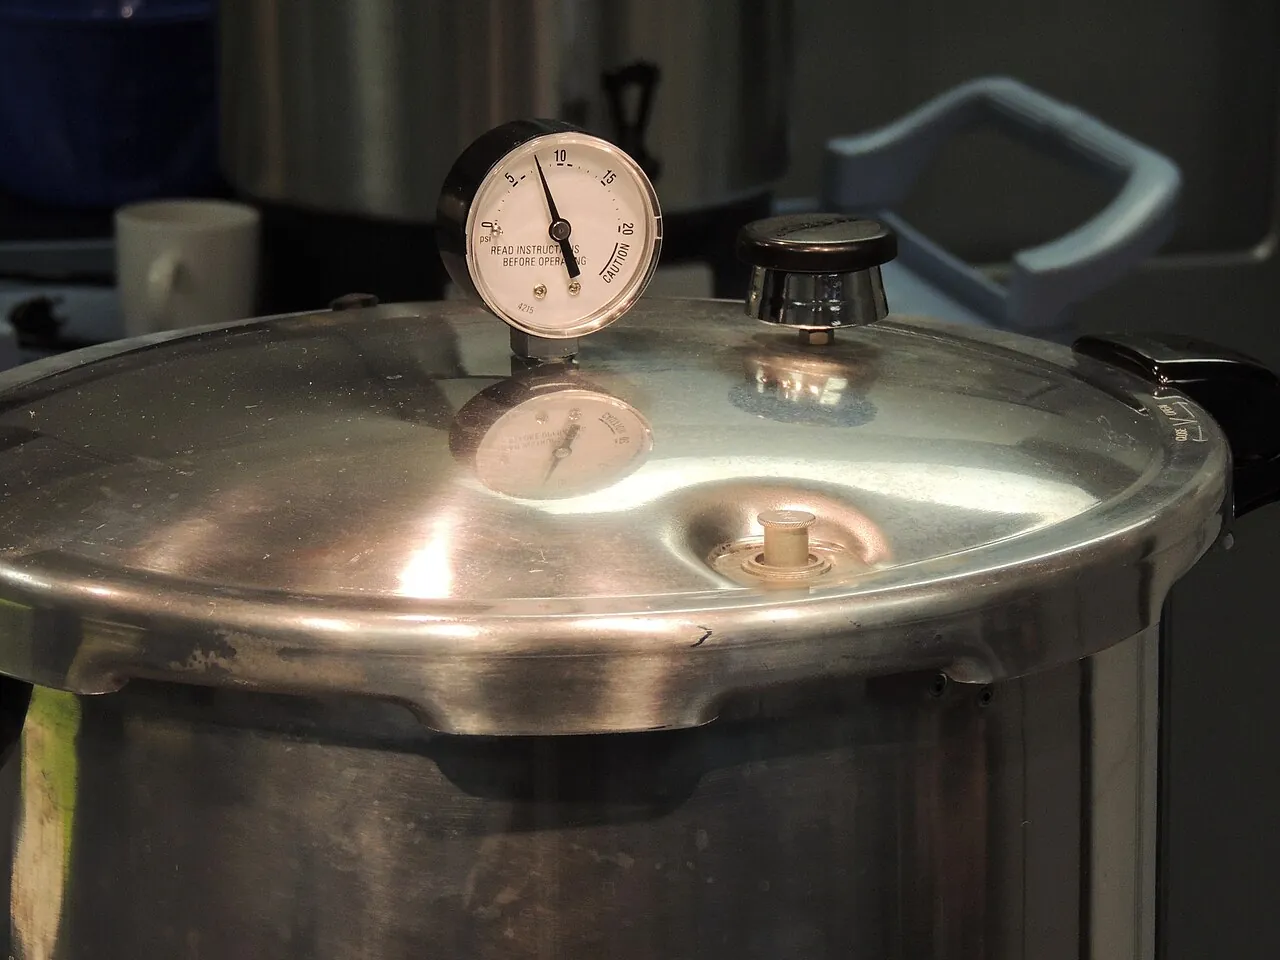
Modern pressure canners are thin-walled kettles with a locking lid, gasket, jar rack, a dial or weighted gauge, a vent port closed by a counterweight, and a safety fuse 1. Use only UL-approved canners 1. A canner is not a pressure cooker: small cookers aren’t validated for canning.

- Weighted gauge: rocks or jiggles to show it’s holding pressure; it controls pressure precisely and needs no accuracy check, but can only be set to 5, 10, or 15 lb 1.
- Dial gauge: shows the pressure, which you hold by adjusting the heat; it must be checked for accuracy every year. A gauge reading high underprocesses; one off by more than 2 lb should be replaced 1. Many county extension offices test gauges 1.
- Gasket and fuse: keep the gasket clean and undamaged; nicked or dried gaskets leak steam 1. Don’t pick at the safety fuse 1.
The steps
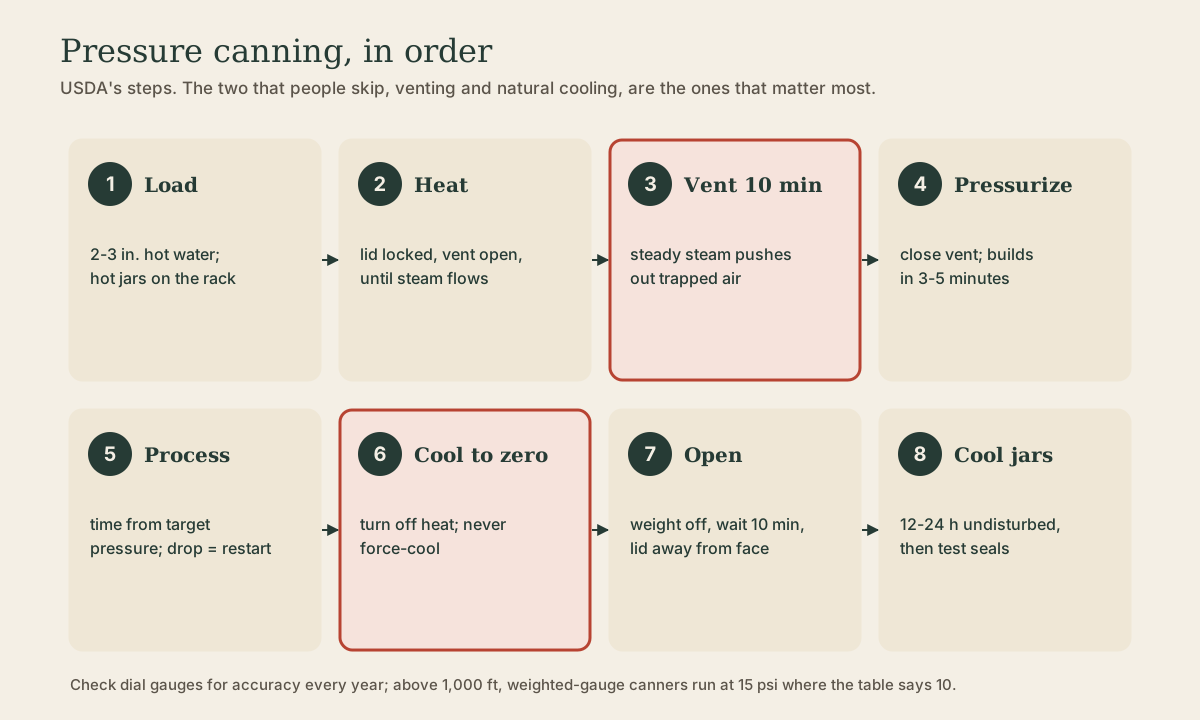
- Put 2-3 in. of hot water in the canner (more if the recipe says), and load filled jars on the rack with a jar lifter, keeping them upright. Lock the lid.
- Leave the weight off or petcock open; heat on high until steam flows freely.
- Vent a steady stream of steam for 10 minutes.
- Put the weight on or close the petcock; the canner pressurizes in 3-5 minutes.
- Start timing when the dial reaches the target pressure or the weight starts to jiggle as the manufacturer describes. Hold the pressure steady at or slightly above target. If pressure drops below target, bring it back up and restart the full time.
- When time is up, turn off the heat and let the canner depressurize on its own. Never force-cool it with water or by opening the vent.
- When it reads zero (or the vent lock drops), remove the weight or open the petcock, wait 10 minutes, and open the lid away from your face.
- Lift jars out onto a towel, 1 in. apart, and cool 12-24 hours undisturbed, then test seals.
Why each step matters
- Venting: air trapped in the canner lowers the temperature at a given pressure and causes underprocessing; raw-packed foods in dial-gauge canners trap the most 1.
- Steady pressure: big swings make jars lose liquid 1; a drop means the food may not have been held at temperature.
- Natural cooling: force-cooling causes liquid loss, seal failures, and unsafe or spoiled food, and can warp older canner lids 1. The cooling time counts toward the process.
Playback is optional. If the player is unavailable, open the video at its source.
Quick check
Air-steam mixtures are cooler than pure steam at the same gauge reading.
Altitude
Above 1,000 ft, the steam at a given pressure is cooler, so canners run at higher pressure 1:
Quick check
Dial gauges can be set to the exact pressure in the altitude table instead.
Worked example: green beans
Snap and Italian beans, from the USDA guide 2:
- Quantity: about 2 lb per quart; 14 lb fills a 7-quart load.
- Prepare: wash, trim, and cut into 1-in. pieces.
- Hot pack: boil 5 minutes, fill loosely with 1 in. headspace. Raw pack: pack tightly, cover with boiling water, 1 in. headspace. Salt (1 tsp per quart) is optional.
- Process: pints 20 minutes, quarts 25 minutes, at 11 lb on a dial gauge at 0-2,000 ft, or 10 lb on a weighted gauge at 0-1,000 ft and 15 lb above.
Playback is optional. If the player is unavailable, open the video at its source.
Quick check
At 0-2,000 ft that’s 11 lb on a dial gauge, or 10 lb weighted up to 1,000 ft.
Venison and meat
Venison is low-acid and must be pressure canned 3. Trim all fat (venison fat has a strong flavor and can interfere with sealing), bone, and gristle, and cut it into strips, cubes, or chunks 3. Hot pack (precooked until at least rare, covered with boiling broth or tomato juice) or raw pack, 1 in. headspace; process pints 75 minutes and quarts 90 minutes at 11 lb on a dial gauge or 10 lb on a weighted gauge at 0-1,000 ft (15 lb above) 3. Canned venison is a good use of tougher shoulder and neck meat (see Breaking Down a Deer).
Mistakes that cause underprocessing
The food may spoil or be unsafe if you 1:
- skip or shorten venting,
- process at lower pressure or for less time than the table says,
- use the wrong altitude row,
- cool the canner with water or open it early,
- use an untested dial gauge.
Try it
Get your dial gauge tested at the county extension office before the season (or confirm you have a weighted gauge). Then can one canner load of green beans exactly by the USDA steps, logging vent start, pressure-up, timing, and depressurizing.
What to take from this
Low-acid foods need a pressure canner, not a pressure cooker. Start with 2-3 in. of water, vent steam 10 minutes, pressurize, time at a steady target pressure (restart if it drops), let the canner cool to zero on its own, wait 10 minutes, and open away from you. Test dial gauges yearly; above 1,000 ft use 15 lb on a weighted gauge where the table says 10. Snap beans take 20 minutes for pints, venison 75.
Lesson complete
Nice work.
Sources for this lesson
- 1Complete Guide to Home Canning, Guide 1: Principles of Home Canning (2015 revision). U.S. Department of Agriculture and National Center for Home Food Preservation. 2015. verifiedBotulinum toxin forms in moist low-acid food at 40-120 °F with under 2% oxygen; pH 4.6 divides acid and low-acid foods; low-acid foods processed at 240-250 °F (10-15 psi); altitude adjustments above 1,000 ft; headspace 1/4, 1/2, and 1-1 1/4 in.; sterilize jars for processes under 10 minutes; vent pressure canners 10 minutes; check dial gauges yearly; no open-kettle, oven, microwave, or dishwasher canning; test seals after 12-24 hours; store below 95 °F; spoilage signs and detoxifying suspect jars by boiling 30 minutes; pickling salt and 5% vinegar; don't alter tested recipes.
- 2Complete Guide to Home Canning, Guide 4: Selecting, Preparing, and Canning Vegetables (2015 revision). U.S. Department of Agriculture and National Center for Home Food Preservation. 2015. verifiedSnap beans hot or raw pack with 1 in. headspace; pints 20 minutes, quarts 25 minutes at 11 lb (dial, 0-2,000 ft) or 10 lb (weighted, 0-1,000 ft), 15 lb weighted above 1,000 ft; about 2 lb of beans per quart.
- 3Margie P. Memmott, Brian A. Nummer, Charlotte P. Brennand. Venison. Utah State University Extension. 2017. verifiedRefrigerate the skinned carcass within 3-4 hours if air is above 45 °F; age at 34-36 °F in a clean, dry place; aging optional for sausage; trim venison fat for its strong flavor; sausage with pork or beef fat, cooked to 165 °F; jerky by hot-cure or vinegar methods dried at 145 °F; pressure-can only; frozen cuts 1 year, ground 6-9 months.