Soil Health and Composting
Start a garden with a soil test (top 5–7 inches, four spots mixed, sent to the UW Soil and Forage Lab for pH, organic matter, phosphorus, potassium, and lime and fertilizer recommendations, plus a lead screen near old buildings), then build soil with compost. A hot pile done right: about a cubic yard of two to three parts browns to one part greens in 4- to 6-inch layers, damp as a wrung-out sponge, heating to 130–150 °F, turned when it cools, finished in 6 to 12 weeks, and cured at least three weeks before it goes near seedlings.
- 5 min
- 6 steps
- 3 questions
- Lesson 3 of 55
In this lesson
- Test before you feed
- Organic matter is the lever
- Build the pile
- Heat and turning
- Finished and cured
- What to take from this
Picking up where you left off.
Test before you feed
Most garden problems blamed on fertilizer are really soil problems: the wrong pH, too little organic matter, or more phosphorus already present than the plants can use. A soil test tells you what’s there before you add anything.
Taking a sample is simple 1:
- Scrape away any mulch, compost, or sod.
- Dig the top 5 to 7 inches in four random spots across one area (ten if you use a soil probe), about a cup in total.
- Mix them in a clean container. Keep the vegetable garden, the lawn, and the berry patch as separate samples.
- Send it to the UW Soil and Forage Lab through your county Extension office.
The standard test reports pH, organic matter, phosphorus, and potassium, with recommendations for lime and fertilizer; options include soil texture and a lead screen 1. Run the lead screen for a garden near an old house or barn, where decades of lead paint chips may have fallen along the foundation.
Quick check
You want the soil, not the mulch or sod.
Organic matter is the lever
Good garden soil is well drained and rich in organic matter 2. Organic matter holds water in sandy soil, opens up heavy clay, feeds soil life, and releases nutrients slowly. UW Extension’s guidance is to work in 4 to 6 inches of compost on an in-ground garden, and to fill raised beds with topsoil and compost mixed 1:1 2. Most homesteads have the raw material for that compost already: leaves, grass, garden waste, kitchen scraps, and bedding from the chicken coop.
Build the pile
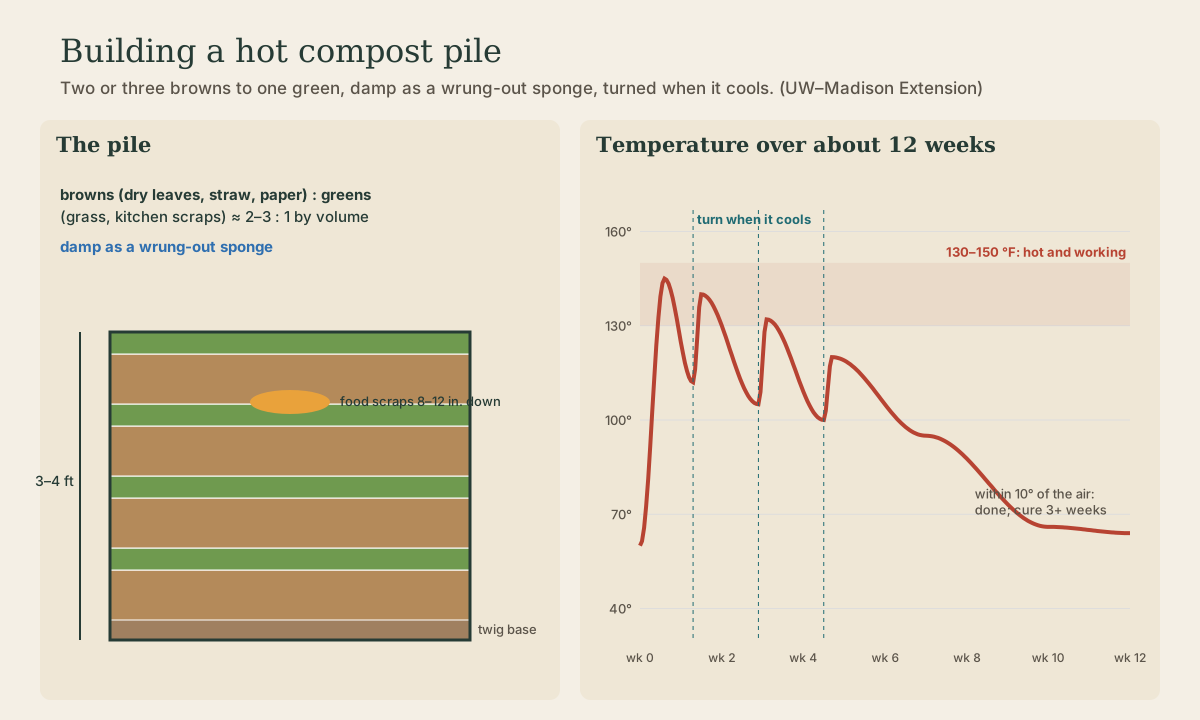
A hot pile turns yard and kitchen waste into compost in about 6 to 12 weeks 3. The recipe:
.jpg)
- Ingredients: about two to three parts browns (dry leaves, straw, hay, small sticks, newspaper) to one part greens (fresh grass clippings, trimmings, fruit and vegetable scraps) by volume 3. Browns supply carbon, greens supply nitrogen; this ratio keeps the microbes working fast without stinking.
- Size: at least a cubic yard, 3 to 4 feet high. Smaller piles can’t hold heat; piles over 5 feet compact and go airless in the middle 3.
- Build: start on a base of twigs or straw for air, chop anything thicker than about half an inch, and stack alternating 4- to 6-inch layers of browns and greens 3. Bury food scraps 8 to 12 inches inside so they don’t draw animals or smell 3.
- Water: as damp as a wrung-out sponge; a squeezed handful should give a drop or two 3. A shovel of finished compost or soil adds the microbes to get it started.
Quick check
Browns bring carbon, greens bring nitrogen; size keeps the heat in.
Heat and turning
Within a few days the center heats up. Watch it with a long compost thermometer 3:
- When it heats and then starts to cool, usually after about a week, turn it: fork the edges and top into the middle and add water if it’s dry.
- If the center passes 150 °F, turn it sooner.
- Don’t turn more than about once a week. Each turning brings in air and the pile reheats, a little less each time 3.
As it works, the pile shrinks to about a third of its starting height 3.
Playback is optional. If the player is unavailable, open the video at its source.
Finished and cured
Compost is done when it’s dark, crumbly, and smells sweet and earthy, the original materials are unrecognizable, and the pile stays within about 10 °F of the air temperature 3. Sift out the chunks and put them back in the next pile.
Then let it cure for at least three weeks, longer if it’s going into seed-starting mix or around transplants. Unfinished compost can harm young plants and temporarily ties up soil nitrogen as it keeps decomposing 3.
Quick check
Cure at least three weeks, longer for seedlings and transplants.
What to take from this
Test first: the top 5–7 inches from four spots per area, mixed, sent to the UW Soil and Forage Lab, with a lead screen near old buildings. Build organic matter with compost (4–6 inches worked in, or 1:1 with topsoil in raised beds). A hot pile is about a cubic yard of two or three parts browns to one part greens, layered, damp as a wrung-out sponge, turned when it cools after heating, done in 6–12 weeks, and cured at least three weeks.
Lesson complete
Nice work.
Sources for this lesson
- 1Lawn and Garden Soil Testing. UW–Madison Division of Extension, La Crosse County. verifiedRemove mulch, compost, or sod and sample the top 5-7 inches; collect about a cup total from four random spots with a trowel (or ten with a probe) in one area, mix in a clean container, and keep different areas separate; samples go to the UW Soil and Forage Lab; the standard analysis gives soil pH, organic matter, phosphorus, and potassium with lime and fertilizer recommendations; options include soluble salts, texture, calcium and magnesium, and lead screening.
- 2Vijai Pandian. Vegetable Gardening 101. UW–Madison Division of Extension, Kenosha and Racine Counties. 2022. verified6-8 hours of sun; well-drained, organic-rich soil; about 110 frost-free days. Start cole crops 6-8 weeks before the last spring frost (mid-late March) and tomatoes, peppers, and eggplant 6-8 weeks before transplanting (mid-late April); direct-seed pumpkins, melons, sunflowers, and beans after frost; harden off 7-10 days. Site 50 feet from black walnut, away from low spots; perennials (asparagus, rhubarb, berries) on the north or northwest side; group by family; tall crops to the north; rows east-west. Shade-tolerant crops: greens and herbs in 3 hours or less, roots and chard in 4-6. Raised beds 1:1 topsoil and compost; in-ground gardens 4-6 inches of compost. Plant cool-season crops late April to the first week of May at 50 F soil; warm-season crops the last week of May to the first week of June at 60-70 F soil with nights above 55 F; pumpkins and melons the first week of June at 70-75 F soil with nights above 60 F. Black plastic mulch warms soil 5-10 F; organic mulches; trap crops and companion plantings.
- 3Composting Recipe Cards: Hot and Fast Compost. UW–Madison Division of Extension, Dane County. verifiedHot and fast compost in about 6-12 weeks: 1 part greens (fruit and vegetable scraps, fresh grass clippings, trimmings) to 2-3 parts browns (dried leaves, hay, sticks, newspaper); a sunny, accessible site at least a cubic yard; a base of twigs or straw; chop pieces over 1/2 inch or 2 inches; alternate 4-6 inch layers to 3-4 feet high (piles over 5 feet compact and go anaerobic); bury food scraps 8-12 inches down; damp as a wrung-out sponge; add a little finished compost or soil; turn after it heats and starts to cool (about a week), sooner if the center passes 150 F, no more than once a week; it shrinks to about a third; finished compost is dark, crumbly, earthy-smelling and within 10 F of air temperature; cure at least three weeks, longer for seedlings, since unfinished compost can harm plants and tie up nitrogen.