Trying Linux from a USB Stick
Run a complete Ubuntu desktop from a USB stick without changing anything on the computer. Download the 26.04.1 image, check it against Ubuntu's published SHA-256 checksums from Git Bash or PowerShell, write it to a stick with Rufus, start the computer from the stick with its boot menu key, and choose Try Ubuntu. Then work through a hardware checklist, Wi-Fi, sound, webcam, Bluetooth, display, touchpad, suspend, monitor, printer, before deciding whether to install.
- 6 min
- 8 steps
- 2 questions
- Lesson 45 of 80
In this lesson
- The idea
- Download the image
- Check the download
- Write it to a USB stick
- Start the computer from it
- Try it
- Your turn
- So
Picking up where you left off.
The idea
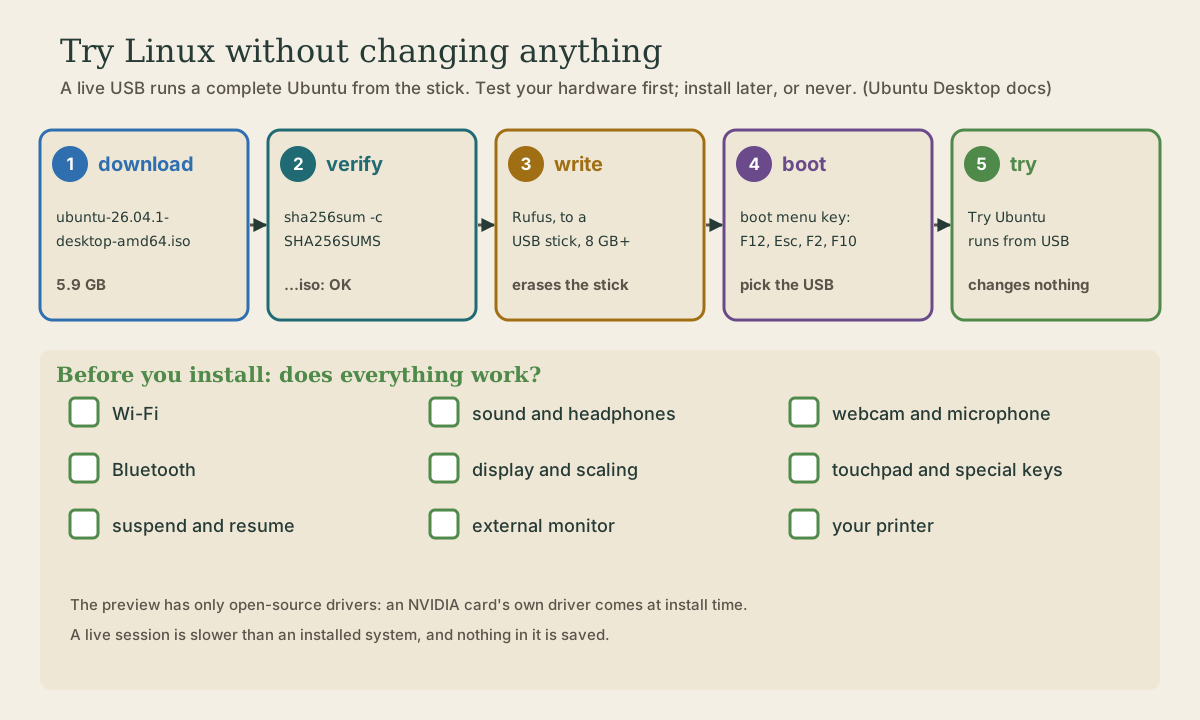
The Ubuntu installer is also a complete, working Ubuntu desktop. Started from a USB stick, it can run in a Try Ubuntu preview that changes nothing on the computer 1. That makes it the safe way to answer the important question before installing anything: does Linux work on this computer, with its Wi-Fi, sound, screen, and touchpad?
You need the computer, a USB stick of 8 GB or more whose contents you don’t mind losing, and about half an hour 1.
Download the image
Get Ubuntu Desktop from Ubuntu’s download page. The file is a disk image, about 5.9 GB, named ubuntu-26.04.1-desktop-amd64.iso for the current LTS on ordinary Intel or AMD computers 2. Save it somewhere you’ll find it, such as Downloads.
Check the download
A 6 GB download can arrive damaged, and it’s worth knowing that what you’re about to boot is exactly what Ubuntu published. Ubuntu publishes a file called SHA256SUMS next to the images, listing the SHA-256 checksum of each one 3. For 26.04 it reads, in part:
601e30fbf5d97759367c632e2c33630665039b7e2158fd068403da3ccf1bda1f *ubuntu-26.04.1-desktop-amd64.iso
cc8a95cde20f6ced61a322420de00f10cc3c90ced545daa46cb9c1a117f1d927 *ubuntu-26.04.1-live-server-amd64.iso
A checksum is a 64-character fingerprint of the file’s contents: change one byte and it’s completely different, the same idea as git’s object IDs (Git course, module 6). Download SHA256SUMS into the same folder as the image, then check it. In Git Bash, sha256sum is already there 3:
me@laptop MINGW64 ~/Downloads
$ sha256sum -c SHA256SUMS --ignore-missing
ubuntu-26.04.1-desktop-amd64.iso: OK
-c reads the list and checks each file; --ignore-missing skips the images you didn’t download. A damaged file says FAILED instead, with a warning that a checksum didn’t match; download it again.
In PowerShell, Get-FileHash computes the same SHA-256, in capital letters; -eq compares strings without caring about case:
PS C:\Users\me\Downloads> (Get-FileHash .\ubuntu-26.04.1-desktop-amd64.iso).Hash -eq '601e30fbf5d97759367c632e2c33630665039b7e2158fd068403da3ccf1bda1f'
True
A matching checksum proves the file arrived intact. To also prove SHA256SUMS itself came from Ubuntu, there’s a signature file, SHA256SUMS.gpg, which gpg --verify checks against Ubuntu’s signing key; Ubuntu’s verification tutorial walks through it 3.
Quick check
A single wrong byte changes the hash. For authenticity too, the SHA256SUMS file itself is signed with Ubuntu’s key.
Write it to a USB stick
Writing an image to a stick isn’t the same as copying the file onto it: a special tool lays it out so the computer can start from it 4. This erases everything on the stick. On Windows, Ubuntu’s instructions use Rufus 4:
- Download Rufus from rufus.ie and start it, allowing online updates if asked.
- Insert the stick. Check that Device shows the stick, not some other drive.
- Click SELECT next to Boot selection and choose the Ubuntu image.
- Click START. Rufus says the image is an ISOHybrid image; keep Write in ISO Image mode. If it asks to download extra files, say yes.
- Confirm the warning that the stick will be erased. Writing takes about ten minutes, and the status bar says READY when it’s done.
Most other settings can stay at their defaults. If the stick later won’t start on a modern computer, Ubuntu’s docs suggest writing it again with Partitioning scheme GPT and Target system UEFI (non CSM) 4.
Start the computer from it
Plug the stick into the computer and restart it. Many computers find the stick and start Ubuntu on their own. If yours starts Windows as usual, restart again and hold the boot menu key as it starts. F12 is the most common; Esc, F2, and F10 are the usual alternatives, and a brief message at startup often says which 4. Choose the USB stick from the menu.
The installer opens and asks for your language, accessibility settings, keyboard layout, and network. Connect to Wi-Fi if you can; the preview works without it, but you’ll want a browser 1.
Try it
Choose Try Ubuntu. The installer closes and you’re on an Ubuntu desktop, running entirely from the stick 1. Two limits to keep in mind:
- It’s slower than an installed system, since everything loads from USB.
- Nothing is saved. Files, settings, and installed apps vanish when you shut down.
Now test the things that matter on this computer:
- Wi-Fi: connect, and load a few web pages.
- Sound: play a video through the speakers and through headphones.
- Webcam and microphone: try a video call site, or the Camera app.
- Bluetooth: pair your headphones or mouse.
- Display: is the text a comfortable size? Try the scaling options in Settings, Displays.
- Touchpad and keyboard: scrolling, gestures, and the brightness and volume keys.
- Suspend and resume: close the lid or choose Suspend, then wake it.
- An external monitor, and your printer, if you use them.
Also open a terminal (Ctrl+Alt+T) and look around: lsb_release -a, lsblk, ip a. It’s the same bash you’ve been using.
One thing the preview can’t show: it uses only open-source drivers. On a computer with NVIDIA graphics, NVIDIA’s own driver isn’t loaded yet; the installer offers it, so graphics may be better installed than in the preview 1.
When you’re done, choose Restart from the menu at the top right, remove the stick when asked, and press Enter. Windows starts as before 1. Or, if you’re ready, the Install Ubuntu icon on the desktop leads to next lesson.
Quick check
Restart, remove the stick, and Windows starts as before.
Your turn
Exercises
- Download the Ubuntu 26.04.1 desktop image and
SHA256SUMS, and verify the image withsha256sum -cin Git Bash orGet-FileHashin PowerShell. - Write it to a USB stick with Rufus.
- Find your computer’s boot menu key (try F12 first, or search for your model), and start Ubuntu from the stick.
- Work through the whole checklist in Try Ubuntu, and note anything that doesn’t work.
- In the preview’s terminal, run
lsblkand find your Windows disk and the USB stick.
Answers
ubuntu-26.04.1-desktop-amd64.iso: OK, orTruein PowerShell.- If none of the usual keys works, the computer’s manual or the maker’s support page names it 4.
- If something fails, search for your laptop model and “Ubuntu 26.04” with the part that failed; many fixes are a setting or a driver. The installer’s option to install third-party software adds drivers the preview doesn’t have 4.
- The internal disk is usually
nvme0n1(an NVMe SSD) orsda, with several partitions; the stick is the small one, oftensdaorsdb, about the size of the stick.
So
A live USB lets you try Ubuntu on your real hardware without changing anything. Download the image, check its SHA-256 against Ubuntu’s SHA256SUMS with sha256sum -c or Get-FileHash, write it with Rufus (which erases the stick), start from it with the boot menu key, and choose Try Ubuntu. Test Wi-Fi, sound, camera, Bluetooth, display, touchpad, suspend, and anything else you rely on. If it all works, you’re ready to install; if not, you’ve learned that without risk.
Lesson complete
Nice work.
Sources for this lesson
- 1Try Ubuntu Desktop (Ubuntu Desktop documentation). Canonical. verifiedBoot the installer from a USB stick (8 GB or more) and choose Try Ubuntu to preview it without changing the PC; test the hardware; the preview uses only open-source drivers, so proprietary ones such as NVIDIA's are missing until installation; restart and remove the stick to return to the regular system.
- 2Download Ubuntu Desktop. Canonical. verifiedUbuntu 26.04.1 LTS: 5.9 GB image for Intel or AMD 64-bit; GNOME 50, Linux kernel 7.0. Requirements: 2 GHz dual-core processor, 6 GB system memory, 25 GB of free disk space, a USB port or DVD drive for the installer.
- 3How to verify your Ubuntu download. Canonical. verifiedMirrors publish SHA256SUMS and the signature SHA256SUMS.gpg next to the images; verify the checksum file with gpg --keyid-format long --verify SHA256SUMS.gpg SHA256SUMS, then check the image with sha256sum. sha256sum and gpg come with Ubuntu and with bash on Windows.
- 4Install Ubuntu Desktop (Ubuntu Desktop documentation). Canonical. verified26.04 LTS tutorial: back up, download the image, write it with Rufus on Windows (SELECT the image, START, ISO Image mode; GPT and UEFI (non CSM) if it won't boot), boot menu key F12 or Esc/F2/F10, Try or Install; Intel RST must be switched to AHCI; default vs extended selection; tick third-party software and media formats; disk setup: erase disk, alongside, or manual; encrypt with a passphrase (keep it safe); BitLocker blocks installing alongside; update with sudo apt update and upgrade afterward. Ubuntu works on a wide range of devices; certified hardware list; Apple Silicon only via the community Asahi project.