Backups and Health Checks
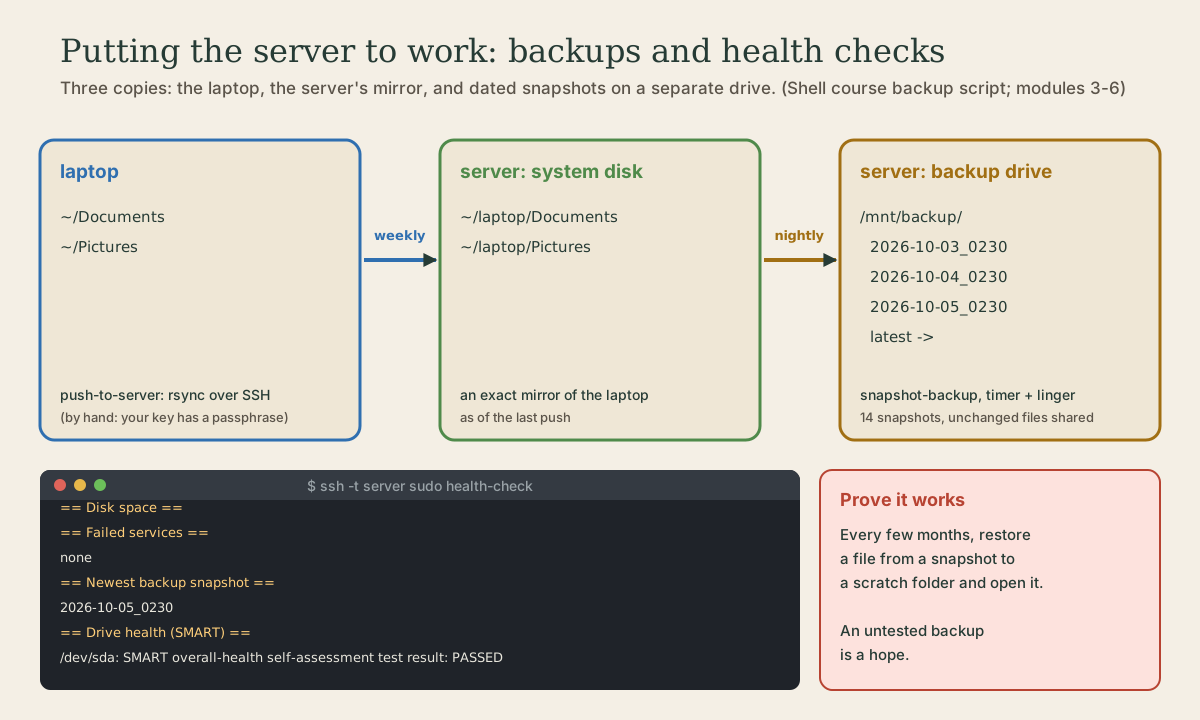
Give the server its first job: three copies of your laptop's files. A weekly push-to-server function mirrors Documents and Pictures over SSH with rsync; the server's backup drive is mounted from fstab; and the Shell course's snapshot-backup script, on a lingering user timer, keeps 14 nightly snapshots of the mirror on that drive. A health-check script reports disk space, failed services, recent errors, the newest snapshot, and SMART status, run from the laptop with ssh -t. Proving a restore works, and where to go next.
- 8 min
- 9 steps
- 2 questions
- Lesson 62 of 80
In this lesson
- The plan
- The backup drive
- The weekly push
- The nightly snapshots
- A health check
- Prove a restore works
- Where to go next
- Your turn
- So
Picking up where you left off.
The plan
Three copies, on two machines, one of them a separate drive:
- The laptop, where you work.
- A mirror on the server:
~/laptopon the server’s own disk, an exact copy of the laptop’s Documents and Pictures as of the last push. - Snapshots on the backup drive: every night, the server’s snapshot script copies the mirror to dated folders on the backup drive, keeping two weeks of history.
The mirror follows the laptop, deletions included. The snapshots are what let you go back: a file deleted or overwritten by mistake on Monday is still in Sunday’s snapshot.
Quick check
rsync --delete, so a file deleted on the laptop disappears from the server’s mirror at the next push. How do you get it back?That’s why the mirror is snapshotted: the mirror tracks the laptop, the snapshots remember the past.
The backup drive
Plug the ext4 drive labelled backup (module 4) into the server and mount it from fstab, exactly as in module 4 1:
LABEL=backup /mnt/backup ext4 nofail,x-systemd.device-timeout=5s 0 2
Then sudo mkdir -p /mnt/backup, sudo systemctl daemon-reload, sudo findmnt --verify, sudo mount /mnt/backup, and sudo chown $USER: /mnt/backup.
The weekly push
On the laptop, add a function to your dotfiles’ bash_aliases:
# Mirror Documents and Pictures to the home server's ~/laptop folder
push-to-server() {
    rsync -av --delete ~/Documents ~/Pictures server:laptop/
}
server:laptop/ means the laptop folder in your home on the host called server, reached over SSH using your ~/.ssh/config entry 2. With no trailing slash on ~/Documents, rsync copies the folder itself, giving laptop/Documents 2. -a keeps permissions and times, -v lists what it sends, and --delete removes files from the mirror that are gone from the laptop 2. Only changed files travel, so after the first push it’s quick.
Run it once a week, as part of update-all day. The first run copies everything and takes a while; start it in tmux if you’ll walk away.
Why by hand? Your SSH key has a passphrase, and a timer can’t type it. A fully automatic push is possible with a second key without a passphrase, limited on the server by options in authorized_keys, such as restrict, which disables forwarding and terminal access for that key 3. It’s a reasonable next step once the manual version has run for a while; a key with no passphrase needs that care.
The nightly snapshots
On the server, copy the Shell course’s snapshot-backup script to ~/.local/bin/ (scp it from the laptop), and change its SOURCES line to back up the mirror:
readonly SOURCES=("$HOME/laptop")
Then give it the user service and timer from module 3, pointed at /mnt/backup 4. In ~/.config/systemd/user/snapshot-backup.service:
[Unit]
Description=Snapshot backup to the backup drive

[Service]
Type=oneshot
ExecStart=%h/.local/bin/snapshot-backup /mnt/backup
and in ~/.config/systemd/user/snapshot-backup.timer:
[Unit]
Description=Nightly snapshot backup

[Timer]
OnCalendar=*-*-* 02:30:00
Persistent=true

[Install]
WantedBy=timers.target
Since nobody logs in to the server, turn on lingering so your user manager, and its timer, run from boot 5:
me@garden-server:~$ loginctl enable-linger
me@garden-server:~$ systemctl --user daemon-reload
me@garden-server:~$ systemctl --user enable --now snapshot-backup.timer
me@garden-server:~$ systemctl --user start snapshot-backup.service
me@garden-server:~$ journalctl --user -u snapshot-backup.service
The manual start makes the first snapshot now; the journal shows how it went 6. After that, it runs every night at 2:30, and catches up after any night the server was off.
A health check
A server you never look at needs a way to tell you how it’s doing. This script gathers the checks from modules 3 and 4 into one report. Save it as health-check:
#!/usr/bin/env bash
#
# health-check: a quick report on this server's health.
#
# Usage: sudo health-check
#
# Shows uptime, disk space, failed services, recent errors, the newest
# backup snapshot, and each disk's SMART health. Changes nothing.

set -uo pipefail

readonly BACKUP=/mnt/backup

section() {
  printf '\n== %s ==\n' "$1"
}

main() {
  if [[ $EUID -ne 0 ]]; then
    echo "Run it with sudo: sudo health-check" >&2
    exit 1
  fi

  section "Uptime and load"
  uptime

  section "Disk space"
  df -h / "$BACKUP"

  section "Failed services"
  local failed
  failed="$(systemctl --failed --no-legend)"
  echo "${failed:-none}"

  section "Errors in the last 7 days (newest 20)"
  journalctl -p err --since "7d ago" --no-pager | tail -n 20

  section "Newest backup snapshot"
  if [[ -L "$BACKUP/latest" ]]; then
    readlink "$BACKUP/latest"
  else
    echo "none found in $BACKUP"
  fi

  section "Drive health (SMART)"
  local disk
  for disk in $(lsblk -dno NAME,TYPE | awk '$2 == "disk" { print $1 }'); do
    printf '/dev/%s: ' "$disk"
    smartctl -H "/dev/$disk" | grep -i 'result' || echo "no SMART report"
  done
}

main "$@"
It passes ShellCheck 7. Notes:
- It needs root for
smartctland the full journal, so it checks$EUIDfirst and says how to run it. - It uses
set -uo pipefailbut not-e: one failing check (say, a disk without SMART) shouldn’t stop the rest of the report. failed="$(...)"then${failed:-none}prints “none” instead of an empty section.lsblk -dno NAME,TYPElists whole disks only, andawkkeeps those of typedisk, skipping snaps’ loop devices.smartctl -Hneeds thesmartmontoolspackage (module 4) 8.
Install it for all users, owned by root:
me@garden-server:~$ sudo apt install smartmontools
me@garden-server:~$ sudo install -m 755 health-check /usr/local/bin/
Then, from the laptop:
me@garden-laptop:~$ ssh -t server sudo health-check
-t gives the remote command a terminal, which sudo needs to ask for your password 9. Make it part of the weekly routine, with the push.
Quick check
ssh -t server sudo health-check rather than without -t?ssh only allocates a terminal for an interactive login unless you ask; -t forces one.
Prove a restore works
A backup is only as good as the last time you restored from it. Every few months, pick a file and bring it back from a snapshot, from the laptop:
me@garden-laptop:~$ ssh server ls /mnt/backup
me@garden-laptop:~$ scp server:/mnt/backup/latest/laptop/Documents/budget.ods /tmp/
Open the copy and check it’s the version you expected. Try an older snapshot’s folder too.
Where to go next
The server is now a dependable Linux machine you manage entirely from the command line, which was the point of this course. Ideas to build on it, each a matter of installing a package and applying what you know (a service, a firewall rule, logs, backups):
- File sharing with your other computers.
- A second backup drive, rotated and kept away from the house.
- The automatic push with a restricted key, as above.
- Monitoring that runs
health-checkon a timer and saves the report.
Your turn
Project, part 2
- Mount the backup drive on the server from fstab, and take ownership of it.
- Add
push-to-serverto your dotfiles, commit, pull on the laptop, and run it. - Install
snapshot-backupon the server withSOURCES=("$HOME/laptop"), its service and timer, and turn on lingering. Start it by hand and read the journal. - Install
health-check, and run it from the laptop withssh -t. - Next morning, check
systemctl --user list-timerson the server andls /mnt/backup. - Restore one file from a snapshot and open it.
Answers
- The first run lists every file; later runs list only what changed.
ssh server ls laptopshowsDocumentsandPictures. - The journal shows the script’s log lines;
ls /mnt/backupshows a dated folder andlatest. - Sections for uptime, disk space, failed services (
none), recent errors, the newest snapshot, and aPASSEDline per disk. LASTshows this morning’s 2:30 run, and there’s a second dated snapshot.
So
Three copies: the laptop, a mirror on the server pushed weekly with rsync -av --delete over SSH, and 14 nightly snapshots of that mirror on a separate ext4 drive, made by the Shell course’s script on a lingering user timer. A health-check script, run with ssh -t server sudo health-check, reports space, failures, errors, the newest snapshot, and SMART status. Restore a file now and then to prove it all works. That completes the course: a Linux desktop you can install, maintain, and fix, and a server you run entirely from the command line.
Lesson complete
Nice work.
Sources for this lesson
- 1fstab(5) manual page. man7.org (Linux man-pages). verifiedSix fields: device (LABEL= or UUID= recommended, since device names are often a coincidence of hardware detection order and can change), mount point, type, options (defaults, noauto, user, ro/rw; comma-separated), dump, fsck pass (1 for root, 2 for others, 0 for no check); spaces escaped as \040; on systemd systems run systemctl daemon-reload after modifying fstab.
- 2rsync(1) manual page. The rsync project (Samba). verified-a (archive) equals -rlptgoD: recursion plus preserving links, permissions, times, group, owner, and devices (not hard links, ACLs, or xattrs). --delete removes files on the receiving side that don't exist on the sending side, for directories being synchronized. -n/--dry-run performs a trial run that changes nothing, best with -v or -i/--itemize-changes. --link-dest=DIR is like --copy-dest but hard-links unchanged files from DIR; files must match in all preserved attributes to be linked, so mount options or drives with generic ownership can prevent linking; a relative DIR is relative to the destination directory. A trailing slash on a source copies its contents instead of the directory itself.
- 3sshd(8) manual page. man7.org (Linux man-pages). verifiedOpenSSH daemon; -t test mode checks the validity of the configuration file and sanity of the keys.
- 4systemd.timer(5) manual page. man7.org (Linux man-pages). verifiedOnCalendar= defines wall-clock timers with calendar event expressions; Persistent=true stores when the service was last triggered and triggers it immediately on activation if a run was missed while inactive (OnCalendar only, default false); RandomizedDelaySec=; Unit= defaults to the service with the same name as the timer.
- 5loginctl(1) manual page. man7.org (Linux man-pages). verifiedenable-linger / disable-linger: with lingering, a user manager is spawned for the user at boot and kept after logout, so users who aren't logged in can run long-running services; with no argument, applies to the calling user.
- 6journalctl(1) manual page. man7.org (Linux man-pages). verifiedWith no arguments shows all logs; -b [ID][±offset] a given boot, --list-boots; -u unit; -p priority, syslog levels emerg (0) to debug (7), a single level shows that and more important; -S/--since and -U/--until with dates, yesterday/today/now, or relative times; -f follow; -k kernel messages; -e jump to end; -n lines; -r reverse; -x catalog explanations; --disk-usage; --vacuum-size/time/files. Members of systemd-journal, adm, and wheel can read all journal files. Examples: journalctl -k -b -1; journalctl -f -u apache.
- 7Vidar Holen. ShellCheck: finds bugs in your shell scripts. shellcheck.net. verifiedA static analysis tool for sh and bash scripts that flags quoting problems, misused tests, unreachable or wrong logic, and portability issues, each with a numbered explanation (for example SC2086, double-quote to prevent word splitting). Installable with apt, dnf, brew, or pip (shellcheck-py), or usable in the browser. Version 0.11.0 checked the course's backup script clean on 2026-10-05.
- 8smartctl(8) manual page, Ubuntu 26.04. Ubuntu Manpages. verifiedControls and monitors SMART on ATA/SATA, SCSI/SAS, and NVMe drives. -H prints health status: a failing status means the device has already failed or predicts its own failure within 24 hours, so get the data off as soon as possible; -t runs self-tests; -l selftest and -a show results and details.
- 9ssh(1) manual page. man7.org (Linux man-pages). verifiedOpenSSH remote login client; on first connection the server's host key fingerprint is shown (check with ssh-keygen -l -f on the server's host key) and stored in ~/.ssh/known_hosts; ~/.ssh/authorized_keys lists public keys allowed to log in as the user; a command given after the host runs instead of a login shell.