Firewall, Updates, and Accounts
Security as layers. Updates first, since unattended-upgrades closes most holes before they're used. The ufw firewall: off by default, deny incoming, allow SSH from your own network or rate-limited, enable it without locking yourself out, and read and delete rules. Accounts: the locked root account and the sudo group (now sudo-rs on Ubuntu), one account per person, locking an account, checking logins with last and the SSH log. AppArmor and snap confinement, disk encryption, and what not to paste into a terminal.
- 7 min
- 10 steps
- 2 questions
- Lesson 59 of 80
In this lesson
- Layers
- Updates come first
- What’s exposed
- A firewall with ufw
- Accounts
- Confinement
- Your data
- What not to type
- Your turn
- So
Picking up where you left off.
Layers
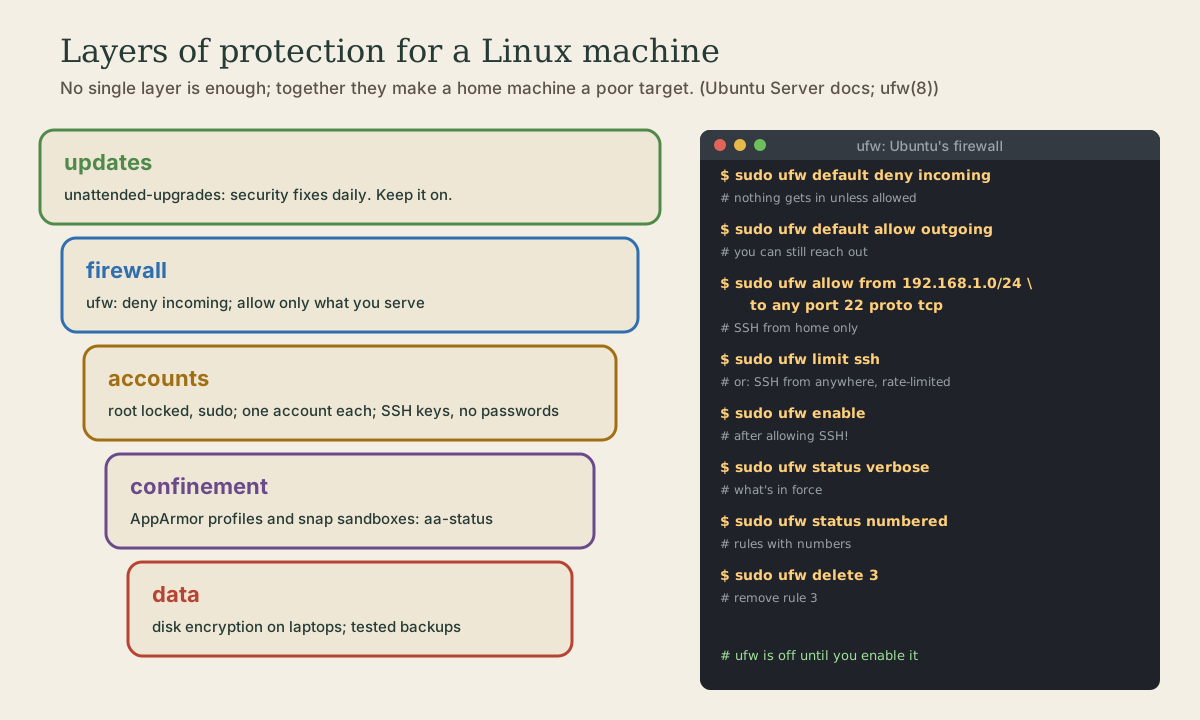
No single setting makes a computer safe. What works is several layers, so that getting past one still leaves the others. For a Linux desktop or a home server, five matter:
Updates come first
Most break-ins use holes that already have fixes. unattended-upgrades installs security updates every day on its own (module 2), and that does more for your safety than anything else in this lesson 1. Leave it on, run your weekly update-all, restart when /var/run/reboot-required appears, and move to a new LTS before your release’s support ends. Stick to the Ubuntu archive, snaps, and Flathub, since every third-party repository you add becomes part of what you’re trusting 2.
What’s exposed
A firewall matters for programs that listen for connections from other machines. sudo ss -tlnp (module 5) lists them. Anything bound to 127.0.0.1 only accepts connections from the same machine; anything on 0.0.0.0, *, or your network address can be reached from your network. On a fresh desktop there’s little or nothing; a server will have sshd on port 22 and whatever you’ve installed.
A firewall with ufw
Ubuntu’s firewall tool is ufw, the Uncomplicated Firewall, a simple front end to the kernel’s packet filtering. It’s installed but off by default 3.
A sensible setup for a home server reachable by SSH:
me@garden-server:~$ sudo ufw default deny incoming
me@garden-server:~$ sudo ufw default allow outgoing
me@garden-server:~$ sudo ufw allow from 192.168.1.0/24 to any port 22 proto tcp
me@garden-server:~$ sudo ufw enable
me@garden-server:~$ sudo ufw status verbose
default deny incomingrefuses any connection you haven’t allowed;default allow outgoinglets the machine reach out as normal 4.- The
allowrule lets in SSH, but only from your own network; use your network fromip addrin place of192.168.1.0/243. - Allow SSH before you enable, if you’re working over SSH. Enabling a deny-by-default firewall without that rule cuts you off.
status verboseshows the defaults and every rule 3.
If SSH has to be reachable from anywhere, use sudo ufw limit ssh instead: it allows connections but denies an address that tries 6 or more within 30 seconds, which defeats password guessing 4. With passwords turned off (module 5), guessing is hopeless anyway.
sudo ufw allow 8080/tcpopens a port to everyone;sudo ufw allow from 192.168.1.0/24lets your whole network in 5.sudo ufw app listshows programs that installed a ufw profile, likeOpenSSH;sudo ufw allow OpenSSHuses it.sudo ufw status numbered, thensudo ufw delete 3, removes rule 3.sudo ufw --dry-run allow httpshows what a rule would do without applying it.sudo ufw disableturns it all off again.
On a desktop that serves nothing, sudo ufw enable with the defaults is enough: nothing comes in, everything goes out.
Quick check
With incoming connections denied by default, enabling ufw without an SSH rule would cut you off.
Quick check
sudo ufw limit ssh do?It slows password-guessing attacks, useful if SSH must be reachable from anywhere.
Accounts
Root is locked. Ubuntu’s root account has no usable password, so nobody can log in as root; administration goes through sudo, with your own password, which records who did what 6. The first account the installer creates is in the sudo group, and adding another account to that group gives it the same power 6. Since Ubuntu 25.10, sudo is sudo-rs, a reimplementation in Rust; it works the same for everyday use, and the original is still available as sudo.ws 6.
Good habits (Shell course, module 3, covered the commands):
- One account per person, and only those who need it in
sudo. - A long passphrase for any account that can log in, and SSH keys with passwords turned off for remote logins (module 5).
- Lock an account you’re not using rather than leaving it open:
sudo passwd -l name, andsudo passwd -u nameto unlock 6.
To see who’s been logging in:
me@garden-server:~$ last
me@garden-server:~$ journalctl -u ssh --since today
last lists logins and logouts, most recent first 7. The SSH service’s journal shows every attempt, accepted or refused; on a machine reachable from the internet, you’ll see strangers trying.
Confinement
Even trusted programs have bugs, so Ubuntu limits what some can touch:
- AppArmor profiles restrict particular programs to the files and abilities they need. It’s installed and loaded by default on Ubuntu;
sudo aa-statuslists the profiles in force 8. - Snaps are sandboxed, with permissions you can see and change (module 2) 9.
You rarely need to touch either. If a confined program can’t open a file it should, the journal will usually mention apparmor="DENIED", and that’s where to look.
Your data
- Disk encryption, chosen at install time (module 1), protects a laptop’s contents if it’s lost or stolen. Without the passphrase the data can’t be read, by a thief or by you 10.
- Backups protect against everything else, including mistakes and ransomware. Keep the nightly snapshots, and keep the backup drive’s copy something an attack on your main account can’t easily delete.
What not to type
Many “fixes” online are a command to paste. Be suspicious of anything you don’t understand that runs with sudo, and especially of curl ... | sudo bash, which runs whatever a website sends with full power over your system. Read it first, or find an apt package or snap instead.
Your turn
Exercises
sudo ss -tlnp. Which programs listen on addresses other than127.0.0.1?sudo ufw status verbose. Is it active? What are the defaults?- On a home server (or your desktop), set deny incoming and allow outgoing, allow SSH from your network only, then enable ufw. Check that SSH still works from another machine.
sudo ufw status numbered; add a test rule (sudo ufw allow 8080/tcp) and delete it by number.getent group sudo: who can use sudo? Thenlast | head.sudo aa-status | head: how many profiles are loaded and in enforce mode?
Answers
- On a desktop, often only services bound to
127.0.0.1or127.0.0.53; on a server,sshdon0.0.0.0:22and[::]:22. - Before enabling:
Status: inactive. After:Status: active, withDefault: deny (incoming), allow (outgoing). - If SSH stops working, the allow rule’s network doesn’t match the machine you’re connecting from; fix it from the server’s own keyboard.
sudo:x:27:followed by the names of accounts in the group.- The first lines report how many profiles are loaded and how many are in enforce mode.
So
Keep unattended-upgrades on: updates are the strongest protection. Check what’s listening with ss -tlnp. Turn on ufw with default deny incoming, default allow outgoing, and an SSH rule for your own network (or ufw limit ssh), added before ufw enable on a remote machine; status verbose, status numbered, and delete manage it. Root is locked and sudo (now sudo-rs) does administration; keep one account per person, lock unused ones, use SSH keys, and check last and the SSH journal. AppArmor and snap sandboxes confine programs; encryption and backups protect your data. Don’t paste sudo commands you don’t understand.
Lesson complete
Nice work.
Sources for this lesson
- 1Automatic updates (Ubuntu Server documentation). Canonical. verifiedunattended-upgrades, installed by default, applies security updates automatically, once a day by default. /etc/apt/apt.conf.d/20auto-upgrades (Update-Package-Lists and Unattended-Upgrade, in days; 0 disables), /etc/apt/apt.conf.d/50unattended-upgrades (Allowed-Origins: release and -security plus ESM; -updates commented out; added repositories aren't included automatically; Automatic-Reboot default false), logs in /var/log/unattended-upgrades; triggered by apt-daily.timer and apt-daily-upgrade.timer, catching up after boot if missed; /var/run/reboot-required; needrestart restarts affected services automatically since 24.04, except a list such as the display manager.
- 2Third party repository usage (Ubuntu Server documentation). Canonical. verifiedUbuntu doesn't recommend third-party software: APT repositories run code that isn't sandboxed and give no security boundary between publishers, so the system is only as secure as the weakest publisher; third-party packages can conflict with official ones, and are the most common cause of release-upgrade failures.
- 3Firewall (Ubuntu Server documentation). Canonical. verifiedufw is Ubuntu's default firewall configuration tool, a front end to netfilter, initially disabled; sudo ufw enable/disable; ufw allow 22 and deny 22; allow from a host or subnet to a port (ufw allow proto tcp from 192.168.0.2 to any port 22); status and status verbose; status numbered and delete; --dry-run; application profiles in /etc/ufw/applications.d with ufw app list and app info.
- 4ufw(8) manual page, Ubuntu 26.04. Ubuntu Manpages. verifieddefault allow|deny|reject for incoming, outgoing, or routed traffic; limit rules allow connections but deny an IP address that initiates 6 or more connections within 30 seconds, typical use ufw limit ssh/tcp.
- 5Uncomplicated Firewall. ArchWiki. verifiedBasic configuration: ufw default deny, ufw allow from 192.168.0.0/24, ufw limit ssh, ufw enable, ufw status; allowing a port or port range by number and protocol.
- 6User management (Ubuntu Server documentation). Canonical. verifiedUbuntu disables the root account by giving it a password hash that matches nothing; sudo lets an authorized user elevate privileges with their own password, providing accountability. From Ubuntu 25.10 sudo is provided by sudo-rs (Rust), with the original sudo kept as sudo.ws through 26.04 LTS; most use is unchanged. sudo passwd enables root, sudo passwd -l root disables it. The installer's first user is in group sudo, which /etc/sudoers authorizes; add others to that group for full sudo. Local users in /etc/passwd and groups in /etc/group; UID 0-99 preinstalled system users, 100-999 dynamic system users, 1000 and up regular users. adduser, deluser (home folder kept), passwd -l/-u, addgroup, adduser user group.
- 7last(1) manual page. man7.org (Linux man-pages). verifiedlast reads wtmp, which records all logins and logouts, and prints them most recent first.
- 8AppArmor (Ubuntu Server documentation). Canonical. verifiedAppArmor is a Linux Security Module restricting programs with per-program profiles (mandatory access control); installed and loaded by default in Ubuntu, check with aa-status; profiles in /etc/apparmor.d, complain and enforce modes.
- 9Snap and deb packages (Ubuntu Desktop documentation). Canonical. verifiedThe App Center shows snaps by default. Snaps: sandboxed (classic snaps aren't, reviewed manually), versions independent of the Ubuntu release, updated automatically, permissions in Settings > Apps, a base snap such as core26 plus bundled libraries, so larger. Debs: tied to the release, security updates installed automatically, other updates via Software Updater, full access, many small dependencies, smaller. If an app is available both ways, Ubuntu generally recommends the snap, especially from third-party developers. Ubuntu Pro can be enabled in the Security Center, free on up to 5 machines.
- 10Install Ubuntu Desktop (Ubuntu Desktop documentation). Canonical. verified26.04 LTS tutorial: back up, download the image, write it with Rufus on Windows (SELECT the image, START, ISO Image mode; GPT and UEFI (non CSM) if it won't boot), boot menu key F12 or Esc/F2/F10, Try or Install; Intel RST must be switched to AHCI; default vs extended selection; tick third-party software and media formats; disk setup: erase disk, alongside, or manual; encrypt with a passphrase (keep it safe); BitLocker blocks installing alongside; update with sudo apt update and upgrade afterward. Ubuntu works on a wide range of devices; certified hardware list; Apple Silicon only via the community Asahi project.