Repointing a Stone Foundation
Why a fieldstone or brick foundation was laid in soft lime mortar and must be repointed with mortar that's softer than the stone; fixing the cause first, raking joints out by hand to two and a half times their width, choosing a lime-rich mix, and packing it back in thin layers.
- 3 min
- 5 steps
- 2 questions
- Lesson 92 of 111
In this lesson
- Fix the cause first
- Softer than the stone
- Rake it out
- Fill it back in
- Try it
Picking up where you left off.
Fix the cause first
Crumbling mortar, loose stones, and damp walls are reasons to repoint, but repointing alone won’t fix what caused them. Leaking gutters, settling, and rising damp have to be dealt with first 1, which is why lesson 1 comes before this one. Repointing is also one of the basic ways to keep exterior water out of an old building 2.
Softer than the stone
A house built in 1905 likely has lime mortar in its foundation. Traditional mortar was lime putty and sand, about 1 part lime to 3 parts sand; portland cement, patented in 1824 and made in the U.S. from 1872, came into general use later 1.
The rule for new mortar 1:
- Match the sand; color and texture usually follow.
- Make it softer and more vapor-permeable than the stone or brick.
- Make it as soft and as permeable as the old mortar, or more so.
The reason: when a wall moves or gets wet, you want the joint to take the strain and let moisture out, not the stone. Hard cement mortar forces the damage into the masonry instead.
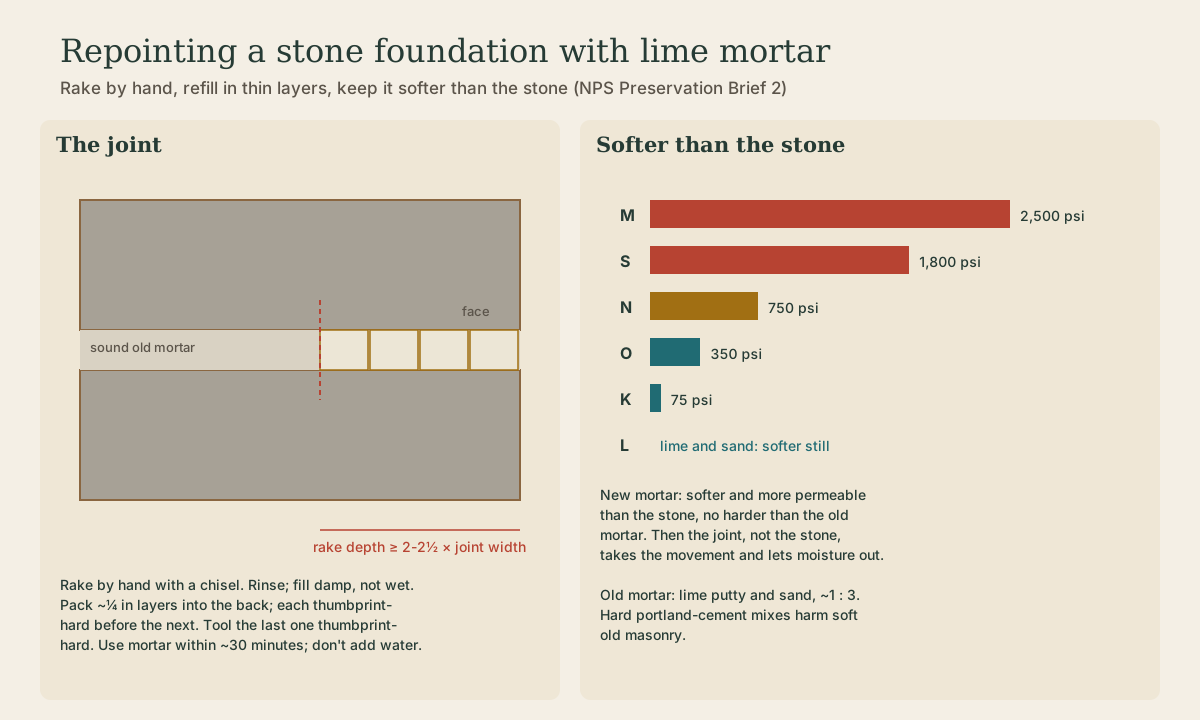
ASTM mortar types run from hard to soft: M about 2,500 psi, S 1,800, N 750, O 350, and K 75; L is straight lime and sand 1. The soft, lime-rich end is where an old foundation usually belongs; the right mix depends on your stone and old mortar, and a mortar analysis or a preservation mason can tell you.
Quick check
Then the joint, not the stone, takes movement and lets moisture out.
Rake it out
Remove old mortar to a depth of at least 2 to 2 1/2 times the joint’s width, plus anything loose beyond that. For brick that’s about 1/2 to 1 inch; for wide stone joints it can be several inches 1.
Use hand chisels and a mash hammer. It’s slow, but it’s the least likely to damage the masonry. Power saws and grinders in unskilled hands chip edges and overcut joints 1.
Rinse the joints to clear dust. Fill them damp but with no standing water; very absorbent masonry can be misted for a few hours beforehand 1.
Quick check
For wide stone joints that can be several inches.
Fill it back in
- Mix dry ingredients by volume, add water sparingly, and use the mortar within about 30 minutes. Don’t add more water to stiffening mortar 1.
- Fill deep areas first, in layers about 1/4 inch thick, packed well into the back of the joint 1.
- Let each layer reach thumbprint hardness before the next. Layering keeps shrinkage down 1.
- Tool the final layer when it’s thumbprint-hard, to match the old joints 1.
Try a 3-foot-square test panel on a hidden part of the wall first; it sets the standard for the rest 1.
Try it
Scratch the old mortar in a joint with a key or nail. Lime mortar usually scratches and crumbles easily; very hard, gray mortar that resists is probably a later cement repair. Knowing which you have tells you how soft the new mortar needs to be.
Lesson complete
Nice work.
Sources for this lesson
- 1Robert C. Mack, John P. Speweik. Preservation Brief 2: Repointing Mortar Joints in Historic Masonry Buildings. National Park Service, Heritage Preservation Services. 1998. verifiedFix the cause first (leaking gutters, settlement, rising damp) before repointing. Traditional mortar was lime putty and local sand, about 1:3 by volume; portland cement, patented 1824 and made in the US from 1872, came into common use later. New mortar must match the sand, be more vapor permeable and softer than the masonry units, and be as permeable and as soft or softer than the historic mortar. ASTM types by approximate strength: M 2,500 psi, S 1,800, N 750, O 350, K 75; L is straight lime and sand. Rake out to at least 2 to 2 1/2 times the joint width (several inches in wide stone joints) plus any loose mortar; hand chisels and mash hammers are safest; power saws and grinders by unskilled hands damage soft masonry. Rinse joints; fill damp but without standing water; mist very absorbent masonry for a few hours first. Use mortar within about 30 minutes, no retempering. Fill deep areas first in layers about 1/4 in thick, each to thumbprint hardness before the next; tool the last layer when thumbprint hard.
- 2Sharon C. Park. Preservation Brief 39: Holding the Line: Controlling Unwanted Moisture in Historic Buildings. National Park Service, Heritage Preservation Services. 1996. verifiedUncontrolled moisture is the most prevalent cause of deterioration in older buildings. Five sources: above-grade exterior moisture, below-grade ground moisture, leaking plumbing and equipment, interior moisture, and construction water. Diagnosis may take up to four seasons; fix obvious defects like clogged gutters and broken pipes at once. Handling surface runoff is one of the most important measures: a 2 in per hour rain can produce 200 gallons from downspouts in an hour for a house. Saturated soil wets footings and enters basements through cracks; builder's trenches with loose or rubble backfill can hold water against walls; leaking downspout drains and unsealed pipe penetrations feed basements; irrigation near foundations. The ground stays drier by sloping grade away, carrying downspout water well away, ground gutters where there are none, and reducing splash-back; excavation, dampproofing, and footing drains only after those. Try for 6 in of fall in the first 10 ft around the foundation; cover window wells; extension pipes for downspouts. Don't seal damp walls inside with waterproof coatings such as cement parging or vinyl: it drives capillary moisture higher up the wall. Rising damp usually comes from high water tables. Check dehumidifiers and sump pumps; battery back-up for sumps in storms; water alarms.