Fixing Squeaky Stairs and Floors
A squeak is two pieces of wood, or a wood and a nail, rubbing together. In an old house everything was nailed, and a century of seasonal swelling and shrinking has worked those nails loose. How to find exactly which part is moving, and the fixes from below (glued shims, glue blocks, regluing the wedges in an old housed stair) and from above (angled nails, screws, and snap-off screws through carpet).
- 4 min
- 6 steps
- 3 questions
- Lesson 74 of 111
In this lesson
- Why old wood squeaks
- Find the squeak
- From below
- From above
- Floors
- Try it
Picking up where you left off.
A squeaky step at 2 a.m. isn’t a structural emergency, but it’s maddening, and in an old house the fix is usually simple once you’ve found exactly what’s moving.
Why old wood squeaks
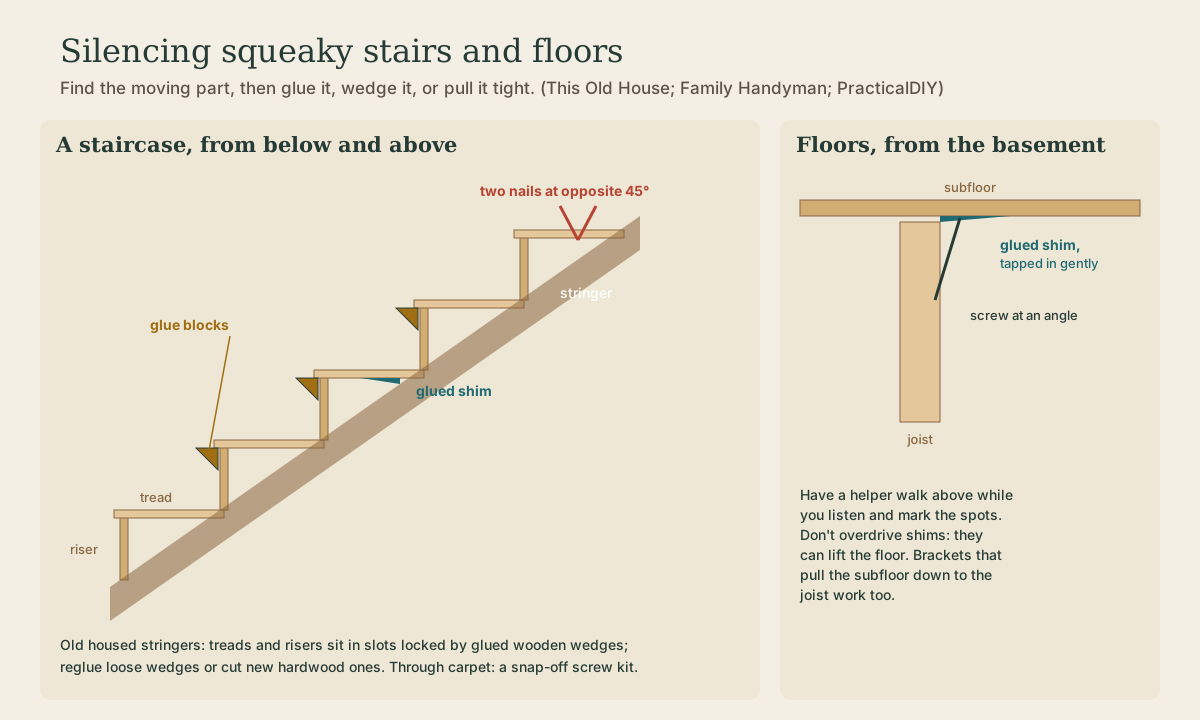
In older houses the floors and stairs were nailed together, often without glue. As the wood swells in humid summers it can pull nails up slightly; when it shrinks in dry winters, the nail is left a little loose. Step on it, and the board squeaks on the nail, or two boards squeak against each other 1. Loosened joints, wear, and stairs built with too little glue add to it 1.
Quick check
Old floors and stairs were nailed, often without glue, and each swell-and-shrink cycle loosens the nails a little more.
Find the squeak
Walk up slowly, stopping on each step, and press different parts of each noisy tread 1:
- Front of the tread: likely loose from the riser below it.
- Back of the tread: likely separated from a stringer.
- Sides: the side stringers or loose balusters.
If you can get under the stairs, have someone walk up while you listen and mark each noisy step 2. Stairs usually have three stringers, one at each side and one in the middle; This Old House’s Tom Silva reads the nail patterns on the treads to locate them without crawling underneath 1.
From below
If the underside of the stairs is open, from a basement stair or a closet, you can fix squeaks invisibly:
- Shims. Where there’s a gap between a tread and a stringer, squirt in glue and tap in a thin shim 3 1.
- Glue blocks. Glue and screw triangular or square blocks into the corner where the front of each tread meets the top of the riser below, using screws short enough not to poke through 2.
- Wedges. Traditional stairs often have housed stringers: each tread and riser sits in a slot cut into the stringer, locked by a glued wooden wedge driven in from underneath. When wedges work loose, chisel them out, reglue them, or cut new hardwood wedges and knock them home. Fit the riser’s vertical wedge first and trim it before driving the tread wedge 2.
Quick check
Loose or worn wedges can be reglued or replaced with new hardwood ones from below.
From above
When the underside is plastered over, work from the top 3:
- Angled nails. Tighten a tread to its stringer by driving two finish nails at opposite 45-degree angles, so they act like a clamp 1. Set the heads and fill.
- Screws and adhesive. If you’re replacing carpet, pull the treads, clean off nails and staples, and reinstall each tread on subfloor adhesive with screws into each stringer and a screw through the riser into the back of the tread 3.
- Through carpet. Snap-off screw kits drive a scored screw through the carpet into the stringer, then break the head off below the surface 3.
Before you screw or nail, shim any gap on top of the stringer, as Silva does, so you aren’t just pulling the tread down into a void 1.
Floors
Floors squeak for the same reasons, usually where the subfloor has lifted off a joist. From the basement, have a helper walk above while you mark the noisy spots on the joists. Tap a glued thin shim into the gap between the joist and the subfloor, gently, because overdriving it can raise the floor above, then drive a short screw at an angle through the joist and shim into the subfloor 4. Hardware brackets that pull the subfloor down tight to the joist work too 4. On carpeted floors with no access from below, a breakaway-screw kit is the tidy fix 4.
Quick check
Tap a glued shim in just snug; add a screw at an angle for extra hold.
Try it
Pick your worst step. Stand on it and rock heel to toe: is the noise at the front or the back? Then look underneath if you can. One glued shim or glue block may be all it takes.
Lesson complete
Nice work.
Sources for this lesson
- 1How to Fix Squeaky Stairs. This Old House. verifiedParts: treads, risers, stringers (usually one each side and at least one in the middle). Tom Silva reads nail patterns on the treads to locate stringers. Causes: wear, loosened joints, seasonal swelling and shrinking, too little glue. In older homes the floor and stair system is all nailed together; as wood swells it pulls nails up slightly, and when it dries the nail is left loose, so boards squeak on the nails or against each other. Find the squeak by walking slowly and pressing different areas: front squeaks suggest the tread loose from the riser; back squeaks, the tread separated from a stringer; sides, stringers or loose balusters. Silva shims a gap on top of the stringer first. Tighten a tread to a stringer by driving two finish nails at opposite 45-degree angles to make a clamp.
- 2Repairing staircases: creaks and squeaks. PracticalDIY. verifiedCreaks come from loose parts rubbing; usually not a safety issue. Have a helper walk while someone listens below. Traditionally treads and risers were held in the stringers by timber wedges, with two or three triangular blocks holding the front of each tread to the riser; modern stairs use blocks instead of wedges. Remove loose wedges with a chisel, reuse or cut new hardwood ones, glue and knock them home; fit the vertical (riser) wedges first and trim them before the tread wedge. Replace loose blocks with glued and screwed blocks, choosing screws that won't come through the tread or riser.
- 3How to Repair Squeaky Stairs. Family Handyman. 2024. verifiedExposed stairs: tap glued shims into voids between treads and stringers, and screw stringers to studs. Finished undersides: fix from the top, ideally when replacing carpet: pry off treads, remove nails and carpet staples, screw outside stringers to studs with 4-1/2-inch screws, apply subfloor adhesive on riser tops, stringers, and tread backs, drive three 2-1/2-inch screws through each tread into each stringer and a 2-inch screw through the riser into the back of the tread. Through carpet: a kit with a depth-control jig and scored snap-off screws.
- 4How to Fix Squeaky Floors. This Old House. verifiedFrom below: have someone walk above, mark squeaky spots on the joists, tap a glued thin shim into the gap between joist and subfloor without overdriving it (which can raise the floor), and add a 1-1/4-inch screw at an angle through joist and shim into the subfloor; or a bracket and threaded rod that pulls the subfloor to the joist. Carpeted floors from above: breakaway-screw kits that snap the head below the carpet, preferred over angled finish nails.