Doors That Stick, Sag, or Won't Latch
Reading the reveal around a door, and fixing what it shows in the right order: tightening and lengthening hinge screws, plugging stripped holes, shimming or bending a hinge, moving or filing the strike, and planing a swollen door from the hinge side, with lead paint in mind and the bare wood sealed right away.
- 4 min
- 5 steps
- 2 questions
- Lesson 88 of 111
In this lesson
- Read the reveal
- Hinges first
- A door that won’t latch
- A swollen door
- Try it
Picking up where you left off.
Read the reveal
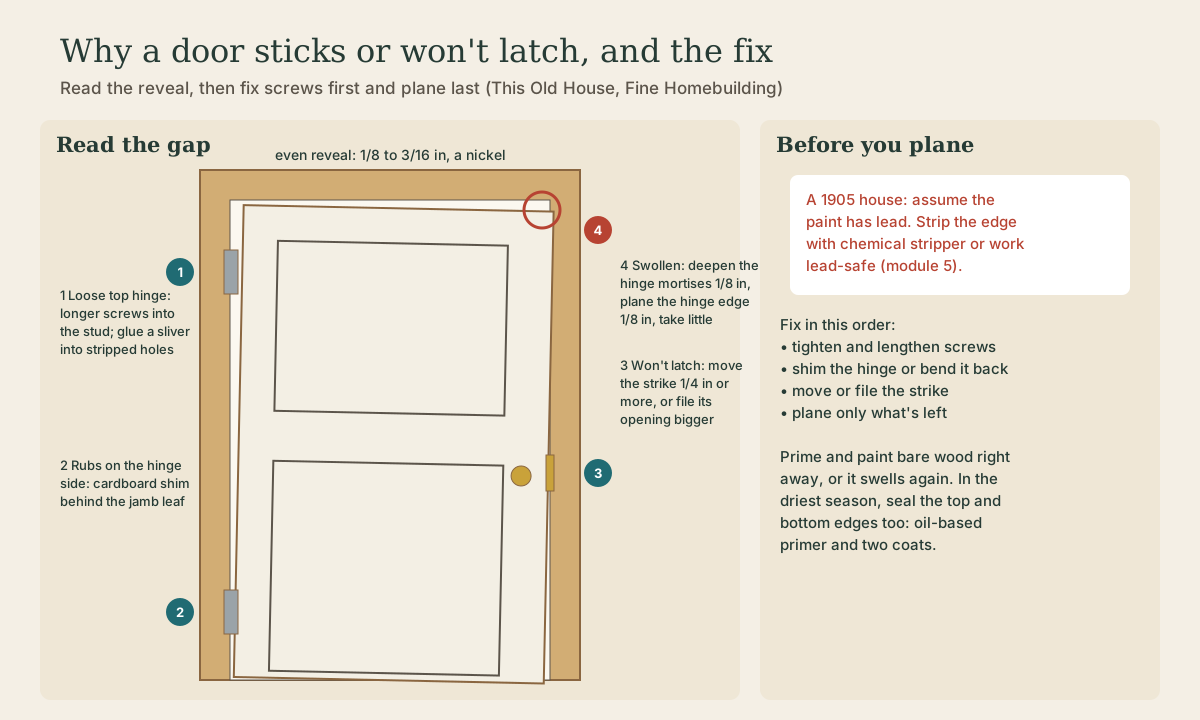
Close the door and look at the gap between door and jamb all the way around. It should be an even 1/8 to 3/16 inch, about the thickness of a nickel 1. Where the gap closes up is where it rubs, and the shape of the gap tells you why:
- Tight at the top of the latch side, wide at the top of the hinge side: the door is sagging, usually from a loose top hinge 2.
- Tight along the hinge side: the hinges sit too deep 2.
- Even gap but the door won’t stay shut: the latch misses the strike 2.
- Tight all around in summer, fine in winter: the door has swollen with humidity 1.
In an old house the jamb itself is a common culprit: one not held with enough screws of the right length gives with use and throws the door off 1.
Hinges first
Tighten every hinge screw. If the door still sags, replace the screws in the jamb leaf with longer ones of the same diameter. The inner screws should reach the stud behind the jamb; the outer ones may not help much 2.
A screw that spins has stripped its hole. Whittle a slightly tapered sliver of wood about 1/4 inch wide, put glue on it and in the hole, tap it in, snap it off flush, and drive the screw while the glue is still wet 1.
- Rubbing on the hinge side: slip cardboard shims behind the jamb leaf, retighten, and trim the cardboard flush 2.
- Still rubbing on the latch side with tight hinges: a hinge may be bent; it can be bent back at the knuckles with an adjustable wrench 2.
- A warped door that hits the stop at the top but not the bottom can be coaxed by shifting the top or bottom hinge outward, or by moving the stop 2.
Quick check
A loose top hinge lets the door sag; planing a sagging door just leaves a gap once the hinge is fixed.
A door that won’t latch
Swing the door nearly shut and mark the jamb where the latch bolt meets it. Then take off the strike, enlarge its recess with a chisel in the direction it needs to go, and reinstall it. Move it at least 1/4 inch so the screws get fresh wood instead of wandering back into the old holes, and fill the exposed part of the old recess with epoxy filler. If it only needs to move a hair, file the opening in the strike larger instead 2.
A swollen door
Only plane once the hinges and strike are right, and take off as little as possible: the door shrinks again in winter, and too much leaves a gap 1.
Plane the hinge edge, so the knob and lock stay put. Take the door down, chisel each hinge mortise 1/8 inch deeper, then plane 1/8 inch off the hinge edge in long strokes and round the sharp corners with 150-grit sandpaper 1.
Lead paint: in a 1905 house, assume the old paint has lead. This Old House’s carpenter would strip a lead-painted edge chemically before planing 1. Homeowners working on their own house aren’t bound by EPA’s renovation rule, but EPA recommends lead-safe work: contain the area, mist before scraping, a proper respirator, and careful cleanup 3. Module 5 has the details.
Seal it right away. Prime and paint the bare wood before rehanging the door, or it will swell again almost at once. Better, in the driest part of the year, take the door off and seal every surface, including top and bottom edges, with oil-based primer and two coats of paint 1.
Playback is optional. If the player is unavailable, open the video at its source.
Quick check
Chisel the hinge mortises 1/8 inch deeper, plane 1/8 inch off that edge, and the hinges sit flush again.
Try it
Walk the house with a nickel. At every door, slide it into the gap along the top and down both sides with the door closed. Note where it won’t go and where it falls through; that list tells you which doors need screws, which need a strike moved, and which, if any, need a plane.
Lesson complete
Nice work.
Sources for this lesson
- 1How to Fix a Door That Sticks. This Old House. verifiedDoors stick from seasonal swelling, settling, or loose jambs and hinges; re-anchor loose hinge leaves with longer screws first. Tom Silva: the reveal between door and jamb should be 1/8 to 3/16 in, about a nickel's thickness; take off the minimum, since the door shrinks again in winter. Stripped screw hole: glue a tapered 1/4 in sliver into it, snap it flush, and refasten while wet. To plane without removing the knob, take wood off the hinge side: chisel the hinge mortises 1/8 in deeper, then plane 1/8 in from that edge with long strokes, round the edges with 150-grit. 'If it were lead paint, I'd first want to use a chemical stripper.' Prime and paint raw wood right away or it swells again. For a swollen door, wait for the driest part of the year, then seal all surfaces, top, bottom, sides, and faces, with oil-based primer and two coats of paint.
- 2First Aid for Doors. Fine Homebuilding. verifiedWon't latch: close the door nearly shut and mark where the latch meets the jamb; move the strike plate at least 1/4 in so the screws get fresh holes, enlarging the gain with a chisel and filling the exposed part with epoxy filler; if it can't move that far, file the strike's opening bigger. Binding on the hinge side: cardboard shims behind the jamb leaf. Binding on the latch side: usually loose hinges; longer screws, with the inner screws reaching the stud. Then check for a bent hinge, which can be bent back at the knuckles with an adjustable wrench. Racked opening: scribe the door with dividers and trim it. Warped door: shift the top or bottom hinge outward, or move the stop.
- 3Lead-Safe Renovations for DIYers. U.S. Environmental Protection Agency. verifiedHomes built before 1978 may have lead-based paint. The RRP Rule generally doesn't apply to owners working on their own home, but EPA recommends lead-safe practices: find out if lead paint is present (or assume it), contain the work area with plastic sheeting, turn off forced air and cover vents, wear an N-100 respirator, coveralls, and shoe covers, mist before sanding or scraping, use a heat gun under 1,100 °F or chemical strippers, use power tools with HEPA vacuum attachments, clean with a HEPA vacuum and wet methods daily, bag waste, and clean again at the end.