Adding a Window
Cutting a new window into an old exterior wall is a serious but manageable carpentry job, as long as you respect the load. The steps: check the wall for wiring, pipes, and ducts; build temporary support inside to carry the floor or roof while studs are cut; frame the opening with king studs, jacks, a header, cripples, and a rough sill; then flash the opening so water that gets past the window drains out. What's different in a balloon-framed house, and what to check about permits and bedroom egress first.
- 5 min
- 7 steps
- 3 questions
- Lesson 72 of 111
In this lesson
- Before you start
- Hold the house up
- Open the wall
- Frame the opening
- Flash it like a roof
- Try it
Picking up where you left off.
A new window can transform a dark room, and in an old house it’s often the most satisfying carpentry you’ll do. It’s also a structural change to the building, so it pays to plan it carefully and do it in the right order.
Before you start
- Permits. Wisconsin’s Uniform Dwelling Code covers houses begun after June 1, 1980, and alterations to them; it doesn’t apply to older houses unless your municipality has adopted it 1. Your city or village may still require a permit for a structural change like a new window opening, so call the building department first.
- Bedrooms. If the window will serve a bedroom, consider making it large enough for emergency escape. The UDC’s egress standard for newer houses is a net clear opening of at least 20 by 24 inches with the sill no more than 60 inches above the floor 2; it’s a sensible target for any bedroom.
- Lead paint and plaster. You’ll be cutting through painted siding and plaster; work lead-safe (see the Residential Construction course).
- What’s in the wall. Look for wiring, plumbing, and ductwork. If the wall is finished, remove the plaster carefully to see 3. Anything in the way has to be rerouted 3 4.
Hold the house up
Most exterior walls carry load: the floor joists above, the ceiling, or the rafters 4. A wall is likely load-bearing if it runs perpendicular to the joists, sits over a foundation wall or beam, stacks through floors, or holds up rafters; joists usually run at right angles to the roof ridge 4. This Old House’s Tom Silva advises confirming with a structural engineer or experienced contractor 4.
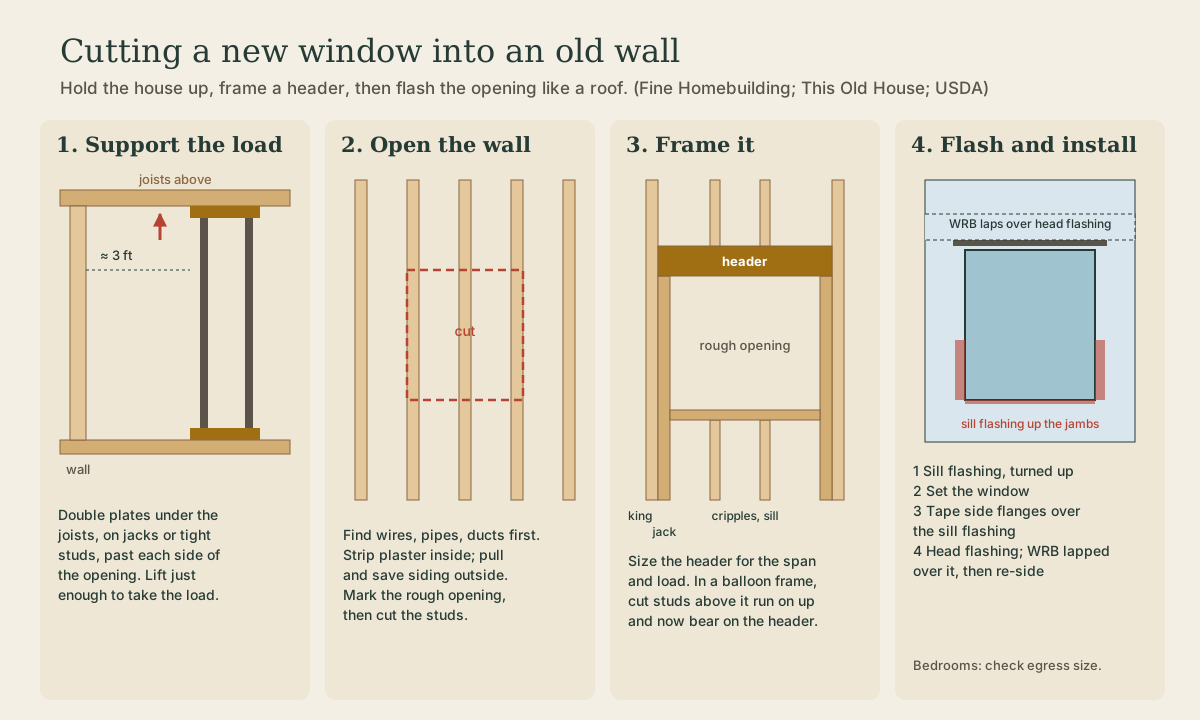
If the wall bears load, you must hold up the ceiling and everything above it while the opening is cut and the header goes in 3. Fine Homebuilding’s method: tack two 2x6 plates flat to the underside of the joists about 3 feet back from the wall, set screw jacks under them on the floor (or the basement slab), about 4 feet apart, with the plates reaching at least one joist past each end of the opening 3. A temporary stud wall works too; Silva cuts the temporary studs an eighth to three-sixteenths of an inch long and drives them in tight so they truly take the load 4.
Quick check
Fine Homebuilding’s method: doubled plates under the joists about 3 feet back, on screw jacks, extending past the opening.
Open the wall
Lay out the opening, then remove the siding outside, saving it to reuse 3, and the plaster inside. Mark the rough opening from the window maker’s specifications, then cut the studs.
Frame the opening
A framed opening has the same parts in an old house as a new one:
- King studs: full-height studs on each side of the opening.
- Jack studs: shorter studs nailed to the kings, holding up the header.
- Header: a beam across the top that carries the load from above to the jacks. Its size depends on the span and what it carries; Wisconsin’s code tables, or an engineer, give sizes 2.
- Cripples: short studs above the header and below the rough sill.
Balloon frames are different. In a balloon frame the exterior studs run continuously from the sill up past the second floor, and the second-floor joists hang on a ribbon let into them 5. When you cut studs for a first-floor window, the pieces above the opening still run up the wall, carrying the second floor’s joists, so they now stand on your header. Make sure the header, the jacks, and whatever is under the jacks can carry that load down to the foundation. In a first-floor wall of a balloon frame, there’s no plate between floors to stop at; you’re cutting a stud that is part of a two-story column.
Quick check
The header transfers the weight to the sides of the opening and down to the foundation.
Flash it like a roof
New windows leak at the sill. A fully flashed opening starts at the bottom: a back dam along the inside edge of the rough sill and a flexible self-adhering sill flashing pressed in and turned up the jambs, so any water that gets past the window drains outward instead of into the wall 6. Then set the window, tape its side flanges over the sill flashing, add head flashing, and lap the building paper or housewrap down over the head flashing so every layer sheds water onto the one below. The Residential Construction course walks through this sequence in detail.
Finally, re-side around the window with the boards you saved, seal and insulate the gap between the window and the framing, and patch the plaster inside.
Playback is optional. If the player is unavailable, open the video at its source.
Quick check
Work bottom to top so each layer laps over the one below it, like shingles.
Try it
Pick the wall where you’d want a window. From the attic or basement, find which way the joists run and whether the wall sits under the ends of joists. Measure where the studs are, and look outside for vents, pipes, or the electric meter on that wall. That’s the information an engineer or your building department will ask for first.
Lesson complete
Nice work.
Sources for this lesson
- 1Wis. Admin. Code ch. SPS 320, Uniform Dwelling Code: Administration and Enforcement. Wisconsin Department of Safety and Professional Services. verifiedThe UDC (chs. SPS 320-325) covers one- and two-family dwellings begun on or after June 1, 1980 (energy rules, SPS 322, from Dec. 1, 1978), including additions and alterations to them and barns or garages converted to homes; it doesn't cover older houses (unless a municipality adopts it), detached garages and accessory buildings, farm buildings, primitive rural hunting cabins, or repairs. A Wisconsin uniform building permit is required before any on-site construction, including excavation; applicants who aren't the owner living in the house need dwelling contractor certification; 2 sets of plans (site plan with erosion control, floor plans with wall bracing, elevations) plus energy data; plans need not be stamped by an architect or engineer; the permit expires in 24 months if the exterior isn't completed. Inspections: erosion control, foundation excavation (after forms and reinforcement, before concrete), reinforcement, foundation (before backfill), rough (basement floor, framing, electrical, plumbing, HVAC), insulation and vapor retarder, and final; work may proceed if an inspection hasn't happened by the end of the second business day after notice; occupancy needs a final inspection with no critical violations, or local rules apply after 5 business days.
- 2Wis. Admin. Code ch. SPS 321, Uniform Dwelling Code: Construction Standards. Wisconsin Department of Safety and Professional Services. verifiedDesign loads (SPS 321.02): complete load path to the foundation; live loads 40 psf floors, 50 garage floors, 40 decks and porches, 20 ceilings with storage, 5 without; roof snow loads from the zone map, Zone 1 (north) 40 psf and Zone 2 (south) 30 psf; wind 20 psf horizontal and uplift or ASCE 7-05; span tables in SPS 325 Appendix A. Frost (321.16): footings and foundations, including stoops and landings, below frost penetration or at least 48 inches below grade, whichever is deeper, never on frozen material; exceptions for ASCE 32 frost-protected shallow foundations, areaways, and clean bedrock. Exits (321.03): two first-floor exit doors separated by the greater of 20 feet or a third of the floor's longest diagonal; egress windows at least 20 by 24 inches net clear opening, sill no more than 60 inches above the floor (a platform if over 46); basement sleeping rooms need a second exit. Ceilings at least 7 feet (321.06). Smoke alarms (321.09) in each sleeping room, outside sleeping areas within 21 feet, and on every level, hardwired and interconnected with battery backup.
- 3Mike Guertin. Framing an Opening in a Bearing Wall. Fine Homebuilding (Issue 137). 2001. verifiedBefore cutting, look for wiring, plumbing, or ductwork in the wall (remove plaster or drywall carefully if finished) and determine whether the wall bears load; if so, the ceiling and weight above must be supported temporarily while the opening is cut and a header installed. Lay out the opening, remove and save the siding. Support: two 2x6 plates tacked flat under the floor joists about 3 feet back from the wall, on screw jacks set on the floor or slab below, jacks about 4 feet apart, the plates extending at least one joist beyond each end of the opening.
- 4How to Cut a Pass-Through in a Load-Bearing Wall. This Old House. verifiedSigns a wall is load-bearing: perpendicular to joists, directly over foundation walls or beams, stacked through floors, supporting rafters or trusses; Tom Silva advises confirming with a structural engineer or qualified contractor. Joists usually run at right angles to the roof ridge. A header sized to carry the load transfers weight to the sides of the opening. Temporary support wall of 2x8 plates and 2x4 studs; Silva cuts temporary studs 1/8 to 3/16 inch long and wedges them in so they take the load before demolition. Have a licensed electrician or plumber reroute utilities in the wall.
- 5L. O. Anderson, O. C. Heyer. Wood-Frame House Construction (Agriculture Handbook No. 73). USDA Forest Service, Forest Products Laboratory. 1955. verifiedPublic domain handbook. Platform construction: the subfloor extends to the outside edges and walls are framed flat on it, raised, plumbed, braced, then capped with a second top plate lapping at corners; balloon framing runs studs from sill to rafter plate. Studs commonly 2x4 at 16 inches on center; framing lumber at no more than 19 percent moisture. Wood basement posts at least 6x6 on a pedestal; girders carry the inner ends of joists; joists usually 2-inch nominal, 6 to 12 inches deep, 16 inches on center, crown up, doubled under bearing partitions, lapped at girders; openings framed with doubled headers and trimmers; cross-bridging at midspan, no more than 8 feet apart; subfloor of boards or plywood; headers of two 2-inch members on edge over openings; diagonal or K bracing at corners; rafters erected in pairs after ceiling joists are fastened.
- 6Fully Flashed Window and Door Openings: Flashing Details. U.S. Department of Energy, Building Science Education Solution Center. verifiedA fully flashed window opening starts at the sill: a back dam nailed along the inside edge of the rough opening, then a formable self-adhered membrane pressed into the sill from the middle toward the sides and up the jambs, so water that gets past the window drains outward onto the water-resistive barrier.