Basements and Rim Joists
The bottom of the house is where the stack effect pulls cold air in, mostly at the rim joist, where the wooden house sits on its stone or concrete foundation. Sealing the sill plate, the edges of the rim joist, and every pipe and wire through it is a cheap, satisfying weekend job. Then insulate each rim cavity with rigid foam. Whether to insulate the basement walls depends on whether the basement is part of the heated house, and it should never be done before the walls are dry.
- 4 min
- 6 steps
- 2 questions
- Lesson 70 of 111
In this lesson
- Where the leaks are
- Seal the rim
- Insulate the rim
- The basement walls
- Try it
Picking up where you left off.
Go down to the basement of an old house on a windy winter day and put your hand along the top of the foundation wall. That cold breeze is the bottom half of the stack effect: air being pulled into the house to replace the warm air leaving through the attic 1.
Where the leaks are
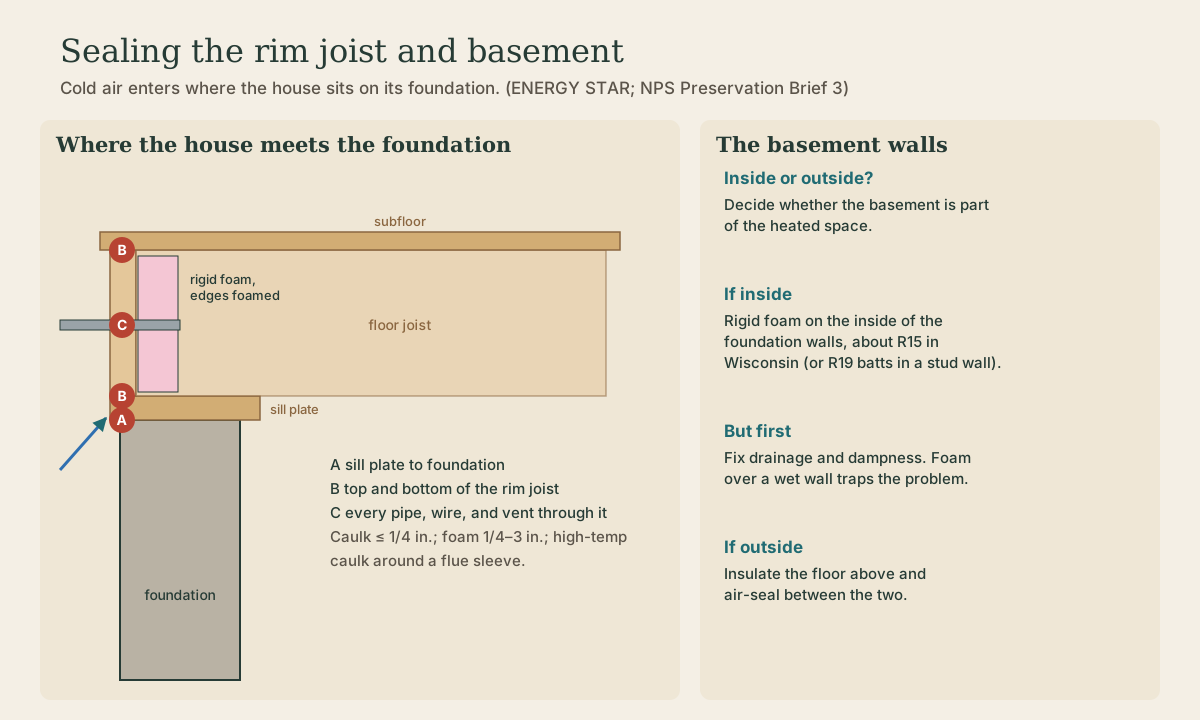
The top of a basement wall is above ground, and the wooden house simply sits on it. The flat board on top of the foundation is the sill plate; the board standing on edge around the perimeter, where the floor joists end, is the rim joist (or band joist). Between every pair of joists is a small pocket along the rim, and each pocket has cracks and gaps to the outside 1. In a stone-foundation house, the top of the wall may be ragged and full of gaps.
Seal the rim
ENERGY STAR lists three places to seal 1:
- A. The gap between the sill plate and the foundation.
- B. The top and bottom of the rim joist, where it meets the subfloor above and the sill below, all around the house.
- C. Every pipe, wire, dryer vent, and gas line that passes through to the outside.
Use caulk for gaps up to a quarter inch and spray foam for gaps from a quarter inch to about 3 inches 1. Around a furnace or water-heater flue sleeve, use high-temperature caulk 1. Bump-outs such as a bay window hanging off the foundation deserve special attention, since they leak more 1.
Quick check
Then insulate each cavity with rigid foam foamed into place, or batts cut to fit.
Insulate the rim
Once it’s sealed, insulate each rim cavity. ENERGY STAR suggests rigid foam cut to fit and foamed into place around its edges, or fiberglass batts cut to fit without compression, gaps, or voids 1. Many people do this at the same time as they finish the basement, insulating the walls from floor to ceiling 1.
The basement walls
The big decision is whether the basement is inside the heated house or outside it 2:
- Outside the heated house (a cold basement): insulate the floor above, between the joists, and air-seal everything between the basement and the living space, including the rim and the stair door 2.
- Inside the heated house (often the case when the furnace, water heater, and ducts are down there): insulate the foundation walls. The Park Service recommends rigid foam on the inside face of the wall, with the joints sealed, only after any drainage problems are fixed 2. ENERGY STAR’s retrofit target for cold climates is R15 of foam sheathing or R19 batts in a framed wall 3.
The “drainage first” rule matters: insulation over a damp wall hides the water where you can’t see it. Fix gutters, downspouts, and grading so water flows away from the house before insulating, and watch the walls through a wet season. (The Residential Construction course covers foundation drainage.)
Crawlspaces follow similar logic: the Park Service notes that venting crawlspaces doesn’t keep them dry in humid summers and suggests sealing the vents and bringing the crawlspace inside the insulated envelope instead 2.
Playback is optional. If the player is unavailable, open the video at its source.
Quick check
The Park Service recommends interior foam only after drainage issues are addressed.
Try it
With a flashlight and a can of foam, go around the basement perimeter and look at the rim joist pockets. Where can you see daylight, feel air, or see cobwebs waving? Seal those first; it’s an afternoon and a few cans of foam. Then measure the rim pockets for rigid foam: most will be the same size, so you can cut them in batches.
Lesson complete
Nice work.
Sources for this lesson
- 1A Do-It-Yourself Guide to Sealing and Insulating with ENERGY STAR. ENERGY STAR (U.S. EPA). 2016. verifiedThe most significant leaks hide in the attic and basement; warm air rises like a chimney and pulls cold air in below. Common leaks: behind kneewalls, attic hatch, wiring holes, plumbing vents, open soffits, recessed lights, flue and duct chases, basement rim joists, windows and doors. Call a contractor for wet insulation, moldy rafters, dryer vents into the attic, ice-dam history, little ventilation, knob-and-tube wiring (pre-1930, a fire hazard in contact with insulation). Tools: caulk for gaps of 1/4 inch or less, spray foam for 1/4 to 3 inches, aluminum flashing and high-temperature caulk for flues. Plug big holes first: open stud cavities behind dropped soffits and kneewalls with folded batts stuffed in plastic bags, cover soffits with foil or rigid foam sealed with caulk or adhesive. Vermiculite may contain asbestos; don't disturb it until lab-tested. Codes usually require 1 inch clearance from metal flues and 2 inches from masonry chimneys to combustibles including insulation; seal with flashing in high-temp caulk and build a metal dam. Dirty insulation marks air leaks. Weatherstrip and insulate the attic hatch. Check combustion appliances for carbon monoxide after tightening. Old recessed lights need air space; replace with IC-AT fixtures. Basement: seal the sill plate to foundation, top and bottom of the rim joist, and all penetrations; then insulate rim cavities with rigid foam foamed in place or batts without compression. Never cover soffit vents; use rafter vents (baffles) to insulate out to the eaves.
- 2Jo Ellen Hensley, Antonio Aguilar. Preservation Brief 3: Improving Energy Efficiency in Historic Buildings. National Park Service, Technical Preservation Services. verifiedStart with an energy audit (independent auditor, BPI standards; blower door and infrared thermography; retest after upgrades). Prioritize measures with most payback and least harm. Replacing windows alone does not bring major savings. Minimal alteration: reduce air leakage, add attic insulation, storm windows, insulate basements and crawlspaces, seal and insulate ducts, weatherstrip doors. More alteration: replace windows, insulate wood-frame and masonry walls. Air leakage can be 5 to 40 percent of space-conditioning costs and is the first priority; stack effect: cold air enters low and warm air exits through the attic, carrying moisture into walls and attics; seal the top and bottom of exterior walls, interfloor bypasses, chases. Don't caulk the underside of clapboards. Tighter buildings may need mechanical ventilation. Attic: high priority; faced batts' vapor retarder toward the heated interior but a vapor retarder isn't necessary in attics; new unfaced batts perpendicular over old; unfinished attics must be ventilated; insulate attic hatches. Storm windows: single-glazed storm brings a single-pane window to about R2. Wood-frame walls: fix moisture first; uninsulated old buildings dry by air leakage, so effects of insulating are hard to predict; walls with sheathing are better candidates than siding nailed straight to studs, where wind-driven rain wets the insulation; dense-packed cellulose or fiberglass blown into cavities does least damage; access from outside by removing individual siding boards at the top of each cavity, or from inside through non-decorative plaster that needs repair; borate-only cellulose recommended because sulfate-treated cellulose can form sulfuric acid and corrode metals. Basements and crawlspaces: decide if inside the thermal envelope; if not, insulate under the floor and air seal band joists; if so, rigid foam on the interior of foundation walls only after drainage is addressed; seal crawlspace vents.
- 3Recommended Home Insulation R-Values. ENERGY STAR (U.S. EPA). verifiedRetrofit levels for existing wood-framed buildings, based on the 2021 IECC. Attic floor, zones 4C, 5, 6, 7, and 8: R60 if uninsulated, R49 to add over 3 to 4 inches of existing insulation. Walls: whenever siding is removed on an uninsulated wood-frame wall, drill holes in the sheathing and blow insulation into the cavity, and in zones 4-8 add R5 to R10 insulative sheathing beneath the new siding; insulated 2x4 walls in zones 4-8 add R10 sheathing. Basement or crawlspace walls, zones 4C and 5-8: R15 insulative sheathing or R19 batt.