Air Sealing and Insulating the Attic
The attic is the best-value energy project in an old house, and mostly a do-it-yourself one. First check for the three things that stop the job: vermiculite, knob-and-tube, and wet or moldy wood. Then plug the big holes: open wall tops and soffits, the chimney and flues (with metal and high-temperature caulk, keeping insulation an inch or two away), wires, pipes, and the hatch. Keep the eaves breathing with rafter vents, and insulate to about R60.
- 5 min
- 8 steps
- 3 questions
- Lesson 68 of 111
In this lesson
- Three stop signs
- Plug the big holes first
- Chimneys and flues
- Wires, pipes, and the hatch
- Keep the eaves breathing
- How much insulation
- Try it
Picking up where you left off.
If you do one energy project in an old house, make it the attic. The National Park Service ranks attic insulation among the most effective measures, with little impact on historic materials 1, and ENERGY STAR calls attic air sealing and insulation a do-it-yourself job if the attic is accessible 2. The order is the same as always: seal first, insulate second.
Three stop signs
Before you start, look for three conditions that mean stop and get help 2:
- Vermiculite. A lightweight, pea-size, flaky gray mineral insulation, common in old attics. It may contain asbestos. Don’t disturb it until it has been tested by an approved lab; your local health department can name one 2.
- Knob-and-tube wiring. ENERGY STAR flags it as a fire hazard when in contact with insulation 2. Deal with it first (see the Old Wiring module).
- Moisture. Wet or damp insulation, moldy or rotted rafters, or a history of ice dams mean a leak or serious air leakage that needs fixing first. So does a bathroom fan or dryer vent dumping moist air into the attic instead of outdoors 2.
Quick check
Vermiculite can contain asbestos; leave it alone until a lab says otherwise.
Plug the big holes first
Don’t try to find every pinhole. Your savings come from the big openings 2. Take a sketch of the floor plan up with you and look where walls meet the attic floor.
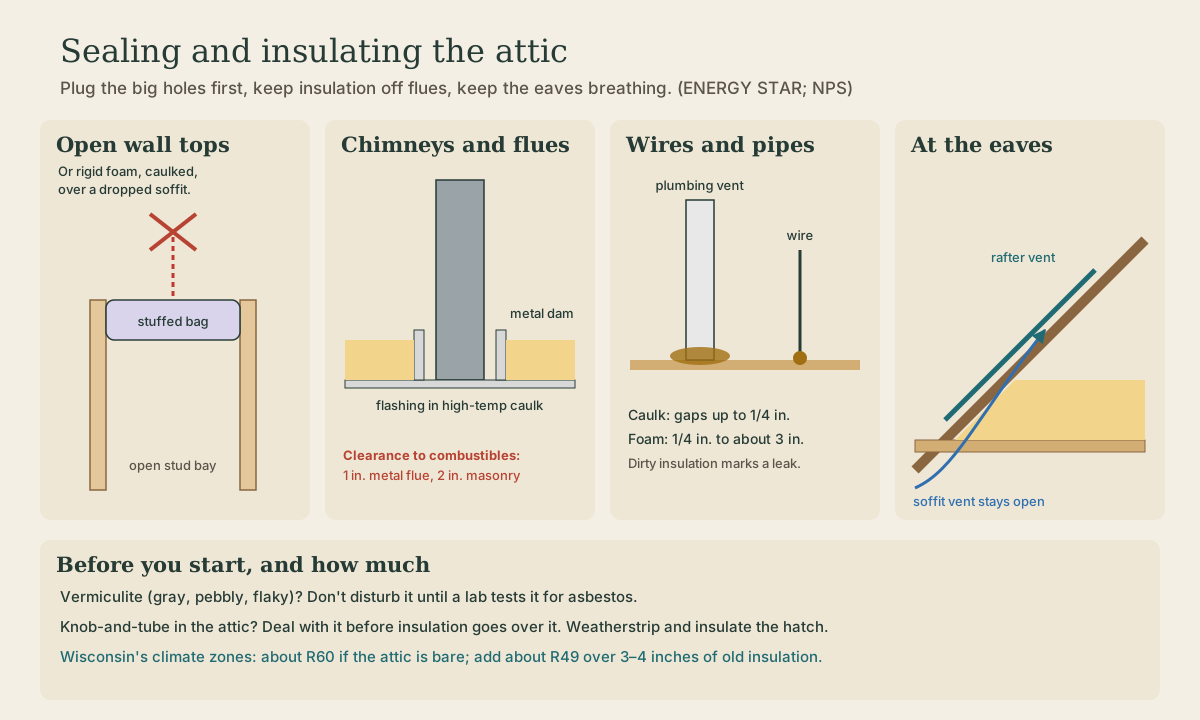
Open wall tops and soffits. In an old house, interior and exterior walls may be open at the top, and dropped ceilings over kitchen cabinets or stairways (soffits) can be open boxes into the wall cavities below. ENERGY STAR’s trick: fold a piece of unfaced fiberglass batt into a plastic garbage bag and stuff it into each open stud bay. Cover open soffits with foil-faced board or rigid foam sealed with caulk or construction adhesive 2. Kneewalls in finished attic rooms often hide the same open cavities 2.
Chimneys and flues
The gap around a chimney or furnace flue can be one of the biggest leaks in the attic, but you can’t stuff it with insulation or foam, because the pipe gets hot. Building codes usually require 1 inch of clearance from metal flues and 2 inches from masonry chimneys to any combustible material, insulation included 2.
Instead, cut aluminum flashing to cover the gap, set it in a bead of high-temperature caulk, and fasten it. Then wrap a sheet-metal dam around the flue so the insulation stays back the required distance 2.
Quick check
Flues get hot; codes usually require 1 inch of clearance from metal flues and 2 inches from masonry chimneys to combustibles.
Wires, pipes, and the hatch
- Seal around wires and plumbing vents: caulk for gaps up to a quarter inch, spray foam for gaps from a quarter inch to about 3 inches. Stuff a little fiberglass in wider gaps as a backer for the foam 2.
- Look for dirty insulation, which marks hidden leaks 2.
- Old recessed lights need air around them to stay cool, so get advice before sealing them, or replace them with IC-AT-rated fixtures made to be covered and airtight 2.
- Weatherstrip the hatch, add hook-and-eye latches to compress the weatherstrip, and glue rigid foam to its back. Treat it like an exterior door 2 1.
Keep the eaves breathing
A vented attic needs air to come in at the soffits and out at the ridge or gables. The most common insulation mistake, ENERGY STAR says, is blocking the soffit vents 2. Before insulating, staple rafter vents (baffles) between the rafters where the roof meets the attic floor. They hold a channel open so you can insulate right out to the edge of the wall below 2. The Park Service adds that unfinished attics must be ventilated 1.
Quick check
Covering soffit vents with insulation is a common mistake.
How much insulation
ENERGY STAR’s retrofit recommendation for cold climates like Wisconsin’s is R60 on an uninsulated attic floor, or R49 added on top of 3 to 4 inches of existing insulation 3. (For comparison, Wisconsin’s code calls for R-49 ceilings in new houses 4.) Where batts are hard to fit, blown insulation gives more complete coverage 1. If you add batts over old insulation that already reaches the tops of the joists, use unfaced batts laid across the joists 1. A vapor retarder isn’t necessary in attic floor insulation 1.
Finally, have your combustion appliances checked after sealing 2.
Playback is optional. If the player is unavailable, open the video at its source.
Try it
Measure the depth of your existing attic insulation in a few spots, especially along the eaves where it’s often thinnest, and note its type. Then count your big leaks: open wall tops, soffits, the chimney, flues, the hatch. That count, and the depth, tell you how big a weekend you have ahead.
Lesson complete
Nice work.
Sources for this lesson
- 1Jo Ellen Hensley, Antonio Aguilar. Preservation Brief 3: Improving Energy Efficiency in Historic Buildings. National Park Service, Technical Preservation Services. verifiedStart with an energy audit (independent auditor, BPI standards; blower door and infrared thermography; retest after upgrades). Prioritize measures with most payback and least harm. Replacing windows alone does not bring major savings. Minimal alteration: reduce air leakage, add attic insulation, storm windows, insulate basements and crawlspaces, seal and insulate ducts, weatherstrip doors. More alteration: replace windows, insulate wood-frame and masonry walls. Air leakage can be 5 to 40 percent of space-conditioning costs and is the first priority; stack effect: cold air enters low and warm air exits through the attic, carrying moisture into walls and attics; seal the top and bottom of exterior walls, interfloor bypasses, chases. Don't caulk the underside of clapboards. Tighter buildings may need mechanical ventilation. Attic: high priority; faced batts' vapor retarder toward the heated interior but a vapor retarder isn't necessary in attics; new unfaced batts perpendicular over old; unfinished attics must be ventilated; insulate attic hatches. Storm windows: single-glazed storm brings a single-pane window to about R2. Wood-frame walls: fix moisture first; uninsulated old buildings dry by air leakage, so effects of insulating are hard to predict; walls with sheathing are better candidates than siding nailed straight to studs, where wind-driven rain wets the insulation; dense-packed cellulose or fiberglass blown into cavities does least damage; access from outside by removing individual siding boards at the top of each cavity, or from inside through non-decorative plaster that needs repair; borate-only cellulose recommended because sulfate-treated cellulose can form sulfuric acid and corrode metals. Basements and crawlspaces: decide if inside the thermal envelope; if not, insulate under the floor and air seal band joists; if so, rigid foam on the interior of foundation walls only after drainage is addressed; seal crawlspace vents.
- 2A Do-It-Yourself Guide to Sealing and Insulating with ENERGY STAR. ENERGY STAR (U.S. EPA). 2016. verifiedThe most significant leaks hide in the attic and basement; warm air rises like a chimney and pulls cold air in below. Common leaks: behind kneewalls, attic hatch, wiring holes, plumbing vents, open soffits, recessed lights, flue and duct chases, basement rim joists, windows and doors. Call a contractor for wet insulation, moldy rafters, dryer vents into the attic, ice-dam history, little ventilation, knob-and-tube wiring (pre-1930, a fire hazard in contact with insulation). Tools: caulk for gaps of 1/4 inch or less, spray foam for 1/4 to 3 inches, aluminum flashing and high-temperature caulk for flues. Plug big holes first: open stud cavities behind dropped soffits and kneewalls with folded batts stuffed in plastic bags, cover soffits with foil or rigid foam sealed with caulk or adhesive. Vermiculite may contain asbestos; don't disturb it until lab-tested. Codes usually require 1 inch clearance from metal flues and 2 inches from masonry chimneys to combustibles including insulation; seal with flashing in high-temp caulk and build a metal dam. Dirty insulation marks air leaks. Weatherstrip and insulate the attic hatch. Check combustion appliances for carbon monoxide after tightening. Old recessed lights need air space; replace with IC-AT fixtures. Basement: seal the sill plate to foundation, top and bottom of the rim joist, and all penetrations; then insulate rim cavities with rigid foam foamed in place or batts without compression. Never cover soffit vents; use rafter vents (baffles) to insulate out to the eaves.
- 3Recommended Home Insulation R-Values. ENERGY STAR (U.S. EPA). verifiedRetrofit levels for existing wood-framed buildings, based on the 2021 IECC. Attic floor, zones 4C, 5, 6, 7, and 8: R60 if uninsulated, R49 to add over 3 to 4 inches of existing insulation. Walls: whenever siding is removed on an uninsulated wood-frame wall, drill holes in the sheathing and blow insulation into the cavity, and in zones 4-8 add R5 to R10 insulative sheathing beneath the new siding; insulated 2x4 walls in zones 4-8 add R10 sheathing. Basement or crawlspace walls, zones 4C and 5-8: R15 insulative sheathing or R19 batt.
- 4Wis. Admin. Code ch. SPS 322, Uniform Dwelling Code: Energy Conservation. Wisconsin Department of Safety and Professional Services. verifiedZone 2 is 15 northern counties (Ashland, Bayfield, Burnett, Douglas, Florence, Forest, Iron, Langlade, Lincoln, Oneida, Price, Sawyer, Taylor, Vilas, Washburn), Zone 1 the rest. Table 322.31-1 prescriptive values: windows U-0.35, skylights U-0.60, ceilings R-49 (R-38 if full height over the plates), frame walls R-20 or 13+5 in Zone 1 and R-21 in Zone 2, floors R-30 (Zone 1) or R-38 (Zone 2), basement walls R-15 continuous or R-19 cavity; or total UA compliance, e.g. with REScheck. Gas furnaces and boilers at least 90% AFUE unless the tighter Table 322.31-4 envelope is used.