Insulating Walls Without Tearing Them Open
Most houses built around 1900 have nothing in their exterior walls but air. You can fill them without removing the plaster by blowing dense-packed cellulose into each stud bay, ideally from outside after lifting one siding board at the top of each bay. But walls are the riskiest insulation job in an old house: an uninsulated wall dries by leaking air, so water problems, missing sheathing, and old wiring have to be dealt with first. When it's worth it, how it's done, and when to wait until the siding comes off.
- 4 min
- 6 steps
- 2 questions
- Lesson 69 of 111
In this lesson
- Why walls are tricky
- The method: dense-pack
- How it’s done
- When the siding comes off anyway
- Try it
Picking up where you left off.
Open up an exterior wall in a house from 1905 and you’ll usually find studs, the back of the siding or sheathing, the back of the plaster, and air. Filling those empty bays can make rooms noticeably more comfortable. It’s also the insulation job most likely to cause problems if done carelessly, so it comes after the attic and the basement.
Why walls are tricky
Wood rots when it stays wet. An uninsulated old wall leaks a lot of air, and the National Park Service points out that this, while wasteful, also keeps the wall dry: moisture that gets in is carried away. Fill the cavity and the wall dries more slowly, in ways that are hard to predict 1. So the Park Service lists wall insulation among the measures that require more alteration and careful evaluation, rather than the easy wins 1.
The questions to answer first 1:
- Is the wall dry? Fix roof leaks, bad gutters, failed flashing, and rotted sills before insulating. Moisture problems come first.
- Is there sheathing? Walls with board sheathing between the siding and studs are better candidates. Where siding is nailed straight to the studs, rain that gets past the siding wets the insulation pressed against it.
And from the wiring side: knob-and-tube must not be buried in insulation, so any live knob-and-tube in the walls must be replaced or disconnected first 2.
Quick check
And walls without sheathing are riskier, since rain that gets past the siding can wet the insulation.
The method: dense-pack
The standard way to insulate a closed wall is to blow loose insulation into each stud bay through a hole, packing it tightly enough that it fills every corner and won’t settle. The Park Service calls blown-in insulation the method that does the least damage to historic materials, and dense-packed cellulose the most common material: it insulates well, slows air movement, absorbs and releases moisture, and is cheap 1. Choose the borate-only grade: cellulose treated with ammonium sulfate can react with moisture and corrode metals 1.
How it’s done
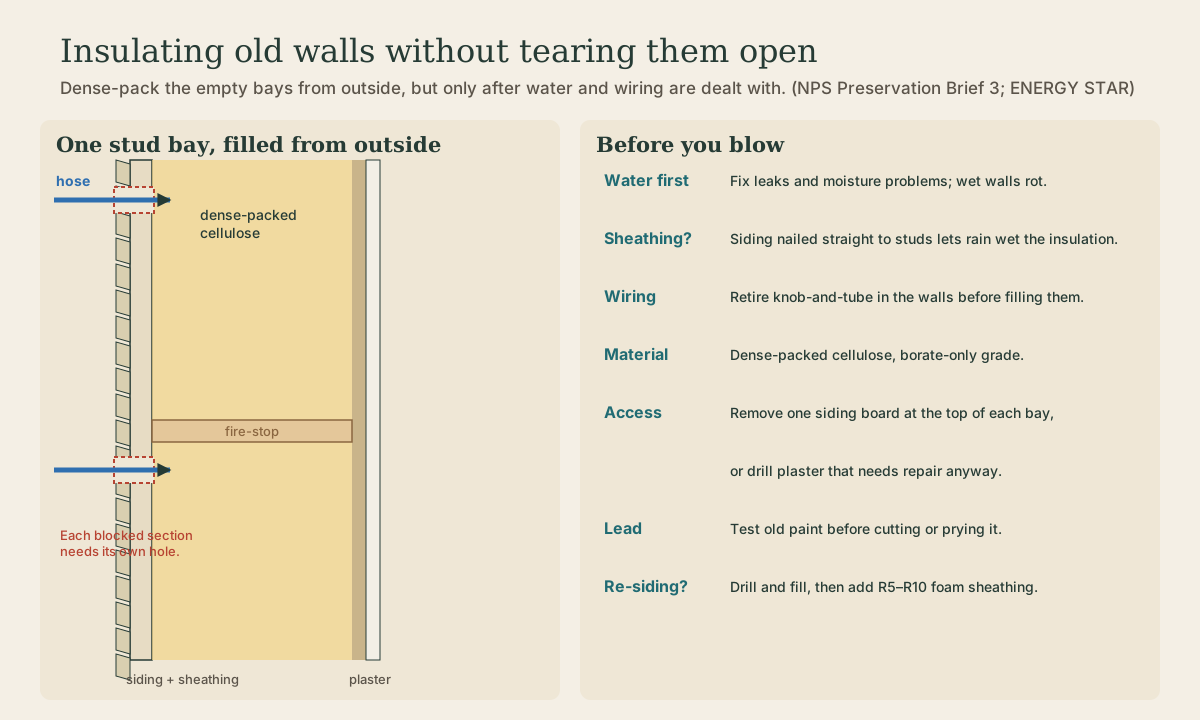
From outside, under the siding. Where the plaster or interior trim is worth preserving, the Park Service recommends working from outside: remove one siding board near the top of each stud bay, drill through the sheathing, blow the bay full, plug the hole, and put the board back. No drill holes show 1.
From inside, through plaster that needs repair anyway, is the other option 1.
Either way, every bay is its own job. Bays are interrupted by windows, braces, and in some balloon frames by fire-stop blocks; each separate section needs its own fill hole, or it stays empty. An infrared camera, the same tool energy auditors use to find missing insulation, can reveal skipped spots afterward 1.
Lead paint. Prying off old siding means disturbing paint that is likely to contain lead in a house this age. Follow lead-safe practices: contain the work area, mist, and clean up with a HEPA vacuum 3. (The Residential Construction course covers lead and asbestos in detail.)
Quick check
The board goes back on and hides the holes.
When the siding comes off anyway
If you’re replacing or stripping the siding, you have the best chance to do the walls right. ENERGY STAR’s advice for an uninsulated wood-frame wall: drill holes in the sheathing and blow insulation into the cavities, then add R5 to R10 of insulating sheathing beneath the new siding in cold climates 4. The foam layer also cuts heat loss through the studs themselves. Think through window and door trim depth before adding thickness to the wall.
Playback is optional. If the player is unavailable, open the video at its source.
Try it
Pick one exterior wall and check it: pull the cover plate off an outlet on that wall (breaker off) and look into the gap beside the box with a flashlight. Insulation, or air? Then check the outside: does the siding sit on boards, or can you see studs behind it at a damaged spot? And are the gutters and roof above that wall sound? Those three answers decide whether that wall is ready.
Lesson complete
Nice work.
Sources for this lesson
- 1Jo Ellen Hensley, Antonio Aguilar. Preservation Brief 3: Improving Energy Efficiency in Historic Buildings. National Park Service, Technical Preservation Services. verifiedStart with an energy audit (independent auditor, BPI standards; blower door and infrared thermography; retest after upgrades). Prioritize measures with most payback and least harm. Replacing windows alone does not bring major savings. Minimal alteration: reduce air leakage, add attic insulation, storm windows, insulate basements and crawlspaces, seal and insulate ducts, weatherstrip doors. More alteration: replace windows, insulate wood-frame and masonry walls. Air leakage can be 5 to 40 percent of space-conditioning costs and is the first priority; stack effect: cold air enters low and warm air exits through the attic, carrying moisture into walls and attics; seal the top and bottom of exterior walls, interfloor bypasses, chases. Don't caulk the underside of clapboards. Tighter buildings may need mechanical ventilation. Attic: high priority; faced batts' vapor retarder toward the heated interior but a vapor retarder isn't necessary in attics; new unfaced batts perpendicular over old; unfinished attics must be ventilated; insulate attic hatches. Storm windows: single-glazed storm brings a single-pane window to about R2. Wood-frame walls: fix moisture first; uninsulated old buildings dry by air leakage, so effects of insulating are hard to predict; walls with sheathing are better candidates than siding nailed straight to studs, where wind-driven rain wets the insulation; dense-packed cellulose or fiberglass blown into cavities does least damage; access from outside by removing individual siding boards at the top of each cavity, or from inside through non-decorative plaster that needs repair; borate-only cellulose recommended because sulfate-treated cellulose can form sulfuric acid and corrode metals. Basements and crawlspaces: decide if inside the thermal envelope; if not, insulate under the floor and air seal band joists; if so, rigid foam on the interior of foundation walls only after drainage is addressed; seal crawlspace vents.
- 2Knob-and-Tube Wiring. International Association of Certified Home Inspectors (InterNACHI). verifiedCommon in North America from about 1880 to the 1940s; obsolete but not inherently dangerous; hazards come from age, improper modifications, and insulation enveloping the wires. No ground wire. No code requires its complete removal; treatment varies by jurisdiction; not allowed in new construction. Insulated copper conductors run through porcelain tubes in drilled framing and are supported on nailed porcelain knobs; loom (flexible cloth or rubber sleeving) where wires enter devices or walls. Higher ampacity than same-gauge cable because hot and neutral are separated, usually 4 to 6 inches, and shed heat to free air; less likely to be nailed through; porcelain lasts almost indefinitely; original installs often superior to Romex. Problems: unsafe modifications, sagging, no ground, deteriorating varnish-and-fiber insulation, not rated for moisture, cracking when bent, amateur splices with modern wire, tape-wrapped splices, oversized fuses installed to stop nuisance blowing. 2008 NEC: not in hollow spaces insulated by loose, rolled, or foamed-in insulation that envelops the conductors; some codes (California) allow it with electrician certification. Many insurers refuse or require evaluation. Advice: have it evaluated by a qualified electrician; avoid overloading; replace brittle or cracked wiring.
- 3Lead-Safe Renovations for DIYers. U.S. Environmental Protection Agency. verifiedHomes built before 1978 may have lead-based paint. The RRP Rule generally doesn't apply to owners working on their own home, but EPA recommends lead-safe practices: find out if lead paint is present (or assume it), contain the work area with plastic sheeting, turn off forced air and cover vents, wear an N-100 respirator, coveralls, and shoe covers, mist before sanding or scraping, use a heat gun under 1,100 °F or chemical strippers, use power tools with HEPA vacuum attachments, clean with a HEPA vacuum and wet methods daily, bag waste, and clean again at the end.
- 4Recommended Home Insulation R-Values. ENERGY STAR (U.S. EPA). verifiedRetrofit levels for existing wood-framed buildings, based on the 2021 IECC. Attic floor, zones 4C, 5, 6, 7, and 8: R60 if uninsulated, R49 to add over 3 to 4 inches of existing insulation. Walls: whenever siding is removed on an uninsulated wood-frame wall, drill holes in the sheathing and blow insulation into the cavity, and in zones 4-8 add R5 to R10 insulative sheathing beneath the new siding; insulated 2x4 walls in zones 4-8 add R10 sheathing. Basement or crawlspace walls, zones 4C and 5-8: R15 insulative sheathing or R19 batt.