Repairing Old Wood Sash
The National Park Service's method for an old double-hung window: judge its condition, free and remove the stop, parting bead, and sash, strip paint lead-safely, reglaze with putty and glazing points, replace the sash cords, and stabilize or splice rotted wood.
- 4 min
- 8 steps
- 2 questions
- Lesson 86 of 111
In this lesson
- Judge the window
- Lead first
- Take out the sash
- Reglaze
- Sash cords
- Rot
- Try it
Picking up where you left off.
The Park Service’s Preservation Brief 9 treats old wood windows as worth repairing, in three classes: routine maintenance, stabilization, and splices or parts replacement 1. Its photographed example was a two-over-two window more than 90 years old with many layers of paint, a broken pane, broken sash cords, and worn weatherstripping, repaired by a staff member in a few hours of work 1.
Judge the window
Check the paint, the frame and sill, the sash (rails, stiles, and muntins), the glazing, and the hardware. Moisture is the main cause of decay; look at the sill, the joint between sill and jamb, the corners of the bottom rail, and the muntin joints, and probe soft spots with an ice pick 1.
Lead first
Paint on 1905 windows almost certainly includes lead, and the window is where it wears to dust. Work lead-safe: assume lead, contain the area with plastic, mist before scraping, wear a respirator, use a heat gun under 1,100°F or a chemical stripper rather than dry sanding, and clean with a HEPA vacuum and wet wipes 2. The 1981 brief’s paint-removal advice predates these rules.
Take out the sash
From the brief 1:
- Run a utility knife along the painted seam between the interior stop and the jamb, and between the parting bead and the jamb.
- Pry the stop off gradually with two putty knives, working up and down a little at a time, starting from the sash side so the scars don’t show.
- Lift out the lower sash. Detach the cords and knot or nail their ends so they don’t fall into the weight pocket.
- Pry out the thinner parting bead the same way and take out the upper sash. Only one side’s stop and bead need to come off.
- Cover the opening with plastic or plywood while the sash are out.
In the brief’s example, removing paint, putty, and glass took about an hour per sash; reglazing both took an hour; weatherstripping, new cords, and reinstalling took an hour and a half. The whole job took several days only because of drying time for putty, primer, and paint 1.
Quick check
About an hour per sash to strip, an hour to reglaze, an hour and a half to weatherstrip, record, and reinstall.
Reglaze
From the brief 1:
- Remove the old putty by hand, pull the glazing points, and lift out the glass. Hardened putty can be softened with a soldering iron. If you use heat on the sash, take the glass out or protect it first.
- Number the panes so each goes back in its own opening. Scrape out the rest of the putty, then sand, patch, and prime the sash. Glazing compound goes only on wood brushed with linseed oil and primed with an oil-based primer.
- Lay a bed of putty or glazing compound around the rabbet, press the glass into it, and set new glazing points.
- Apply the face putty and bevel it.
- Paint once the putty skins over, in 2 to 3 days, lapping the paint slightly onto the glass.
Quick check
Lapping the paint onto the glass seals the joint.
Sash cords
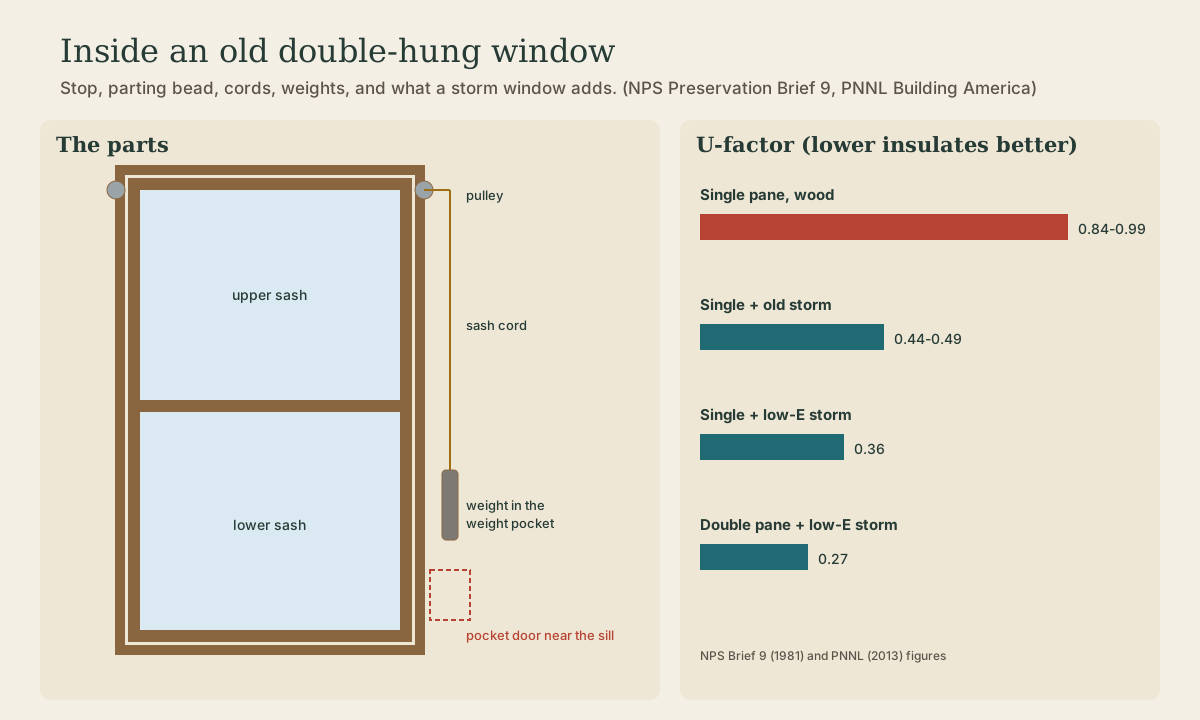
Replace broken cords with new rope or chain. The weight pocket is often reached through a small door in the jamb near the sill; if there isn’t one, take off the interior trim 1.
Rot
- Stabilize: dry the wood, treat decay with a fungicide, waterproof it with two or three coats of boiled linseed oil a day apart, fill with putty, and paint once the putty skins; slope patches so water runs off, and caulk the sill-jamb joint. Or consolidate soft wood with semi-rigid epoxy and fill with epoxy patching compound 1.
- Splice: where a part is too far gone, a carpenter or millwork shop can reproduce the bottom rail, a muntin, or a sill and splice it in 1.
Try it
Pick the worst window in the house and do only the inspection: note paint, putty, cords, and every soft spot you find with an ice pick. If the stiles and rails are sound, it’s a routine-maintenance window, the easiest class.
Lesson complete
Nice work.
Sources for this lesson
- 1John H. Myers. Preservation Brief 9: The Repair of Historic Wooden Windows. National Park Service, Technical Preservation Services. 1981. verifiedEvaluate each window: location, paint, frame and sill, sash (rails, stiles, muntins), glazing, hardware; moisture is the primary cause of decay, found at sills, sill-jamb joints, bottom rail corners, and muntin joints; test wood with an ice pick. Repair classes: I routine maintenance (paint removal, reglazing with a bed of putty, glazing points, beveled putty, sash cords, weatherstripping, paint lapped onto glass), II stabilization (dry, fungicide, boiled linseed oil, putty, or epoxy consolidation; slope patched surfaces), III splices and parts replacement. A staff member restored a 90-year-old two-over-two window in a few hours of work spread over several days of curing. Exterior storms are efficient and reversible. U-values: single-glazed wood 0.88-0.99, with storm 0.44-0.49, double-glazed metal without thermal break about 0.6. Pegged mortise-and-tenon sash come apart easily for repair. (1981 text: its heat-gun and paint-removal advice predates lead-safe rules.)
- 2Lead-Safe Renovations for DIYers. U.S. Environmental Protection Agency. verifiedHomes built before 1978 may have lead-based paint. The RRP Rule generally doesn't apply to owners working on their own home, but EPA recommends lead-safe practices: find out if lead paint is present (or assume it), contain the work area with plastic sheeting, turn off forced air and cover vents, wear an N-100 respirator, coveralls, and shoe covers, mist before sanding or scraping, use a heat gun under 1,100 °F or chemical strippers, use power tools with HEPA vacuum attachments, clean with a HEPA vacuum and wet methods daily, bag waste, and clean again at the end.