Redoing Old Stairs
Old stairs are often worn, painted, carpeted, or patched with mismatched treads, and sometimes steeper than anything built today. How to replace a worn tread the way the original was made (template, rabbet, adhesive, angled nails), what to know before stripping paint or pulling carpet, and the Wisconsin code numbers for risers, treads, headroom, handrails, and guards that make a stair safe, worth meeting wherever you rebuild.
- 4 min
- 5 steps
- 2 questions
- Lesson 75 of 111
In this lesson
- Before you tear into them
- Replacing a tread
- The numbers that make a stair safe
- Try it
Picking up where you left off.
Stairs take more wear than any other woodwork in a house, and old ones show it: dished treads, layers of paint, carpet over plywood patches, wobbly balusters. The good news is that most old stairs can be rebuilt a piece at a time, using the same joinery the original builder used.
Before you tear into them
- Carpet. Under carpet you’ll find tack strips and hundreds of staples; pull them all before working on the treads 1. What’s under it may be original hardwood worth refinishing, or a patchwork that’s better replaced.
- Paint. Painted stairs in an old house very likely have lead paint, and stairs are friction surfaces, so sanding them makes a lot of dust. Assume lead, contain the area, mist, and use a HEPA vacuum 2.
- Keep the stair usable. Treads come out one at a time; block off the top so no one walks onto a missing step 1.
Replacing a tread
This Old House’s Tom Silva replaces worn treads this way 3:
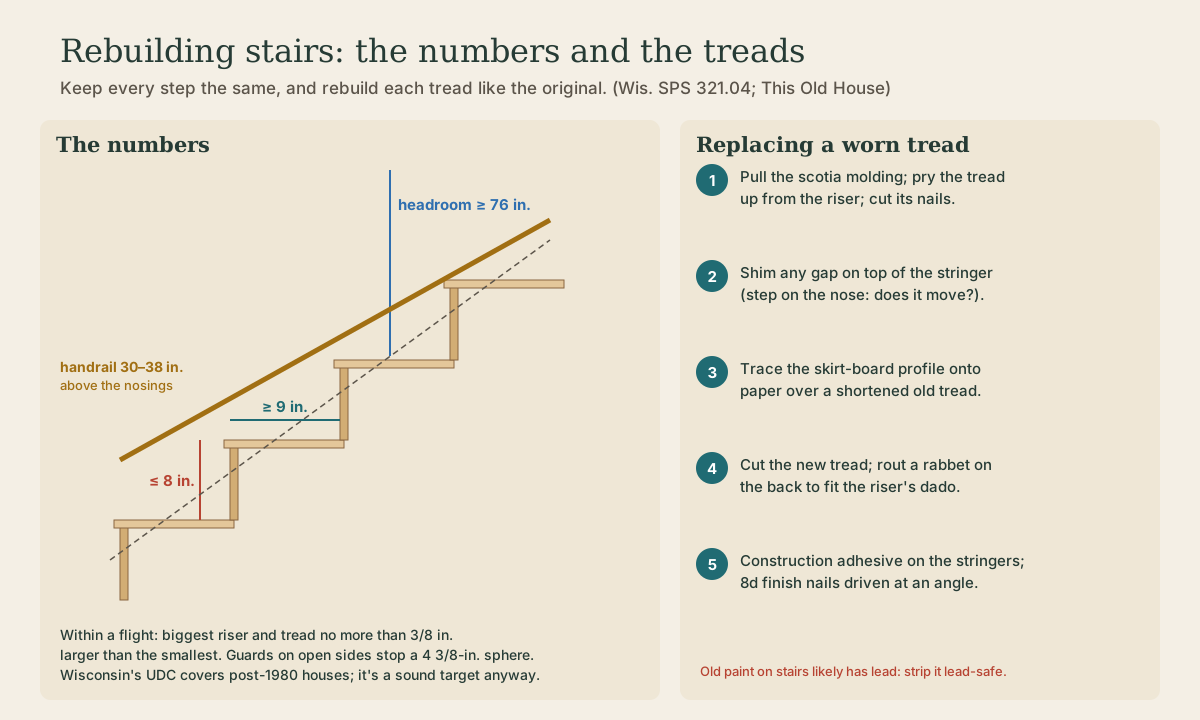
- Remove the old tread. Pry off the scotia molding under the nose. Gently pry the tread away from the riser, cut its nails into the stringer with a metal-cutting blade in a reciprocating saw, and lift it out without damaging the skirt board along the wall.
- Fix the risers. Step hard on the nose of each tread; if it moves up and down, there’s a gap on top of the stringer. Glue and shim it before going on.
- Make a template. Stair openings are rarely square, so measure with a template, not a tape. Cut an old tread slightly short, set it in place, lay paper over it tight to the riser, and trace the skirt-board profile at each end with a combination square.
- Cut the new tread. Transfer the profile and cut. On the back edge, rout a rabbet to fit the groove (dado) in the riser above. That joint is there for a reason: wood shrinks across its width, and the tongue keeps a gap from opening where dirt would fall through.
- Install. Run construction adhesive along the stringers, slide the tread in with the rabbet engaged, tap it home with a mallet, and nail it. Silva drives 2-1/2-inch 8d finish nails at an angle into the stringers: “Driving nails at an angle really locks down the tread.”
Then reinstall the scotia molding and finish to match.
Quick check
Copy that joint when you make a replacement tread.
The numbers that make a stair safe
Old stairs are often steep, narrow, or uneven. Wisconsin’s Uniform Dwelling Code applies to houses built after 1980 4, so it doesn’t require you to rebuild an old stair, but its numbers describe a safe stair, and they’re the target whenever you rebuild one 5:
| Wisconsin UDC | |
|---|---|
| Riser height | 8 inches maximum |
| Tread depth | 9 inches minimum, nosing to nosing |
| Uniformity | tallest and shortest riser (and deepest and shallowest tread) in a flight within 3/8 inch |
| Headroom | 76 inches minimum above the line of the nosings |
| Width | 36 inches minimum |
| Handrail | on any flight of more than 3 risers, 30 to 38 inches above the nosings |
| Guards | on open sides; openings that won’t pass a 4-3/8-inch sphere |
The most important number for safety is uniformity: people stumble on the one step that’s different. If you add a thicker tread or new flooring at the top or bottom of the stairs, check that you haven’t made the first or last riser taller or shorter than the rest; the code measures those to the finished floor 5.
Handrails and guards matter just as much. A sturdy handrail the full length of the flight, and balusters close enough together to stop a small child, are worth adding to any old stair 5.
Playback is optional. If the player is unavailable, open the video at its source.
Quick check
Uneven steps trip people; keep every rise and run the same when you rebuild.
Try it
Measure every riser and tread on your main staircase and write them down. How much do the tallest and shortest risers differ? Is there a handrail the full length, and could a 4-inch ball pass between the balusters? That list tells you whether your stairs need refinishing or rebuilding.
Lesson complete
Nice work.
Sources for this lesson
- 1How to Repair Squeaky Stairs. Family Handyman. 2024. verifiedExposed stairs: tap glued shims into voids between treads and stringers, and screw stringers to studs. Finished undersides: fix from the top, ideally when replacing carpet: pry off treads, remove nails and carpet staples, screw outside stringers to studs with 4-1/2-inch screws, apply subfloor adhesive on riser tops, stringers, and tread backs, drive three 2-1/2-inch screws through each tread into each stringer and a 2-inch screw through the riser into the back of the tread. Through carpet: a kit with a depth-control jig and scored snap-off screws.
- 2Lead-Safe Renovations for DIYers. U.S. Environmental Protection Agency. verifiedHomes built before 1978 may have lead-based paint. The RRP Rule generally doesn't apply to owners working on their own home, but EPA recommends lead-safe practices: find out if lead paint is present (or assume it), contain the work area with plastic sheeting, turn off forced air and cover vents, wear an N-100 respirator, coveralls, and shoe covers, mist before sanding or scraping, use a heat gun under 1,100 °F or chemical strippers, use power tools with HEPA vacuum attachments, clean with a HEPA vacuum and wet methods daily, bag waste, and clean again at the end.
- 3How to Update Oak Treads and Risers. This Old House. verifiedParts: treads, risers, stringers, skirt boards. Remove old treads: pry off scotia molding, pry the tread from the riser, cut nails to the stringer with a metal-cutting reciprocating saw blade, remove carefully to spare the skirt board. Old treads have a rabbet on the back edge that fits a dado in the riser, so seasonal movement doesn't open a gap. Check risers: step hard on each nose; movement means a gap on top of the stringer to shim and glue. Template: cut an old tread slightly short, lay paper over it against the riser, and trace the skirt-board profile with a combination square; transfer, cut, and rout the rabbet. Install: construction adhesive on the stringers, slide the tread in, adjust with a mallet, finish-nail; Tom Silva drives 2-1/2-inch 8d finish nails at an angle into the stringer.
- 4Wis. Admin. Code ch. SPS 320, Uniform Dwelling Code: Administration and Enforcement. Wisconsin Department of Safety and Professional Services. verifiedThe UDC (chs. SPS 320-325) covers one- and two-family dwellings begun on or after June 1, 1980 (energy rules, SPS 322, from Dec. 1, 1978), including additions and alterations to them and barns or garages converted to homes; it doesn't cover older houses (unless a municipality adopts it), detached garages and accessory buildings, farm buildings, primitive rural hunting cabins, or repairs. A Wisconsin uniform building permit is required before any on-site construction, including excavation; applicants who aren't the owner living in the house need dwelling contractor certification; 2 sets of plans (site plan with erosion control, floor plans with wall bracing, elevations) plus energy data; plans need not be stamped by an architect or engineer; the permit expires in 24 months if the exterior isn't completed. Inspections: erosion control, foundation excavation (after forms and reinforcement, before concrete), reinforcement, foundation (before backfill), rough (basement floor, framing, electrical, plumbing, HVAC), insulation and vapor retarder, and final; work may proceed if an inspection hasn't happened by the end of the second business day after notice; occupancy needs a final inspection with no critical violations, or local rules apply after 5 business days.
- 5Wis. Admin. Code SPS 321.04, Stairways and elevated areas (Uniform Dwelling Code). Wisconsin Department of Safety and Professional Services. 2024. verifiedRegister November 2024. Stairways at least 36 inches wide (handrails may project 4.5 inches). Risers no more than 8 inches; rectangular treads at least 9 inches nosing to nosing; winder rules. Headroom at least 76 inches measured from a line parallel to the nosings. Uniformity: within a flight the greatest tread depth and riser height may not exceed the smallest by more than 3/8 inch. Open risers may not allow a 4-inch sphere through. Flights of more than 3 risers need at least one handrail for the full length; guards on open sides of stairs with more than 3 risers and of areas more than 24 inches above the floor or grade. Guards stop a 4-3/8-inch sphere (6 inches in the triangle under the bottom rail). Handrails 30 to 38 inches above the nosings; handrails and guards resist 200 pounds.