Patching Plaster and Lath
Old plaster looks worse than it is. Three-coat plaster on wood lath is harder and stronger than drywall, and most cracks, holes, and even sagging ceilings can be repaired in place. How plaster holds on (keys behind the lath), how to read a crack, the right fix for hairline cracks, recurring cracks, holes, and loose ceilings, and which materials a homeowner can use, following the National Park Service's guide to historic plaster.
- 5 min
- 7 steps
- 3 questions
- Lesson 71 of 111
In this lesson
- How plaster holds
- Reading cracks
- Fixing cracks
- Patching holes
- Loose ceilings
- Try it
Picking up where you left off.
Plaster was the wall surface in nearly all buildings until the 1930s or ’40s, and the National Park Service makes a strong case for keeping it: three-coat plaster is unmatched in strength, replacing it is expensive, and it’s often much less damaged than it first appears 1. Before you tear out a wall, learn to repair it.
How plaster holds
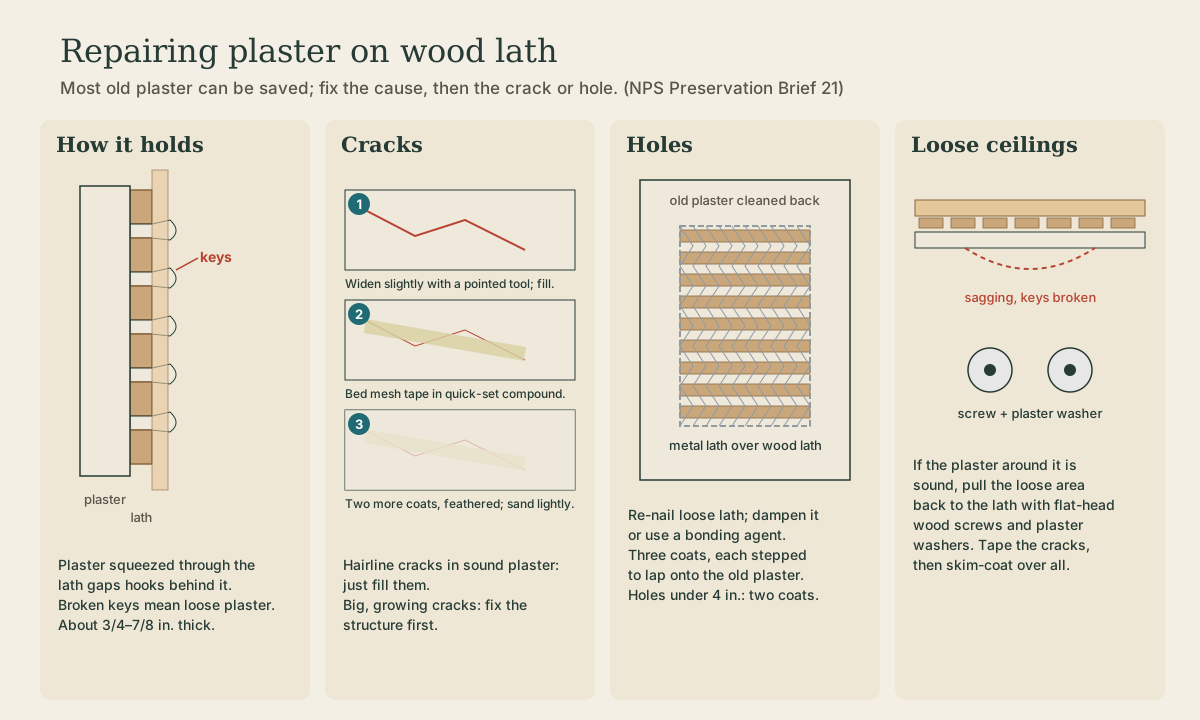
In a house from around 1900, the plaster was usually applied in three coats over wood lath, narrow wooden strips nailed across the studs with small gaps between them. The first coat was pushed hard enough that it squeezed through the gaps and slumped down behind the lath, forming keys that lock the plaster on 1. Two thick base coats (the scratch and brown coats, about 3/8 inch each) and a thin finish coat make a wall about 3/4 to 7/8 inch thick on wood lath 1.
Early plaster was lime (with sand and animal hair); by the early 1900s plasterers were switching to gypsum, which sets in minutes rather than months but stands up to water less well 1. Once cured, you usually can’t tell them apart 1.
Before sanding or chipping, remember that the paint on old plaster probably contains lead. Mist the surface, contain the dust, and clean up with a HEPA vacuum 2.
Quick check
When the keys break, the plaster comes loose, which is why ceilings sag.
Reading cracks
The pattern tells you the cause 1:
- Diagonal cracks running from the corners of doors and windows: structural stress or settling.
- Horizontal cracks along lath lines: wood lath swelling and shrinking with humidity, or loosened lath nails.
- Fine networks of cracks in the finish coat: a problem with how the plaster was originally applied.
- Bubbling, crumbling, or efflorescence: moisture. Find and stop the water before any repair.
Quick check
The tape bridges the movement; a crack that keeps growing means a structural problem to solve first.
Fixing cracks
- Hairline cracks in otherwise sound plaster aren’t serious; just fill them with patching material 1.
- Cracks that reopen with the seasons: widen the crack slightly with a pointed tool, fill it, and bridge it with fiberglass mesh tape pressed into quick-setting joint compound. When that dries, add a second coat to cover the tape, feathered at the edges, then a third coat to level it, sanded lightly 1.
- Big structural cracks: fix the structure first. Then the plaster is cut back about 6 inches on each side down to the lath, metal lath is applied, and the gap is replastered. If a crack is growing, call a structural engineer 1.
Patching holes
Small holes, under about 4 inches, that go through the finish and brown coats get two layers: a base coat scraped back below the surface, then, once it has set, a finish layer flush with the wall. One-coat patches tend to dry concave and show through paint 1.
Larger holes down to the lath 1:
- Clean out all loose plaster and re-nail any loose lath.
- Mist the old lath so it doesn’t twist when wet plaster hits it, or better, brush on a bonding agent.
- Fasten expanded metal lath (diamond mesh) over the wood lath with tie wire or lath nails, for stronger keys.
- Apply three coats, stepping each one to lap onto the old plaster around the hole, and follow any waviness in the wall so the patch doesn’t look flat.
For homeowners, the Park Service suggests all-purpose joint compound for fine cracks, quick-setting compound to bed tape and fill larger holes (it shrinks less but is hard to sand), and ready-mixed perlited base-coat plaster for the base coats 1.
Loose ceilings
Cracks are cosmetic; a sagging ceiling isn’t. It means the keys have broken, and gravity will eventually bring chunks down 1. If the plaster around the loose area is sound, it can be pulled back up to the lath with flat-head wood screws and plaster washers, thin perforated discs that spread the screw’s grip. Then the cracks are taped and the washers skim-coated over 1. Where you can reach the back of the lath from the attic, bowed plaster can be pushed back with a padded brace and re-keyed with plaster or adhesive 1. A ceiling too far gone can be furred, relathed, and replastered right over the old one 1.
Playback is optional. If the player is unavailable, open the video at its source.
Quick check
Loose ceilings shouldn’t be ignored: gravity eventually brings chunks down.
Try it
Walk through the house with a flashlight held flat against the walls and ceilings; low-angle light shows cracks and bulges. Press gently on any bulge: if it moves or crunches, the keys are broken there. Make a list: hairline cracks, moving cracks, holes, and loose spots. Most of it is weekend work.
Lesson complete
Nice work.
Sources for this lesson
- 1Marylee MacDonald. Preservation Brief 21: Repairing Historic Flat Plaster, Walls and Ceilings. National Park Service, Technical Preservation Services. verifiedPlaster was the wall surface for nearly all buildings until the 1930s or 1940s; three-coat plaster is unmatched in strength; it is often less damaged than it looks. Lime plaster (lime, sand, animal hair) until the end of the 19th century; gypsum from then on, sets fast, more vulnerable to water. Three coats: scratch and brown coats (about 3/8 inch each) and a thin finish coat; total thickness on wood lath about 3/4 to 7/8 inch. Wood lath holds plaster by keys formed where plaster slumps through the gaps; metal lath gives more keys and is most reliable for repairs. Causes of failure: structural overloading (diagonal cracks from door and window corners), settlement, lath movement (horizontal cracks), poor mixes, moisture. Hairline cracks in sound plaster: fill; cracks that reopen: widen slightly, fill, bridge with fiberglass mesh tape in quick-setting joint compound, two more coats feathered, sand; structural cracks: fix the structure, cut back about 6 inches each side, add metal lath, replaster in three layers; consult an engineer if a crack is growing. Delaminated finish coat: bonding agent and new finish. Holes under 4 inches: two applications, base coat then finish; larger holes: clean out, re-nail loose lath, mist or use a bonding agent, attach expanded metal lath over the wood lath, three stepped coats lapping onto the old. Loose ceiling plaster with sound surroundings: reattach with flat-head wood screws and plaster washers, tape cracks, skim coat. Bowed areas reachable from behind can be pushed back and rekeyed; a sagging ceiling can be relathed and replastered over. Homeowner materials: all-purpose joint compound for fine cracks, quick-setting compound to bed tape or fill large holes (harder to sand), ready-mix perlited base-coat plaster.
- 2Lead-Safe Renovations for DIYers. U.S. Environmental Protection Agency. verifiedHomes built before 1978 may have lead-based paint. The RRP Rule generally doesn't apply to owners working on their own home, but EPA recommends lead-safe practices: find out if lead paint is present (or assume it), contain the work area with plastic sheeting, turn off forced air and cover vents, wear an N-100 respirator, coveralls, and shoe covers, mist before sanding or scraping, use a heat gun under 1,100 °F or chemical strippers, use power tools with HEPA vacuum attachments, clean with a HEPA vacuum and wet methods daily, bag waste, and clean again at the end.