Patching Siding Where a Vent Came Out
When you remove an old dryer vent, exhaust fan, or pipe from an exterior wall, you're left with a hole through every layer of the wall: siding, building paper, and sheathing. A good patch rebuilds them in order. Fix the sheathing with cleats and a matching patch, lap the paper shingle-style, then cut back the siding to studs with staggered joints, slip in new boards primed on all sides, and nail them so they can move. How to cut clapboards in place without cracking their neighbors.
- 5 min
- 8 steps
- 3 questions
- Lesson 73 of 111
In this lesson
- Look before you patch
- Patch the sheathing
- Patch the paper
- How clapboards work
- Cut back the siding
- New boards
- Try it
Picking up where you left off.
Pulling an old dryer vent or exhaust duct out of an exterior wall leaves a round hole through every layer of the wall. A tube of caulk and a plastic cover will hide it, but a real patch that disappears and keeps water out means rebuilding each layer, in order, from the inside out.
Look before you patch
Take the vent hood off and pull the duct. Then look at what’s around the hole. Thump the sheathing: if it’s soft or water-stained, cut out and patch those areas before going further 1. The paint on old siding very likely contains lead, so work lead-safe: plastic on the ground, mist before scraping, and clean up carefully 2.
Patch the sheathing
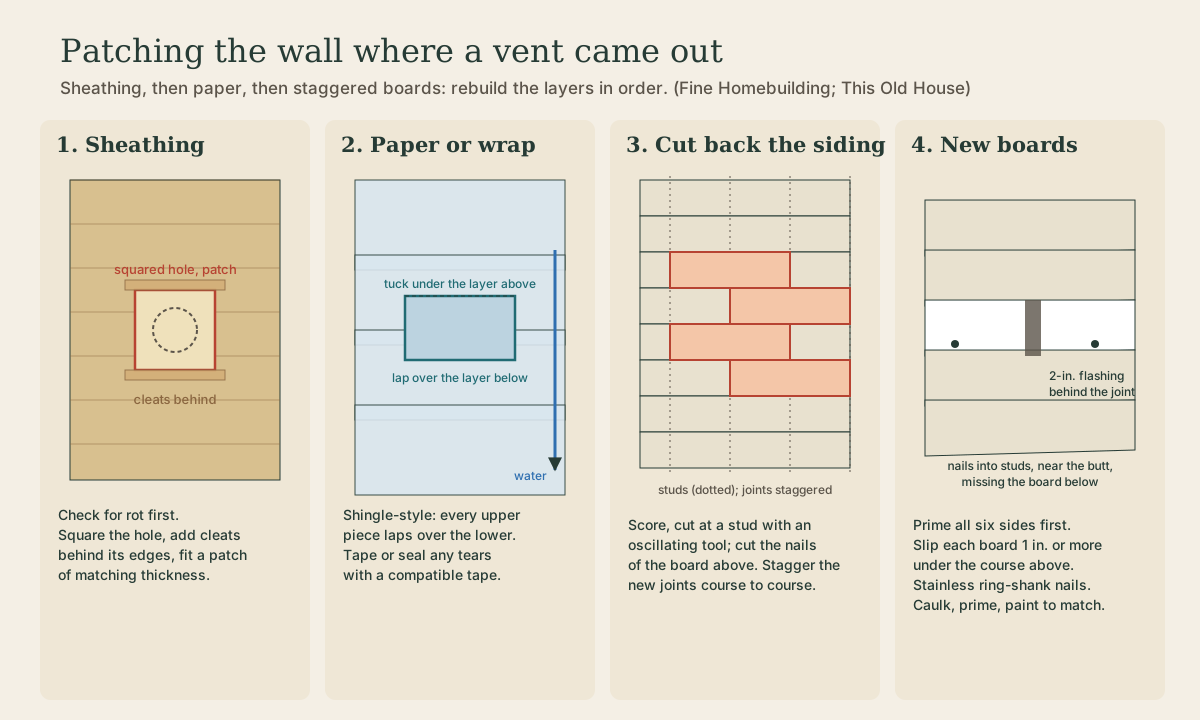
Square up the round hole in the sheathing into a neat rectangle, fasten wooden cleats or blocking behind its edges so a patch has something to nail to, and cut a patch of the same thickness. In an old house the sheathing is often boards, so a piece of board or plywood of matching thickness works.
Patch the paper
Behind the siding is a water-resistive barrier: building paper or felt in an old house, housewrap in a newer one. Patch it shingle-style: the new piece tucks under the layer above it and laps over the layer below, so water running down the wall always flows onto the outside of the next piece down. Seal any cuts or tears with a sealant or tape approved for that barrier 3.
Quick check
Water runs down the wall; every piece must shed onto the one below it.
How clapboards work
Before cutting siding, understand how it’s fastened. Clapboards are nailed near their bottom edge into the studs, and each board above laps the one below by about 3/4 inch. Ideally the nails just miss the top of the board below, so each board is held along only one edge and can swell and shrink without splitting. In practice, most old siding is nailed through both boards 3, which matters when you go to remove a piece.
Clapboards split easily. This Old House’s Tom Silva advises patience and hand tools, since the vibration of power tools can crack the surrounding boards and turn a small patch into a big one 1. Fine Homebuilding’s Andy Engel uses an oscillating multitool with care 3. Either way, go slowly.
Quick check
Nailing both edges of a board can crack it as it shrinks.
Cut back the siding
Don’t patch with one short piece over the hole; that leaves a column of joints that shows. Instead, remove sections of each course the hole touches, cutting each one at a stud, and stagger the joints so they fall on different studs from course to course.
To remove a section 3:
- Mark a square line at a stud, and score it with a knife to prevent splintering.
- Cut along the line up to the bottom of the board above.
- Punch the visible nails in the section through with a nail set.
- Slip a metal-cutting blade between the boards and cut the nails holding the board above.
- Pry the upper board out slightly, finish the cut with a knife, and slide the piece out.
- Trim any nail stubs flush with the sheathing.
This Old House’s alternative is to score the damaged board lengthwise about halfway up and pry off the lower half first, leaving the upper half in place as a guide until last 1. Pull every old nail before installing new boards; leftover nails split new clapboards 1.
New boards
- Match the old siding: butt thickness, exposure (add an inch for the overlap), texture, and wood species 1.
- Prime all six sides before installing, with oil-based primer if the siding is painted 3 4.
- Flash each new end joint: slip a strip of flashing about 2 inches wide, a little longer than the board is tall, behind the joint, lapped onto the board below 3.
- Slip each board in at least an inch under the course above and align its butt with its neighbors 1.
- Nail with stainless-steel ring-shank siding nails, which won’t rust or streak the paint; 7d or 8d into the studs. Keep nails about 3/4 inch up from the butt and at least 1-1/2 inches from an end joint 1, just high enough to miss the board below 3.
- Caulk the ends with paintable caulk 4, renail the board above, and paint to match.
Playback is optional. If the player is unavailable, open the video at its source.
Quick check
It sheds any water that gets into the joint back out over the course below.
Try it
Before the real job, practice on the back of the house or a garage: remove and replace one short section of a clapboard at a stud, using the nail-cutting trick. Once you can do one without cracking the board above, the vent patch is just four of them, staggered.
Lesson complete
Nice work.
Sources for this lesson
- 1How to Patch Wood Siding. This Old House. verifiedTom Silva: patience; use hand tools, since vibration can crack surrounding clapboards. Score the damaged board lengthwise about halfway up from the butt with a utility knife without cutting the felt beneath; pry the lower half off with a small bar next to the nails; leave the upper part as a guide; remove all old nails and debris; thump the sheathing and patch soft or water-damaged areas. Match butt thickness, exposure (add an inch for the lap), texture, grade (Silva prefers clear quartersawn), species. Nails: stainless ring-shank (galvanized second best); 7d or 8d into studs, or 5d into sheathing at least 5/8 inch thick. Push the new board at least an inch under the course above; align butts; nails about 3/4 inch up from the butt, aligned with others, at least 1-1/2 inch from end joints.
- 2Lead-Safe Renovations for DIYers. U.S. Environmental Protection Agency. verifiedHomes built before 1978 may have lead-based paint. The RRP Rule generally doesn't apply to owners working on their own home, but EPA recommends lead-safe practices: find out if lead paint is present (or assume it), contain the work area with plastic sheeting, turn off forced air and cover vents, wear an N-100 respirator, coveralls, and shoe covers, mist before sanding or scraping, use a heat gun under 1,100 °F or chemical strippers, use power tools with HEPA vacuum attachments, clean with a HEPA vacuum and wet methods daily, bag waste, and clean again at the end.
- 3Andy Engel. Replacing a Damaged Clapboard. Fine Homebuilding (Issue 304). 2021. verifiedDec 2021/Jan 2022. Clapboards are nailed near the bottom, into studs, with the board above lapping about 3/4 inch; nails should just miss the top of the board below so each board can move, though most old installations are nailed through both. To replace a section: mark a square line at a stud beyond the defect, score it, cut with an oscillating multitool up to the board above; punch the visible nails through; cut the nails of the board above with a metal-cutting blade slipped between the boards; finish the cut with a knife and slide the piece out; trim nails flush. Seal any cuts in the water-resistive barrier with compatible sealant or tape. Slip a 2-inch-wide strip of flashing, a bit longer than the board is wide, under the end of the remaining board at the joint. Prime all six sides of painted siding with oil-based primer (stain all sides if stained). Nail the new board, missing the top of the board below; renail the upper board; touch up.
- 4How to Repair Clapboards. This Old House. verifiedReplace loose nails with ring-shank nails at a slight downward angle, beside oversized old holes. Replace split or rotted boards; caulk the ends with paintable silicone caulk; for painted siding use boards primed on all sides (Tom Silva). Painter Rich D'Amato prefers oil-based primer on exterior wood repairs. Prevention: clean gutters, keep paint up, trim shrubs, fix roof and foundation issues, recaulk around windows and doors, repaint every five to seven years.