Siding
The outside skin goes on last, over the drainage plane: a permanent weather-resistant finish over housewrap and flashing. Vinyl hangs on its nails (center of the slot, a dime's clearance, 16 inches apart, 1/4-inch gaps at trim, 3/8 below 40 °F, never face-nailed), wood and fiber cement are nailed through, and anything that touches concrete or soil stays 6 inches above grade (2 above paving) unless it's decay-resistant. Flashing first: window heads, trim, decks, and kickouts.
- 4 min
- 6 steps
- 3 questions
- Lesson 18 of 111
In this lesson
- Siding is the first line, not the last
- Flash first
- Keep it off the ground
- Vinyl
- Wood and fiber cement
- What to take from this
Picking up where you left off.
Siding is the first line, not the last
The UDC requires exterior walls to have a permanent weather-resistant finish 1: wood clapboard or shingles, fiber cement, vinyl, engineered wood, brick or stone veneer, or stucco. But siding is the first line of defense, not a waterproof skin. Behind it, the housewrap and flashing from the first lesson form the drainage plane that catches the water siding lets through 1.

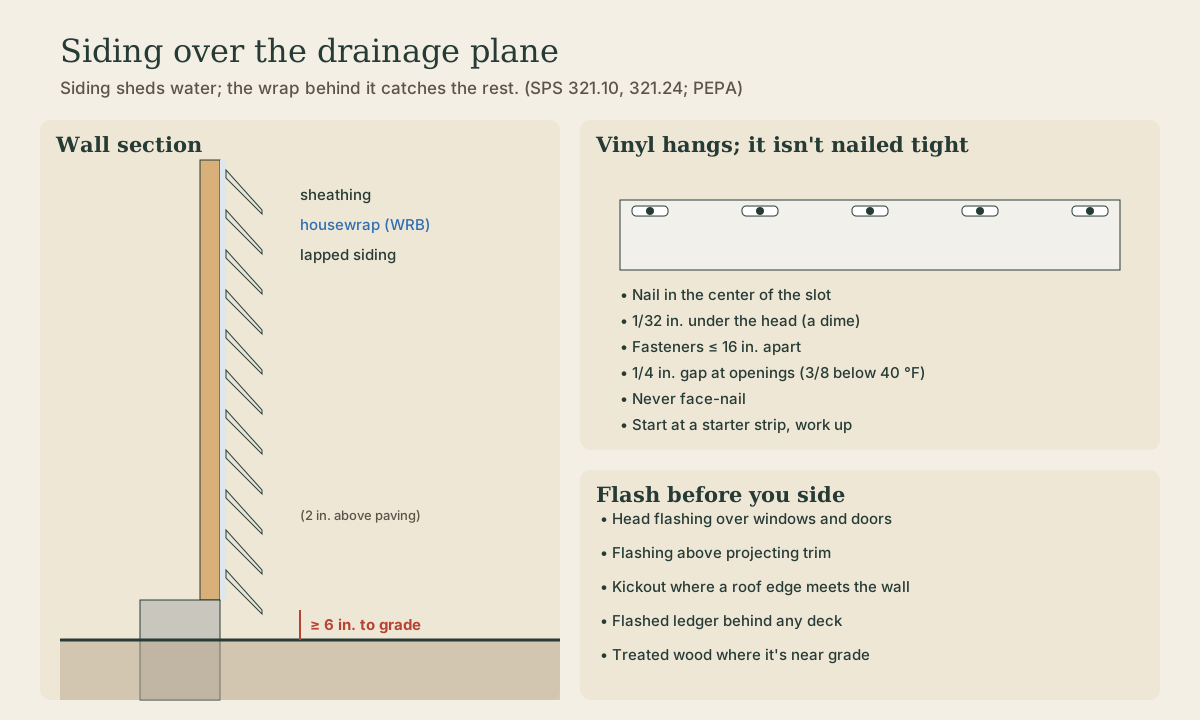
So the order on any wall is: sheathing, housewrap lapped upper over lower, flashing at every opening and intersection, and then siding.
Flash first
Before the first course of siding, the flashing has to be in 1:
- Head flashing over every window and door.
- Continuous flashing above projecting trim.
- A flashed ledger wherever a deck, porch, or stair attaches.
- Kickout flashing where a roof edge dies into a wall, turning water into the gutter instead of down the siding.
- Flashing where chimneys and masonry meet the wall.
Keep it off the ground
Siding and sheathing in contact with concrete, masonry, or soil must be at least 6 inches above final grade, or at least 2 inches above a paved surface, unless it’s pressure-treated or naturally decay-resistant 1. Rain splashing off the ground and wet soil against the wall rot untreated wood quickly, and termites and carpenter ants follow.
Quick check
Splashback and wet soil rot untreated wood fast.
Vinyl
Vinyl siding moves: it expands and shrinks noticeably between a January night and an August afternoon. It’s designed to hang on its nails, not be clamped by them. The industry association’s rules 2:
- Start with a starter strip at the bottom and work up, locking each panel into the one below without forcing it up.
- Drive fasteners in the center of the nailing slot, leaving about 1/32 inch (a dime’s thickness) under the head. The panel should slide side to side after it’s nailed.
- Space fasteners no more than 16 inches apart.
- Leave at least 1/4 inch at openings, corners, and trim channels, 3/8 inch when it’s below 40 °F.
- Never face-nail through a panel, except the last piece at the top of a gable.
- Check level every few courses.
Nailed tight or face-nailed, vinyl buckles in the first hot spell.
Quick check
Vinyl expands and contracts a lot with temperature; nailed tight, it buckles.
Quick check
At 40 °F and above, 1/4 inch minimum.
Wood and fiber cement
Wood clapboard (bevel siding) laps each board over the one below, nailed through into the studs 3. Fiber cement lap siding installs similarly, following the manufacturer’s nailing and clearance rules, with gaps at trim caulked or flashed. Both hold paint well and don’t expand like vinyl, but wood needs repainting every several years.
Many builders put a rainscreen gap behind the siding, thin furring strips or a dimpled wrap, so water drains and the back of the siding dries.
Playback is optional. If the player is unavailable, open the video at its source.
What to take from this
Siding goes on last, over a lapped housewrap and complete flashing: window and door heads, trim, deck ledgers, and roof-wall kickouts. Keep siding and sheathing 6 inches above soil (2 above paving) unless decay-resistant. Hang vinyl loosely: center of the slot, a dime’s clearance, 16 inches apart, 1/4-inch gaps (3/8 below 40 °F), no face nails. Lap and nail wood and fiber cement per the manufacturer, and consider a rainscreen gap.
Lesson complete
Nice work.
Sources for this lesson
- 1Wis. Admin. Code ch. SPS 321, Uniform Dwelling Code: Construction Standards. Wisconsin Department of Safety and Professional Services. verifiedDesign loads (SPS 321.02): complete load path to the foundation; live loads 40 psf floors, 50 garage floors, 40 decks and porches, 20 ceilings with storage, 5 without; roof snow loads from the zone map, Zone 1 (north) 40 psf and Zone 2 (south) 30 psf; wind 20 psf horizontal and uplift or ASCE 7-05; span tables in SPS 325 Appendix A. Frost (321.16): footings and foundations, including stoops and landings, below frost penetration or at least 48 inches below grade, whichever is deeper, never on frozen material; exceptions for ASCE 32 frost-protected shallow foundations, areaways, and clean bedrock. Exits (321.03): two first-floor exit doors separated by the greater of 20 feet or a third of the floor's longest diagonal; egress windows at least 20 by 24 inches net clear opening, sill no more than 60 inches above the floor (a platform if over 46); basement sleeping rooms need a second exit. Ceilings at least 7 feet (321.06). Smoke alarms (321.09) in each sleeping room, outside sleeping areas within 21 feet, and on every level, hardwired and interconnected with battery backup.
- 2Vinyl Siding Installation Tips & Tricks. Polymeric Exterior Products Association (formerly Vinyl Siding Institute). verifiedFasten in the center of the nailing slot leaving about 1/32 inch (a dime's thickness) under the head so panels can move; space fasteners no more than 16 inches on horizontal panels; leave at least 1/4 inch clearance at openings and stops, 3/8 inch when installing below 40 °F; start with a starter strip and work up, locking each panel without forcing it; never face-nail except the last piece at a gable top; check level every few courses.
- 3L. O. Anderson, O. C. Heyer. Wood-Frame House Construction (Agriculture Handbook No. 73). USDA Forest Service, Forest Products Laboratory. 1955. verifiedPublic domain handbook. Platform construction: the subfloor extends to the outside edges and walls are framed flat on it, raised, plumbed, braced, then capped with a second top plate lapping at corners; balloon framing runs studs from sill to rafter plate. Studs commonly 2x4 at 16 inches on center; framing lumber at no more than 19 percent moisture. Wood basement posts at least 6x6 on a pedestal; girders carry the inner ends of joists; joists usually 2-inch nominal, 6 to 12 inches deep, 16 inches on center, crown up, doubled under bearing partitions, lapped at girders; openings framed with doubled headers and trimmers; cross-bridging at midspan, no more than 8 feet apart; subfloor of boards or plywood; headers of two 2-inch members on edge over openings; diagonal or K bracing at corners; rafters erected in pairs after ceiling joists are fastened.