Drywall
Hanging and finishing gypsum board: sheets at right angles or parallel to framing with every parallel edge landing on a stud or joist, ceilings perpendicular to the joists (1/2-inch at 16 inches on center, 5/8-inch or sag-resistant 1/2-inch at 24 inches under textured finishes), screws about 12 inches apart on ceilings and 16 on walls set just below the paper, the three-coat taping sequence, keeping regular board out of water, and Wisconsin's fire separation between an attached garage and the house.
- 5 min
- 6 steps
- 3 questions
- Lesson 21 of 111
In this lesson
- The board
- Layout
- Fasten it
- Tape and finish
- The garage wall
- What to take from this
Picking up where you left off.
The board
Gypsum board is a sheet of gypsum plaster faced with paper. Sheets are 4 feet wide, in lengths up to 12 feet or more, with the long edges slightly recessed so tape and joint compound can fill them flush 1. Half-inch board is the usual wall material because it resists sagging between framing better than thinner board 1; 5/8-inch goes on ceilings with wide framing and wherever fire resistance is required.
Hanging drywall is where a house’s framing either rewards or punishes you. Studs and joists that are out of line show up as wavy walls, so straighten crowned studs and add a strongback across ceiling joists in an unfinished attic before hanging anything 1.
Layout
The International Residential Code’s rules are the practical standard (Wisconsin’s UDC doesn’t spell out general drywall fastening):
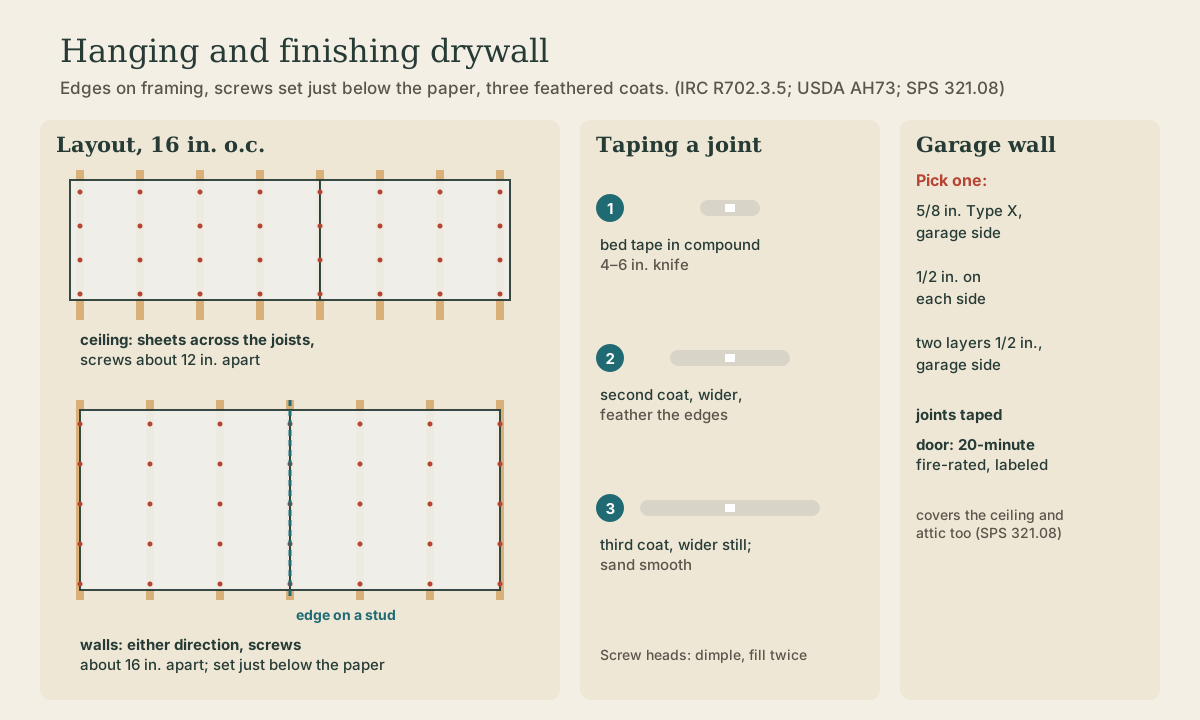
- Sheets go at right angles or parallel to the framing 2.
- Every edge and end that runs parallel to the framing lands on a stud or joist; only edges perpendicular to the framing may fall between members 2.
- Ceilings: run sheets perpendicular to the joists. Under a water-based texture, use at least 1/2-inch board at 16 inches on center and 5/8-inch (or 1/2-inch sag-resistant ceiling board) at 24 inches 2.
- Walls: either direction. Horizontal sheets mean fewer vertical joints, so use full lengths where you can and put unavoidable butt joints over doors and windows 1.
- Not where it gets wet: regular gypsum board isn’t installed where it’s directly exposed to weather or water 2. Tub and shower walls get cement board or a manufacturer’s waterproof system.
Hang the ceiling first, then the walls, with the top wall sheet pushed up tight to support the ceiling’s edges.
Quick check
Ends and edges perpendicular to the framing can fall between members.
Fasten it
Screws have replaced the nails the 1955 handbook describes. Typical spacing for 1/2-inch board is about 12 inches apart on ceilings and 16 inches on walls at 16-inch framing 2. Drive each one so its head sits just below the surface, leaving a shallow dimple without breaking the paper 1. A screw that tears through the paper isn’t holding anything; put another one beside it. A drywall screw gun with a depth clutch makes this automatic.
Quick check
Torn paper means the screw isn’t holding; fill dimples twice.
Tape and finish
The handbook’s taping sequence is still the method 1:
- With a 4- to 6-inch knife, fill the recessed joint with compound and press the paper tape into it until compound squeezes through.
- Cover the tape with a thin coat, feathering the edges.
- Let it dry, sand lightly, and apply a second coat wider than the first, feathered.
- A third coat, wider still, feathered beyond the second.
- Sand smooth when dry.
- Fill every screw dimple with compound, twice, sanding between coats.
Inside corners get paper tape folded down the center and bedded in compound; outside corners get metal or paper-faced corner bead 1. Butt joints (the unrecessed ends) build up a hump, so feather them extra wide.
Playback is optional. If the player is unavailable, open the video at its source.
The garage wall
An attached garage holds cars, fuel, and solvents, so Wisconsin requires a fire separation between it and the house. The walls and ceiling between them, including attic and soffit areas, must be one of 3:
- one layer of 5/8-inch Type X gypsum on the garage side;
- one layer of 1/2-inch gypsum on each side;
- two layers of 1/2-inch on the garage side.
Joints must be taped (or tightly fitted and backed) 3, and the door between garage and house must carry a label showing at least a 20-minute fire rating 3. Beams and columns in the garage that hold up living space above need the same protection 3.
Quick check
Also allowed: 1/2-inch on each side, or two layers of 1/2-inch on the garage side; the door needs a 20-minute label.
What to take from this
Run ceiling sheets across the joists and land every parallel edge on framing; use 1/2-inch board at 16-inch spacing and 5/8 or sag-resistant 1/2 at 24 inches under texture. Screw about every 12 inches on ceilings and 16 on walls, set just below the paper. Tape in three widening, feathered coats and fill screws twice. Keep regular board out of wet areas, and build the garage separation to SPS 321.08: 5/8-inch Type X on the garage side (or the equivalents), taped joints, and a 20-minute door.
Lesson complete
Nice work.
Sources for this lesson
- 1L. O. Anderson, O. C. Heyer. Wood-Frame House Construction (Agriculture Handbook No. 73). USDA Forest Service, Forest Products Laboratory. 1955. verifiedPublic domain handbook. Platform construction: the subfloor extends to the outside edges and walls are framed flat on it, raised, plumbed, braced, then capped with a second top plate lapping at corners; balloon framing runs studs from sill to rafter plate. Studs commonly 2x4 at 16 inches on center; framing lumber at no more than 19 percent moisture. Wood basement posts at least 6x6 on a pedestal; girders carry the inner ends of joists; joists usually 2-inch nominal, 6 to 12 inches deep, 16 inches on center, crown up, doubled under bearing partitions, lapped at girders; openings framed with doubled headers and trimmers; cross-bridging at midspan, no more than 8 feet apart; subfloor of boards or plywood; headers of two 2-inch members on edge over openings; diagonal or K bracing at corners; rafters erected in pairs after ceiling joists are fastened.
- 2International Residential Code (2015), Section R702.3: Gypsum Board and Gypsum Panel Products (excerpt). International Code Council (excerpt hosted by Green Building Advisor). 2015. verifiedR702.3.5: gypsum board is applied at right angles or parallel to framing; all edges and ends occur on framing except those perpendicular to it; interior gypsum board isn't installed where directly exposed to weather or water; fastening per Table R702.3.5 (for 1/2-inch board, ceilings perpendicular to framing up to 24 inches o.c. with screws about 12 inches apart, walls either direction with screws about 16 inches apart at 16-inch framing). Ceilings receiving water-based texture: board perpendicular to framing, at least 1/2 inch at 16 inches o.c. and 5/8 inch (or 1/2-inch sag-resistant) at 24 inches o.c.
- 3Wis. Admin. Code ch. SPS 321, Uniform Dwelling Code: Construction Standards. Wisconsin Department of Safety and Professional Services. verifiedDesign loads (SPS 321.02): complete load path to the foundation; live loads 40 psf floors, 50 garage floors, 40 decks and porches, 20 ceilings with storage, 5 without; roof snow loads from the zone map, Zone 1 (north) 40 psf and Zone 2 (south) 30 psf; wind 20 psf horizontal and uplift or ASCE 7-05; span tables in SPS 325 Appendix A. Frost (321.16): footings and foundations, including stoops and landings, below frost penetration or at least 48 inches below grade, whichever is deeper, never on frozen material; exceptions for ASCE 32 frost-protected shallow foundations, areaways, and clean bedrock. Exits (321.03): two first-floor exit doors separated by the greater of 20 feet or a third of the floor's longest diagonal; egress windows at least 20 by 24 inches net clear opening, sill no more than 60 inches above the floor (a platform if over 46); basement sleeping rooms need a second exit. Ceilings at least 7 feet (321.06). Smoke alarms (321.09) in each sleeping room, outside sleeping areas within 21 feet, and on every level, hardwired and interconnected with battery backup.