Flooring
Laying solid wood strip flooring the way it lasts: species and grades (oak, maple, beech, birch; quartersawn and flatsawn grades), installing after the wet trades and with the house heated, about 7 percent moisture for most of the country, strips run across the joists and lengthwise in the room, the first strip face-nailed near the wall under the base, every strip after blind-nailed through the tongue at 45 to 50 degrees, staggered end joints, and why squeaks and gaps happen.
- 4 min
- 5 steps
- 3 questions
- Lesson 23 of 111
In this lesson
- Wood and grades
- Dry before you lay
- Lay it
- Squeaks
- What to take from this
Picking up where you left off.
Wood and grades
Solid hardwood strip flooring is usually red or white oak, hard maple, beech, or birch; softwood floors are typically southern pine or Douglas-fir, where vertical-grain stock wears better than flat-grain 1. Oak is graded by appearance, with Clear, Sap Clear, and Select in quartersawn grades and Clear, Select, and No. 1 and No. 2 Common in flatsawn; maple, beech, and birch go by First, Second, and Third grades 1. The most common pattern is 25/32 inch thick with a 2¼-inch face, tongue-and-groove on edges and ends, in random lengths 1. The face is a hair wider than the back, so the top edges close tight while the bottoms stay slightly open 1.
Dry before you lay
Flooring goes in after the drywall is finished, the windows and exterior doors are in, and most of the trim (but not the base) is up, so it isn’t wetted or banged up by other work 1. Deliver it only in dry weather and store it in the warmest, driest place in the heated house 1.
The handbook gives target moisture contents at installation: about 6 percent in the dry Southwest, 10 percent in the damp South, and 7 percent for most of the rest of the country 1. Moisture the flooring absorbs after delivery is one of the most common causes of open joints that appear several months after the floor is laid 1. A pin moisture meter on the flooring and on the subfloor before starting is cheap insurance.
Quick check
Deliver in dry weather and store it in the heated house.
Lay it
- Prepare the subfloor: clean and flat, covered with building paper or felt, which cuts dust and, over a crawlspace, air leakage. Chalk the joist locations on the paper 1.
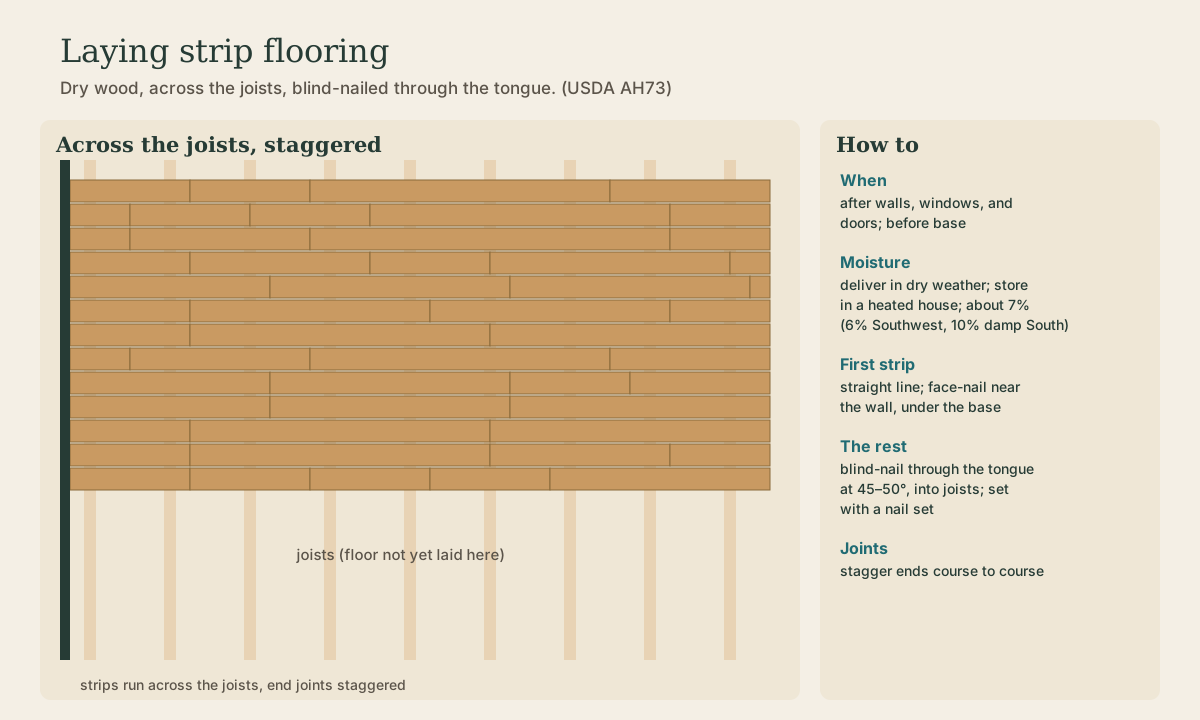
- Direction: lay strips across the joists, and lengthwise in a rectangular room where possible 1.
- First strip: snap a straight line near the starting wall. Face-nail the first strip close to the wall, where the base and shoe will hide the nails, into the joists 1. Leave a gap at the wall for the floor to swell into; the base covers it.
- The rest: blind-nail each strip through the tongue where it meets the shoulder, at 45 to 50 degrees, into joists when possible 1. Finish each nail with a nail set rather than a hammer so you don’t dent the edge 1; today a pneumatic flooring nailer does both in one blow.
- Tight joints: drive each strip up with a scrap block, never by hitting the tongue directly; wedge crooked pieces into line 1.
- Stagger end joints well apart from course to course 1.
Playback is optional. If the player is unavailable, open the video at its source.
Quick check
The next strip’s groove hides the nail.
Quick check
Running across the joists lets nails reach them and stiffens the floor.
Squeaks
A squeak is one board rubbing on another. Light joists, loose tongues, and poor nailing all cause it 1. Nailing through the subfloor into the joists makes a much better floor than nailing into subfloor alone 1, and a stiff subfloor glued to the joists (the framing module) prevents most squeaks before the flooring goes down.
What to take from this
Install wood flooring last among the wet and messy trades, with the house heated and the flooring stored inside, at about 7 percent moisture in most of the country. Run strips across the joists and lengthwise in the room, face-nail the first strip near the wall where the base will cover it, blind-nail the rest through the tongue at 45–50° into joists, drive strips tight with a block, and stagger joints. Gaps come from wet flooring; squeaks from loose nailing and soft framing.
Lesson complete
Nice work.
Sources for this lesson
- 1L. O. Anderson, O. C. Heyer. Wood-Frame House Construction (Agriculture Handbook No. 73). USDA Forest Service, Forest Products Laboratory. 1955. verifiedPublic domain handbook. Platform construction: the subfloor extends to the outside edges and walls are framed flat on it, raised, plumbed, braced, then capped with a second top plate lapping at corners; balloon framing runs studs from sill to rafter plate. Studs commonly 2x4 at 16 inches on center; framing lumber at no more than 19 percent moisture. Wood basement posts at least 6x6 on a pedestal; girders carry the inner ends of joists; joists usually 2-inch nominal, 6 to 12 inches deep, 16 inches on center, crown up, doubled under bearing partitions, lapped at girders; openings framed with doubled headers and trimmers; cross-bridging at midspan, no more than 8 feet apart; subfloor of boards or plywood; headers of two 2-inch members on edge over openings; diagonal or K bracing at corners; rafters erected in pairs after ceiling joists are fastened.