Trim Carpentry
Interior trim that goes up tight and stays that way: getting the house heated and the wood dry before any trim arrives (15 °F above outdoors in warm weather, about 60 °F in cold), door jambs, stops, and casing set back to a small reveal with mitered head joints, base molding coped at inside corners and mitered at outside ones, shoe nailed to the floor rather than the base, and why miters open in the first dry winter.
- 4 min
- 5 steps
- 3 questions
- Lesson 22 of 111
In this lesson
- Dry wood first
- Doors and casing
- Base molding
- Why miters open
- What to take from this
Picking up where you left off.
Dry wood first
The handbook describes the problem that shows up in so many new houses: a few months after move-in, cracks open between floorboards, mitered trim joints gap, doors warp, and stair treads creak 1. The cause is almost always moisture. Millwork leaves the factory dry, but an unheated house under construction is humid, so trim and flooring absorb moisture on site, get nailed up swollen, then shrink once the heat comes on 1.

The fix is to dry the house before the wood arrives: hang the outside doors and windows, get the heating plant running, and keep the house warmer than outdoors. In warm weather the handbook says to hold it about 15 °F above the average outdoor temperature overnight; in cold weather, about 60 °F 1. Then let the trim sit inside for some days before cutting it. Interior millwork should be at roughly 6 to 11 percent moisture depending on the region 1.
Quick check
The handbook says 15 °F above outdoors in warm weather, about 60 °F in cold.
Doors and casing
A door frame is two side jambs and a head jamb, with separate stops the door closes against 1. Most interior doors today come prehung, but the parts are the same.
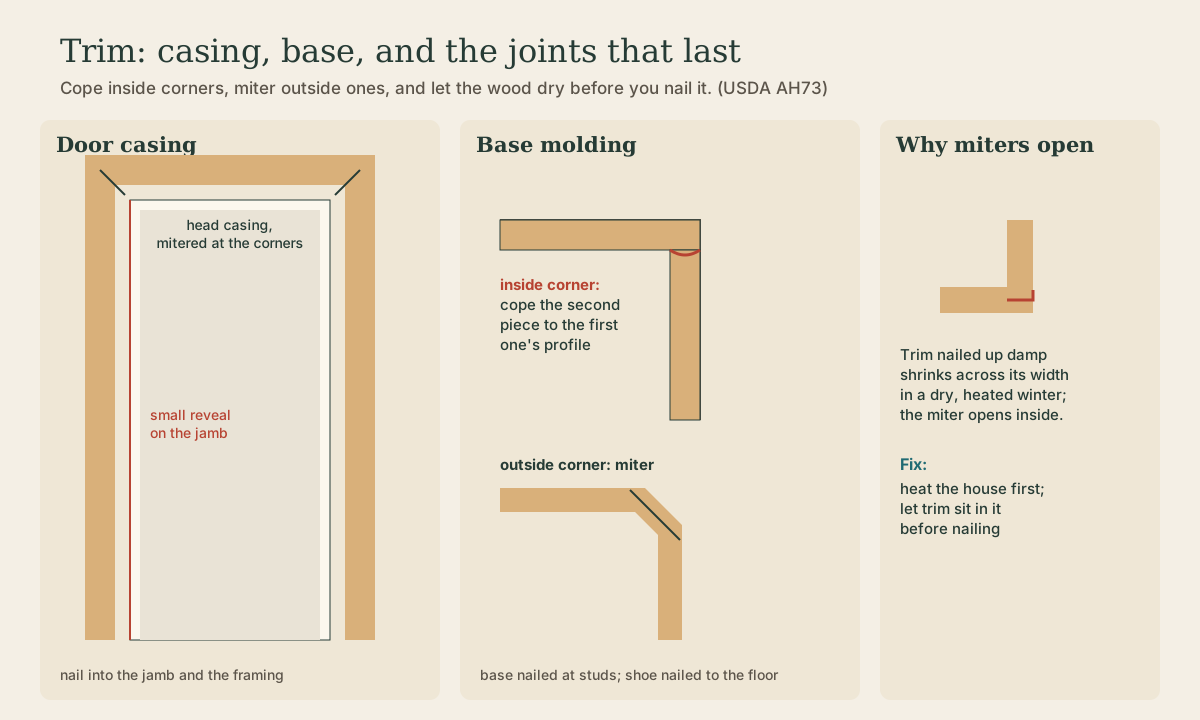
Casing frames the opening and covers the gap between jamb and drywall. Molded casing needs miter joints where the head meets the sides 1. Set the casing back from the jamb’s inside edge by a small, even reveal (about an eighth of an inch is common); a reveal hides small irregularities that a flush edge would show. Nail into the jamb’s edge with small finish nails and into the framing with larger ones, and glue and pin the miter so it can’t open from the corner.
Base molding
Base finishes the joint between wall and floor. A two-piece base adds a small cap molding that follows the wall even where it isn’t straight, and a shoe molding at the floor covers the gap below 1.
- Nail the base at the studs 1, keeping it slightly clear of the finish floor.
- Inside corners: cope. Run the first piece square into the corner. Cut the second piece’s end to the first one’s profile with a coping saw, so it fits against it like a puzzle piece 1. A coped joint stays tight when the corner isn’t square and when the wood shrinks; an inside miter opens.
- Outside corners: miter, glued and pinned.
- Long walls: join lengths with a scarf (two overlapping bevels) over a stud.
- Shoe: nail it down into the floor, not into the base 1, so the floor and the wall can move without opening a gap.
Playback is optional. If the player is unavailable, open the video at its source.
Quick check
Miter outside corners; cope inside ones.
Quick check
That keeps a gap from opening under the base as the floor moves.
Why miters open
Wood shrinks across its width as it dries, much more than along its length (the wood-drying and woodworking courses). A miter joins two pieces at 45°, so when each shrinks across its width, the joint pulls apart at the inside (heel) of the miter and the gap opens there. Trim that was nailed up damp in a humid summer and then dried by a winter’s heat shows it worst. Dry, acclimated trim, glued and pinned miters, and coped inside corners avoid nearly all of it.
What to take from this
Heat and dry the house before trim arrives (15 °F above outdoors in warm weather, about 60 °F in cold), and let the wood acclimate. Set casing back to a small reveal with glued, pinned miters at the head. Nail base at the studs, cope inside corners, miter outside ones, scarf long runs, and nail the shoe into the floor. Miters open on the inside when damp trim dries; dry wood prevents it.
Lesson complete
Nice work.
Sources for this lesson
- 1L. O. Anderson, O. C. Heyer. Wood-Frame House Construction (Agriculture Handbook No. 73). USDA Forest Service, Forest Products Laboratory. 1955. verifiedPublic domain handbook. Platform construction: the subfloor extends to the outside edges and walls are framed flat on it, raised, plumbed, braced, then capped with a second top plate lapping at corners; balloon framing runs studs from sill to rafter plate. Studs commonly 2x4 at 16 inches on center; framing lumber at no more than 19 percent moisture. Wood basement posts at least 6x6 on a pedestal; girders carry the inner ends of joists; joists usually 2-inch nominal, 6 to 12 inches deep, 16 inches on center, crown up, doubled under bearing partitions, lapped at girders; openings framed with doubled headers and trimmers; cross-bridging at midspan, no more than 8 feet apart; subfloor of boards or plywood; headers of two 2-inch members on edge over openings; diagonal or K bracing at corners; rafters erected in pairs after ceiling joists are fastened.