Restoring Old Windows
Repairing original double-hung wood windows following NPS Preservation Brief 9, updated for lead safety: the parts of the window, a window-by-window condition schedule, finding the water and testing wood with an awl, then the three repair classes: routine maintenance (pulling the stop and parting bead, reglazing, new sash cords, weatherstripping), stabilizing decayed wood with linseed oil, putty, or epoxy, and splicing or milling new parts. Why a repaired window with a storm (U about 0.44 to 0.49) beats a double-glazed metal window without a thermal break (about 0.6).
- 6 min
- 8 steps
- 3 questions
- Lesson 26 of 111
In this lesson
- Why repair
- The parts
- Evaluate each window
- Class I: routine maintenance
- Class II: stabilization
- Class III: splices and new parts
- Storms and the energy question
- What to take from this
Picking up where you left off.
Why repair
Original wood windows are built from parts that can be taken out, repaired, and put back. The National Park Service’s guide to repairing them argues that most can be repaired and weatherized, and that many are replaced only because people don’t know how practical repair is 1. To show it, an NPS staff member restored a 90-year-old two-over-two window with a broken pane, many coats of paint, broken sash cords, and worn-out weatherstripping. The hands-on work took a few hours, spread over several days of waiting for putty and paint to cure 1.

Lead comes first. Window parts in pre-1978 houses often carry lead paint, and a sash sliding in painted tracks grinds some of it into dust. Brief 9 was written in 1981, before today’s lead-safe practices; follow EPA’s DIY practices whenever you scrape, sand, or heat old paint (the next lesson) 2. Doing your own owner-occupied home is outside Wisconsin’s certification rule, but hiring anyone to replace or repair windows in a pre-1978 house brings it in 3.
The parts
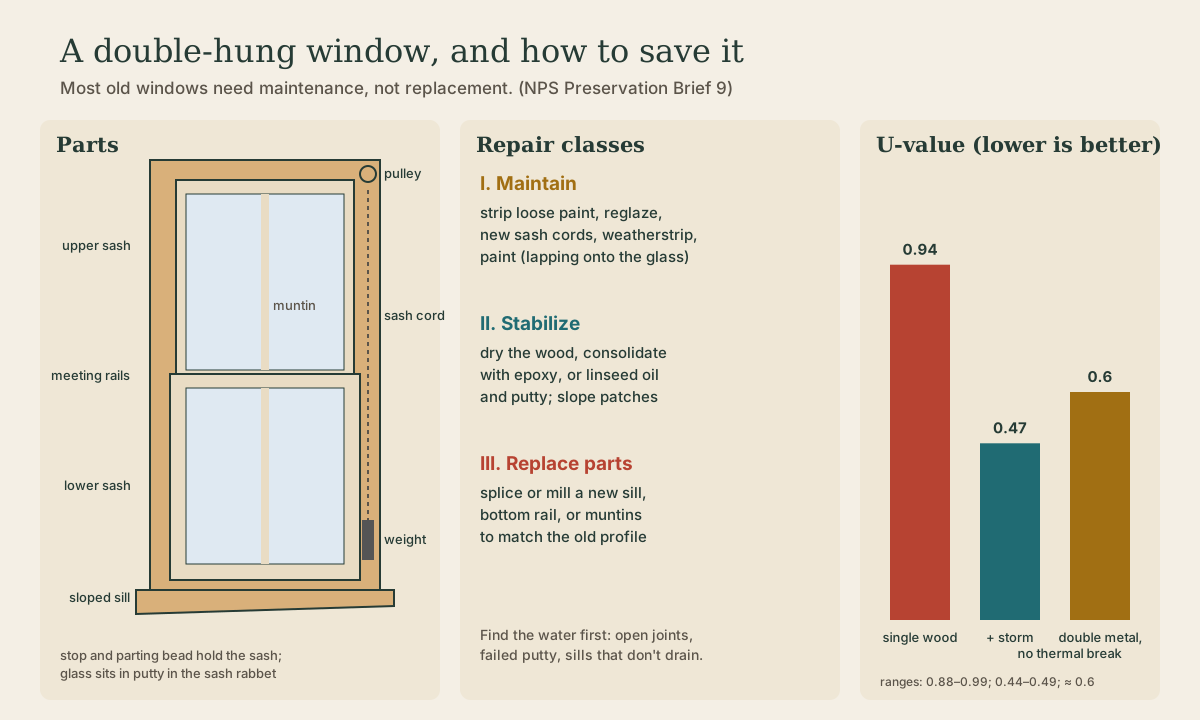
A double-hung window has two sash that slide past each other. Each sash is a frame of vertical stiles and horizontal rails, with muntins dividing the glass; the glass sits in a rabbet, bedded in and sealed with glazing putty and held with small glazing points. The meeting rails lock together in the middle. The lower sash runs between the interior stop and the parting bead, a thin strip set in a groove in the jamb; the upper sash runs between the parting bead and the outer blind stop. Sash cords run over pulleys in the jamb to iron weights in a hidden pocket, balancing the sash so it stays where you put it. The sill at the bottom should slope outward to shed water.
Evaluate each window
Make a schedule, one line per window, noting at least: location, paint condition, frame and sill, sash (rails, stiles, muntins), glazing, hardware, and an overall rating 1.
Moisture is the main cause of decay 1. Check where water collects: the sill, the joints between sill and jambs, the corners of the bottom rail, and the muntin joints. Peeling, blistering paint shows where water’s getting in, but bad paint doesn’t mean bad wood underneath 1. Test suspicious spots with an awl or ice pick: jab it in at an angle and pry. Sound wood comes up in long fibrous splinters; decayed wood lifts in short, irregular pieces. Pushing straight in finds sills that are rotten under a sound-looking skin 1. Make sure each sill slopes away from the house; a drip groove cut along the underside helps water fall free 1.
Fix the water source first: open joints, failed putty, and sills that hold water 1.
Quick check
Peeling paint points to those spots; probe them with an awl.
Class I: routine maintenance
Most windows need only this 1:
- Free the stop. Score the paint along the seam between the interior stop and jamb with a utility knife, then pry the stop off gradually with two putty knives. Do one side only.
- Remove the lower sash. Detach the cords and knot or pin their ends so they don’t fall into the weight pocket.
- Remove the upper sash. Score and carefully pry out the parting bead (thin and fragile), then lift out the upper sash. Cover the opening with plastic or plywood.
- Strip and reglaze at the bench. Remove failed putty by hand without gouging the rabbet, pull the glazing points, number the panes, and take them out. Clean and prime the wood (brush bare wood with linseed oil before oil primer if you use glazing compound). Lay a bed of putty in the rabbet, press the glass in, set new points, then run a beveled bead of putty around the glass.
- Paint once a skin forms on the putty, usually in 2 or 3 days, and lap the paint slightly onto the glass to seal the joint 1.
- New cords. Open the weight pocket through its access door near the sill (or remove interior trim), and tie in new sash cord or chain 1.
- Weatherstrip and reinstall. Metal or plastic spring strips at the rails and, where there’s room, in the jamb channels; a sash lock on the meeting rails pulls them tight 1.
Playback is optional. If the player is unavailable, open the video at its source.
Quick check
Lapping onto the glass seals the joint against water.
Class II: stabilization
Partly decayed wood can be saved 1:
- Linseed oil method: dry the wood, treat decay with a fungicide, saturate with two or three coats of boiled linseed oil a day apart, fill cracks and holes with putty, and paint once it skins.
- Built-up patches: wood putty or homemade fillers built up in layers, sanded, primed, and painted.
- Epoxy consolidation: a penetrating epoxy soaks into soft wood and hardens it, then epoxy filler rebuilds missing edges and profiles.
Always slope a rebuilt sill or rail so water runs off instead of puddling 1.
Class III: splices and new parts
When a sill, bottom rail, or muntin is too far gone, splice in new wood or have a matching part milled, keeping as much original material as possible 1. A woodworker with a table saw and router can reproduce many profiles; a millwork shop can do the rest.
Storms and the energy question
Exterior storm windows are efficient, reversible, and keep the original sash 1. The numbers in Brief 9: a single-glazed wood window has a U-value of about 0.88 to 0.99; adding a storm cuts that to about 0.44 to 0.49; a double-glazed metal window without a thermal break is about 0.6 1. Lower is better, so a repaired window with a good storm beats that metal replacement. Interior storms risk condensation on the cold outer sash unless they seal tightly 1.
Quick check
Lower U-value means less heat loss; wood insulates much better than metal.
What to take from this
Treat window paint as lead and work lead-safe. Survey every window, find where water gets in, and test wood with an awl. Most windows need only Class I work: pull the stop and parting bead, reglaze with a putty bed and beveled bead, paint once it skins and lap onto the glass, new cords, weatherstrip. Stabilize soft wood with linseed oil, putty, or epoxy, and splice or mill new parts only when needed. Add exterior storms for efficiency.
Lesson complete
Nice work.
Sources for this lesson
- 1John H. Myers. Preservation Brief 9: The Repair of Historic Wooden Windows. National Park Service, Technical Preservation Services. 1981. verifiedEvaluate each window: location, paint, frame and sill, sash (rails, stiles, muntins), glazing, hardware; moisture is the primary cause of decay, found at sills, sill-jamb joints, bottom rail corners, and muntin joints; test wood with an ice pick. Repair classes: I routine maintenance (paint removal, reglazing with a bed of putty, glazing points, beveled putty, sash cords, weatherstripping, paint lapped onto glass), II stabilization (dry, fungicide, boiled linseed oil, putty, or epoxy consolidation; slope patched surfaces), III splices and parts replacement. A staff member restored a 90-year-old two-over-two window in a few hours of work spread over several days of curing. Exterior storms are efficient and reversible. U-values: single-glazed wood 0.88-0.99, with storm 0.44-0.49, double-glazed metal without thermal break about 0.6. Pegged mortise-and-tenon sash come apart easily for repair. (1981 text: its heat-gun and paint-removal advice predates lead-safe rules.)
- 2Lead-Safe Renovations for DIYers. U.S. Environmental Protection Agency. verifiedHomes built before 1978 may have lead-based paint. The RRP Rule generally doesn't apply to owners working on their own home, but EPA recommends lead-safe practices: find out if lead paint is present (or assume it), contain the work area with plastic sheeting, turn off forced air and cover vents, wear an N-100 respirator, coveralls, and shoe covers, mist before sanding or scraping, use a heat gun under 1,100 °F or chemical strippers, use power tools with HEPA vacuum attachments, clean with a HEPA vacuum and wet methods daily, bag waste, and clean again at the end.
- 3Lead-Safe Renovation Rule FAQs. Wisconsin Department of Health Services. verifiedWisconsin's rule (Wis. Admin. Code ch. DHS 163, administered by DHS for EPA) covers paid renovation in homes and child care centers built before 1978 that disturbs 6 sq ft of painted surface in a room, 20 sq ft outside, or any window replacement. It doesn't apply to owners working on their own home if only the owner's immediate family lives there, no child with an elevated blood lead level lives there, and no part is rented. No amount of lead is safe; lead dust that can poison a child is too small to see.