How Chair Designers Work
The design loop: drawing-first, model-first, and making-first starting points, a brief written as observable behavior, measuring body and room, full-size drawings, cheap mockups of risky assumptions, body, structure, and form reviews, and changing one variable at a time.
- 7 min
- 10 steps
- 3 questions
- Lesson 118 of 160
In this lesson
- Three starting points, one required convergence
- Write the brief as observable behavior
- Measure the body and the room
- Draw at full size before drawing beautifully
- Mock up the dangerous assumptions
- Test in layers
- Change one variable and keep a chair log
- Design can also be the lesson
- A complete first design sprint
Picking up where you left off.
Chair design is iteration with unusually honest feedback. Propose a posture, embody it, sit, notice, revise. The romance differs—academy drawing, sculpted prototype, inherited vernacular pattern—but a chair eventually meets a full-size body and gravity.
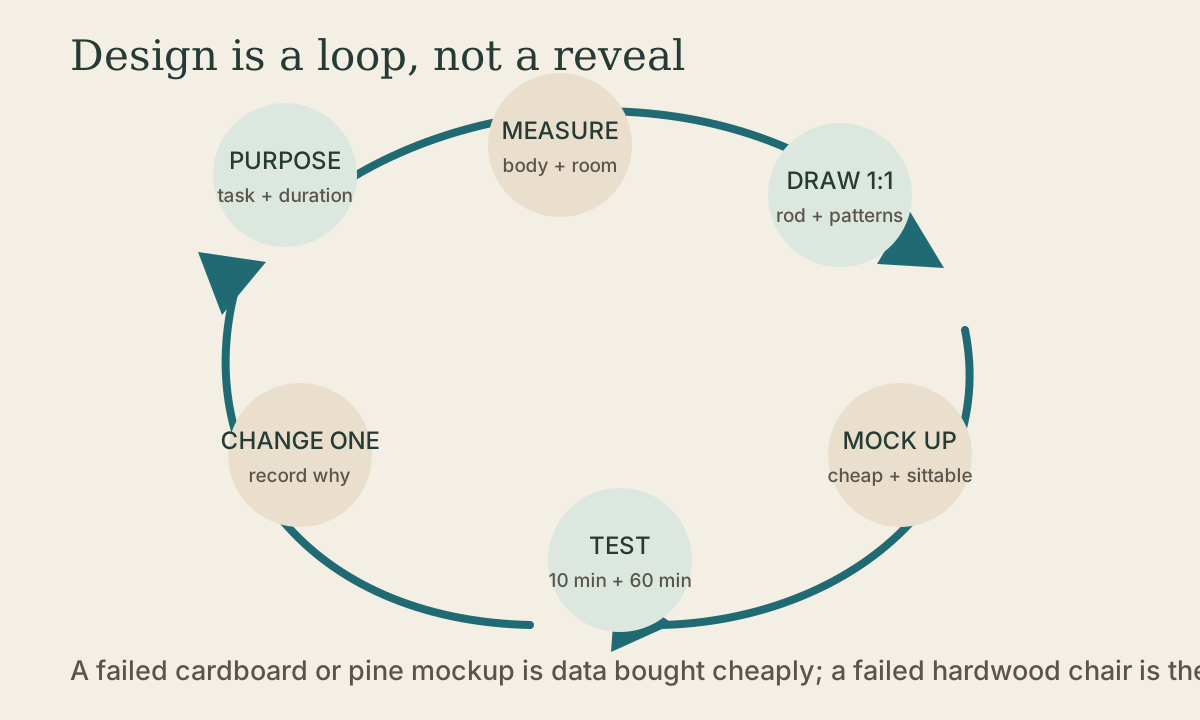
The loop is purpose, measure, draw, mock up, test, change one thing, and repeat.
Three starting points, one required convergence
Designers can enter the loop in different places.
Drawing-first work begins with dimensions, elevations, and coordinated views. It is powerful when another maker or a factory must reproduce the result. Full-size drawings expose proportion and joint intersections before stock is cut.
Model-first work begins with cardboard, foam, plaster, softwood, or the fitting rig described in Lesson 1.2. It is powerful when body contact and complex form are difficult to predict on paper. Drawings may follow to capture what the model discovered.
Material-first work begins with a board, branch, production process, or available component. It is powerful when grain, edge, bend, or manufacturing constraint should generate the form.
These are not ideologies. A responsible material-first designer still measures posture. A drawing-first designer still sits in a prototype. A model-first designer still produces dimensions if the chair will be repeated.
Write the brief as observable behavior
“A comfortable reading chair” is too vague. A useful brief states:
- intended sitter or body-size range;
- task and typical duration;
- table, desk, or room constraints;
- whether arms, head support, or easy rising matter;
- target weight or mobility;
- tools and processes available;
- maintenance and repair expectation.
Example:
A personal reading chair for a 5 ft 8 in sitter, used 45–90 minutes, feet supported without a footstool, low enough to relax but easy to rise from, narrow enough for a 30-inch doorway, with a renewable woven seat and no upholstery.
Every phrase can be tested. If a later design decision does not serve one of those constraints or a conscious visual aim, ask why it is there.
Quick check
‘A personal reading chair for a 5 ft 8 in sitter, used 45-90 minutes, narrow enough for a 30-inch doorway’ can be checked against a mockup.
Measure the body and the room
Lesson 1.2 provides the sitting relationships. Add the environment:
- table underside and apron clearance;
- distance from wall to circulation path;
- door and stair widths;
- floor material and suitable feet or glides;
- adjacent seat height if the chair joins an existing group;
- sightline across the room if the back is visually prominent.
Photograph a cardboard envelope of the proposed chair in the intended location. A beautiful elevation can still be too deep for the room or block a window.
Draw at full size before drawing beautifully
Galbert’s Chairmaker’s Notebook treats full-size drawings, sightlines, patterns, and chair geometry as working tools 1. A 1:1 side view answers questions a small sketch can hide:
- Does the back meet the sitter at the intended height?
- Where do a rear post, seat rail, and arm compete for wood?
- Does a stretcher enter a leg with enough mortise wall?
- How much extra length does an angled tenon require?
Use cheap roll paper, a straightedge, dividers, and full-size body measurements. Neatness matters only enough to keep one line from being mistaken for another. Date every revision; do not erase the design history into one mysterious final line.
Mock up the dangerous assumptions
Miller’s chair-design method emphasizes test rigs and prototypes because drawings cannot report pressure, reach, or the feeling of rising 2. Build the mockup only as refined as the question requires.
- To test seat height: blocks and plywood.
- To test seat/back relationship: an adjustable fitting rig, screwed or bolted before anyone sits.
- To test stance: a full-size side frame screwed together.
- To test a sculpted arm: foam, rigid insulation, or softwood.
- To test joinery: one hardwood corner at final section.
- To test appearance: cardboard silhouettes and battens.
The rule is one mockup, one main uncertainty. A crude rig built to test comfort should not be rejected because its legs look clumsy. A form study does not prove structural capacity.
Quick check
A crude comfort rig shouldn’t be judged on looks, and a form study doesn’t prove strength.
Test in layers
Conduct three reviews:
Body review
Have the intended sitter use the fitting rig, not an unproven structural prototype. Note pressure locations, posture changes, and rising. Ask specific questions rather than “comfortable?”
Structure review
Trace load paths, inspect leverage, and load-test prototypes with weights (Lesson 3.4), not people. A screwed pine mockup can reveal racking direction; it can’t prove a final hardwood joint.
Form review
Photograph front, side, rear, and three-quarter views at a normal lens length. Convert one image to silhouette. Look at negative spaces and where lines stop. Review form after the body and structure are viable, not instead of them.
Change one variable and keep a chair log
Schwarz presents published stick-chair forms as starting points for continued variation, with many interchangeable seat, leg, arm, and crest patterns 3. The fastest way to learn from variations is to isolate them.
Keep a table:
| Revision | Changed | Held constant | Immediate result | One-hour result |
|---|---|---|---|---|
| A | seat front lowered 1/2 in | depth, tilt, back | feet better supported | less thigh pressure |
| B | back leaned 2° more | seat from A | relaxed at first | sliding after 35 min |
If you change height, depth, tilt, and back at once, a better result cannot tell you which decision helped.
Cost-of-learning calculation
Suppose a pine mockup costs $35 and four hours. A hardwood chair costs $450 in material and 70 hours. Three focused mockups cost $105 and 12 hours—still far less than rebuilding one unresolved final chair. Mockups are not waste when they prevent expensive uncertainty; unlabeled, aimless mockups are.
Quick check
Keep a log of what changed, what held constant, and the immediate and one-hour results.
Design can also be the lesson
Enzo Mari’s Autoprogettazione? makes the building process itself the educational outcome. The publisher describes elementary rough-board-and-nail furniture intended to teach critical understanding through construction 4. This widens the brief: sometimes the chair is not only a seat but also a curriculum.
Ask of any instructional build:
- What concept should become obvious in the hands?
- Which operation repeats enough for the learner to improve?
- Which mistake remains safe and informative?
- What record will let the next build advance?
A complete first design sprint
- Write the behavioral brief in six sentences.
- Measure sitter and room; record reference photos.
- Draw a full-size side view and seat plan.
- Circle three uncertain relationships.
- Build the cheapest mockup that tests the largest uncertainty.
- Run body, structure, and form reviews separately.
- Change one variable.
- Repeat until the brief is met.
- Produce the coordinated plan set in Lesson 3.2.
- Preserve the log with the finished chair.
The loop does not eliminate intuition. It gives intuition evidence and memory. Start wherever the problem is vivid - paper, model, or material - but converge on a full-size fitting rig before hardwood and joinery make revision expensive.
Lesson complete
Nice work.
Sources for this lesson
- 1Peter Galbert. Chairmaker's Notebook. Lost Art Press. 2015. verifiedDetailed chairmaking reference for drilling, reaming, sightlines, and compound geometry. Cited at: Chair Design and Appendix A.
- 2Jeff Miller. Chairmaking & Design. Taunton Press. 1997. verifiedPractical chair-design reference covering fit, mockups, jigs, and seven projects. Cited at: design and fitting chapters.
- 3Christopher Schwarz. The Stick Chair Book. 2nd revised ed. Lost Art Press. verifiedPublisher page with the complete book available as a free PDF. Cited at: chair plans and design options.
- 4Enzo Mari. Autoprogettazione?. Corraini Edizioni. 2002. verifiedPublisher description of Mari's 1974 self-building exercise, rough boards, nails, and educational purpose. Cited at: project description.