Rustic Stretch
Pushing bent-willow chairs further: writing one testable brief, recording harvest as a material specification, joined rustic with shrink-fit rungs, measured rustic built to a fitting rig, a material study, assembly cradles, and logging failures.
- 7 min
- 9 steps
- 3 questions
- Lesson 139 of 160
In this lesson
- Write one testable brief
- Harvest as material specification
- Direction 1: joined rustic
- Direction 2: measured rustic
- Direction 3: material study
- Assembly sequencing
- Load-test before use
- Failure modes worth preserving in the log
Open alongside this lesson
-
Making Rustic Furniture (opens in a new tab)
Use for the maker's documented rustic methods, not as an unstated controlling plan.
-
Park and Recreation Structures, Part III: Furniture and Furnishings (opens in a new tab)
Eight historical plates; review dimensions, accessibility, joinery, and testing for modern use.
-
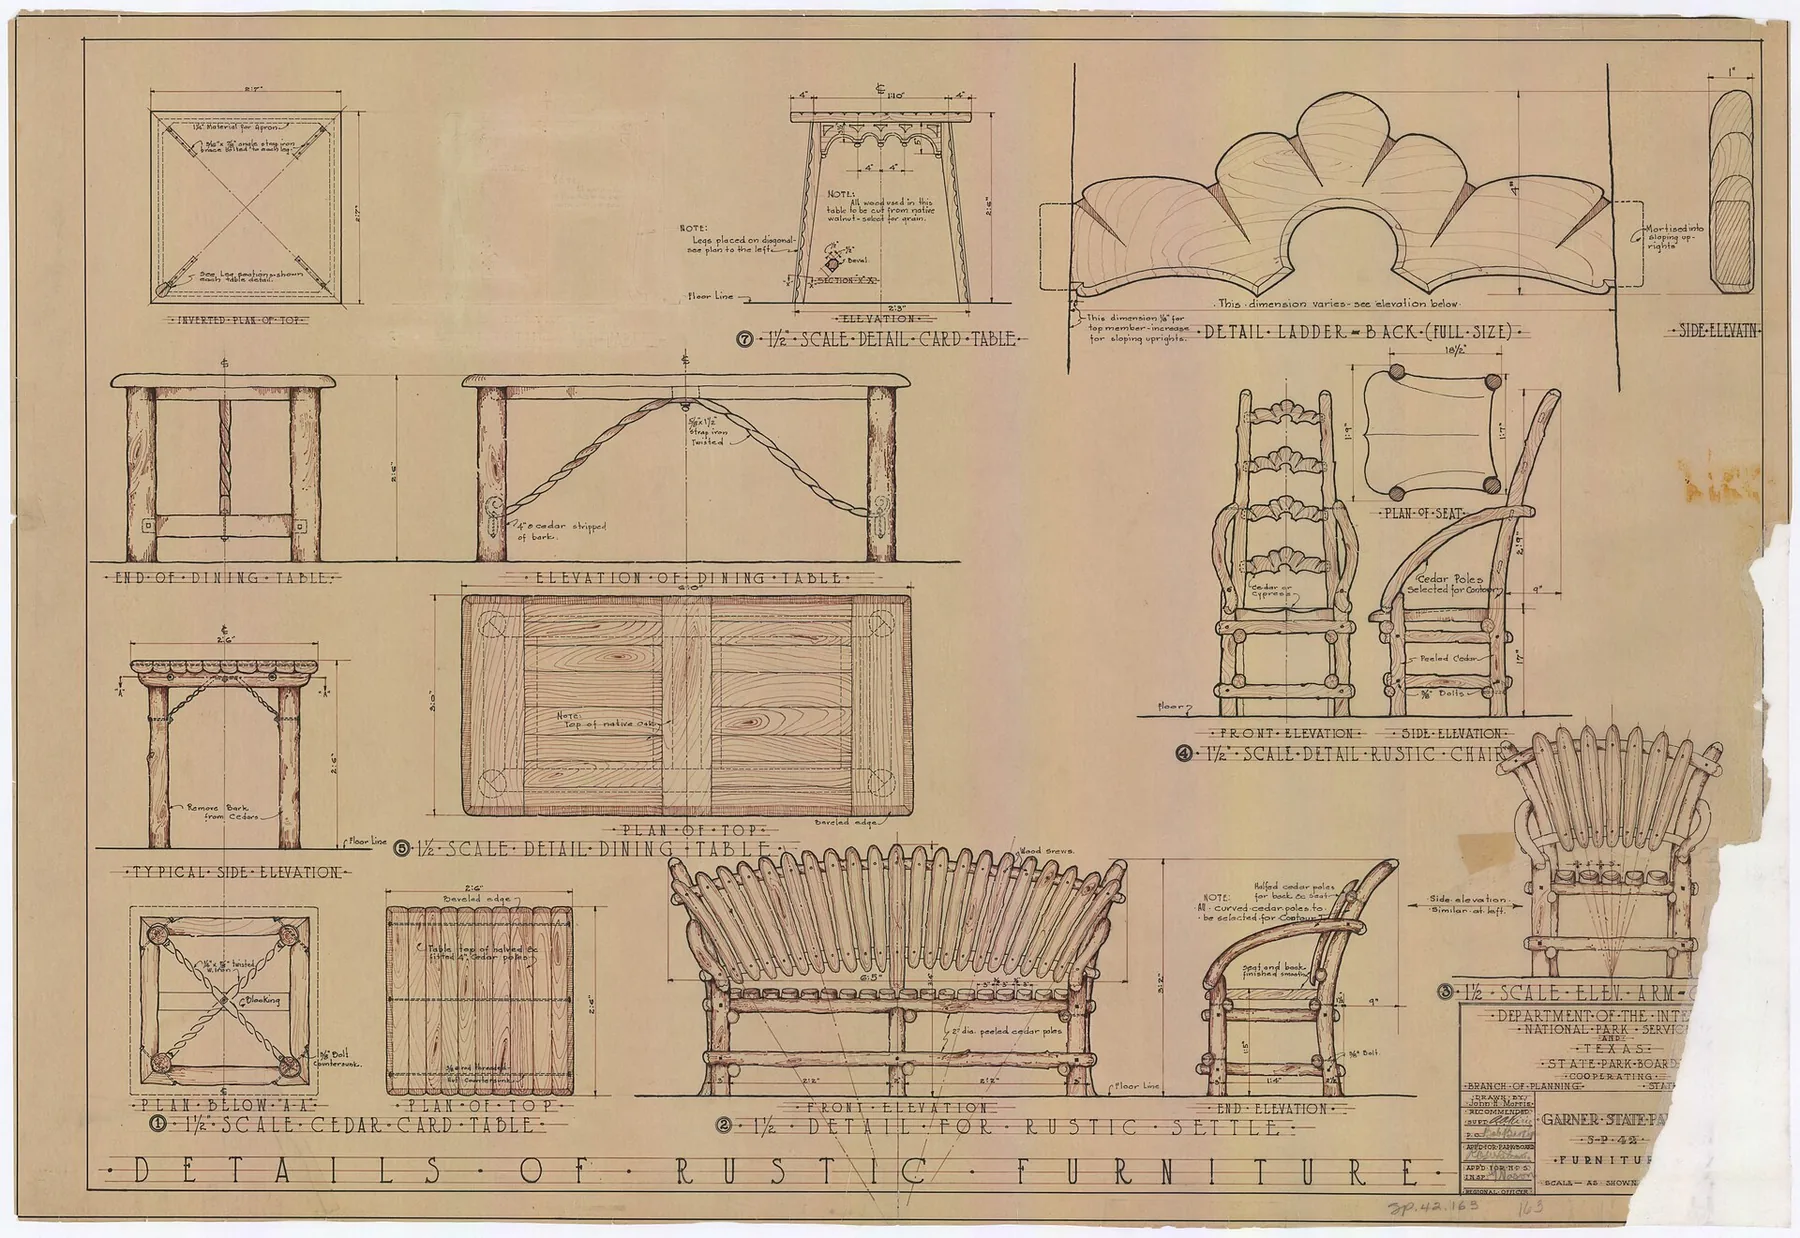
Garner State Park — Furniture — SP.42.163 (opens in a new tab)
Useful elevations and details, but not a current chair-load standard.
-
Make a Chair from a Tree: Third Edition (opens in a new tab)
Use when adopting Alexander's post-and-rung moisture and assembly method.
Picking up where you left off.
This lesson assumes you already know bent-willow chairmaking. The stretch is to bring one unfamiliar discipline into the rustic vocabulary without sanding away its character. Choose one primary direction:
- Joined rustic: replace selected nailed intersections with bored mortises and fitted round tenons.
- Measured rustic: use a sitting rig, full-size elevations, and sightlines to control stance and comfort.
- Material study: build the same structural idea in a locally available species or at a new harvest condition, documenting how it behaves.
Daniel Mack’s bibliography describes Making Rustic Furniture and later books as a mixture of history, lore, technical information, projects, and many makers’ work 1. Use the relevant book as the technique source. This brief adds experiment design, stop gates, and records.
.jpg)
The historic Garner State Park drawing demonstrates the central proposition: natural-form furniture can still have front and side elevations, part relationships, and joint details 2. Do not copy its dimensions blindly. Read how documentation disciplines irregular material.
Write one testable brief
Avoid a project whose goal is simply “make a better willow chair.” Define the variable:
- “Use shrink-fit tenoned rungs at the undercarriage while keeping a bent-and-nailed upper structure.”
- “Build to my sitting-rig seat and back references, then compare comfort with my teaching chair.”
- “Compare bark-on and peeled samples of the same species through bending, drying, fastening, and finish.”
Keep all other major choices stable. If species, geometry, joint method, finish, and seat all change at once, the result may be interesting but it will not teach which decision mattered.
Harvest as material specification
Permission, species identification, season, site health, and sustainable cutting come before technique. Record:
- species and confidence of identification;
- site/permission and harvest date;
- stem position, diameter range, and visible defects;
- bark condition and whether the part was peeled;
- initial mass, circumference, or moisture reading if useful; and
- storage between harvest and use.
Cut longer than final size so checked ends can be removed. Reject rot, insect galleries, crushed fibers, abrupt doglegs through a critical joint, and cracks that enter the working length. Natural variation is not the same as hidden decay.
Sort stems by role. The straightest continuous grain goes to legs, posts, and long rungs. Graceful curves can become arms and braces when their fiber path supports the form. Forks are useful only when the included grain is sound and the load direction makes sense.
Mnemonic: permission, species, season, soundness.
Quick check
Harvest is a material specification: it explains later bending and splitting behavior.
Direction 1: joined rustic
The experiment is not “replace every nail with joinery.” Identify joints where repeatable geometry and moisture strategy add value—usually rungs between posts—while keeping redundant bent elements where they belong.
Make a test ladder first: two short post samples joined by two rungs. Use the exact boring bit, tenon method, species, and moisture conditions planned for the chair. Label growth-ring orientation. Measure rung tenons with both a caliper and a gauge block bored by the actual bit.
If using a wet-post/super-dry-rung joint, follow Jennie Alexander’s current moisture targets, ring orientation, and assembly method; the third edition integrates wood movement, rung formation, post mortising, and assembly 3. Do not import only the phrase “shrink fit” into a different species and guess.
For found roundwood, do not assume the outside is a reference cylinder. Establish joint centerlines from the chair elevation and a stable cradle. Bore square to the intended local axis, not visually square to a lumpy bark surface. A V-block, sandbag cradle, or custom saddle can hold irregular stems without crushing them.
Stop gate: the sample ladder assembles without splitting, joints tighten or hold according to the chosen system after conditioning, and the boring cradle repeats the intended centerline.
Quick check
Make a test ladder with the exact bit, tenon method, species, and moisture conditions first.
Direction 2: measured rustic
Take the sitting-rig outputs already developed in the course: target seat plane, seat depth, usable width, back contact, and stance. Draw front and side elevations full size. The natural stems are fitted to references, not forced into identical silhouettes.
Use three control structures:
- a floor rectangle or footprint with foot stations;
- a seat-plane frame showing rail height and twist; and
- a side template for the back or arm sweep.
Measure diagonals at the seat frame, but also use winding sticks or a level to detect twist. A frame can have equal diagonals while its corners lie in different planes. Shim the feet on the assembly floor until the seat plane matches the drawing; only then scribe final foot cuts.
Estimate splay with projection rather than an angle alone. If a leg travels vertical distance \(h\) and moves outward \(d\) in a given view, its view angle from vertical is approximately:
On compound legs, front and side projections are separate pieces of information. Use full-size sightlines or the geometric method from the earlier course lesson rather than combining them by eye.
Stop gate: the dry frame hits foot stations, seat plane, and back template without a fastener pulling a stem against its natural spring.
Quick check
Use winding sticks or a level to check that the seat frame lies in one plane.
Direction 3: material study
Harvest matched samples from the same source where possible. Make short bending and fastening coupons before the chair. Record:
- minimum successful bend radius at a fixed section;
- surface checking after a consistent drying period;
- springback at fixed stations;
- pilot-hole behavior and splitting near ends; and
- finish color and adhesion on bark-on, peeled, and cut surfaces.
Do not generalize from one miraculous stem. Three samples begin to reveal consistency. When a new species is uncertain or toxicological information is incomplete, research dust, sap, and skin hazards before machining or finishing, and use appropriate extraction and protection.
Assembly sequencing
Rustic parts resist being stacked neatly on a bench. Build cradles before glue or fastening. Mark every part with chair side, end, and mate. Photograph each dry stage.
Sequence from the least negotiable structure outward:
- joined or measured side frames;
- front/back rungs or seat rails;
- seat plane and diagonals;
- arms and bent back framework;
- redundant braces and decorative work; and
- seat surface.
Do not use a fresh bent element as a giant clamp that twists the undercarriage into alignment. Let it relax on its own form or holding jig, then fit it to a sound frame.
Load-test before use
Before anyone sits on a new chair, inspect every joint, then load the seat with sandbags or weights in steps, standing clear. Unload and look after each step; stop and diagnose if anything moves, cracks, ticks, or stays bent. A first chair that passes is fine to use and watch; an experimental one-off deserves a second look after some months of use.
Failure modes worth preserving in the log
- Stem splits at the pilot: end distance, pilot, fastener, moisture, or grain path needs change.
- Round tenon fits only one rotation: it is oval or the mortise surface is irregular; diagnose before reducing everything.
- Chair stands but seat twists: feet were leveled before the seat attitude was established.
- Back feels harsh: locate the pressure point against the side template and the fitting-rig record; “rustic” is not an ergonomic exemption.
- Bark loosens under finish: material condition and finish schedule were incompatible; a cosmetic topcoat will not reattach it structurally.
Finish with a one-page teaching note: what a first-time willow student could safely borrow from the experiment, what requires advanced joinery or measurement, and what failed. That conversion from private experiment to clear method is the real stretch for an experienced maker.
Lesson complete
Nice work.
Sources for this lesson
- 1Daniel Mack. Making Rustic Furniture. Lark Books. 1992. verifiedAuthor's official bibliography and overview of his rustic-furniture books, techniques, history, and projects. Cited at: author bibliography.
- 2John H. Morris. Garner State Park — Furniture — SP.42.163. Texas State Archives. 1934. verifiedHistoric measured elevations and details for rustic furnishings; use as a plan-reading example, not a chair-load standard. Cited at: drawing description.
- 3Jennie Alexander. Make a Chair from a Tree: Third Edition. Lost Art Press. 2021. verifiedPublisher contents and excerpts for post-and-rung construction, moisture management, bending, assembly, and hickory-bark seating. Cited at: chapters 2 and 8–11.
Further reading
- Albert H. Good. Park and Recreation Structures, Part III: Furniture and Furnishings. National Park Service. 1938. verifiedPublic-domain U.S. government publication with eight plates of rustic furniture precedents. It is a historical design source, not a current accessibility or seating-load standard.