Carving a Plank Seat
Saddling the seat of a plank chair: whether to saddle at all, choosing seat wood, carving only after the joinery, laying out the spindle deck, bowl, pommel, and cups, holding the blank, roughing with a scorp across the grain, smoothing with a travisher by tilt, recovering when you cross the line, and finishing with sanding and a scraper.
- 8 min
- 11 steps
- 3 questions
- Lesson 129 of 160
In this lesson
- Do you have to saddle?
- Seat wood
- Carve after the joinery
- Lay out the saddle
- Hold the seat
- Rough out with the scorp
- Smooth with the travisher
- When you cross the line
- Sand, scrape, and edge
- Try it
Picking up where you left off.
The seat of a stick chair or Windsor is the hub of the structure (Lesson 1.1) and also the part the body meets first. Carving it, called saddling, is the most physical job in plank-chair making. It is also more forgiving than it looks: there is no single magic sequence of cuts, Christopher Schwarz writes; you make a few seats and your hands figure it out 1.
Do you have to saddle?
Not necessarily. Most vernacular stick chairs Schwarz has studied have little or no saddle: flat boards with the front edge rounded, often softened in use by sheepskins, blankets, or cushions 1. Flat seats are more comfortable than they look if you sit back in them.
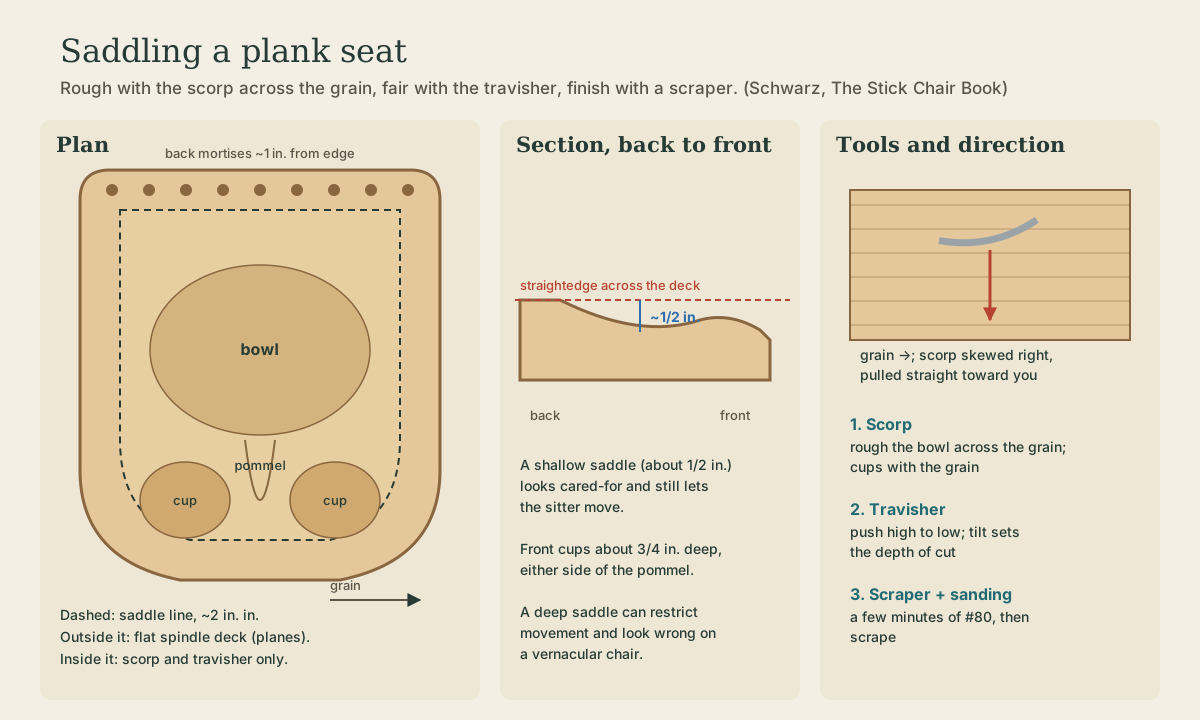
Still, customers prefer saddled seats, and a saddle signals care and echoes the body. Schwarz’s recommendation is a shallow saddle, about 1/2 inch deep: attractive, and it won’t restrict the sitter’s movement. A deep saddle can trap the sitter, become uncomfortable, and look wrong on a vernacular chair 1. Remember that saddle depth is only one part of comfort; tilt, height, and the back matter as much (Lesson 1.2).
Seat wood
The seat wants wood that is hard to split, because a ring of mortises sits close to its edge. Schwarz passes on Welsh chairmaker John Brown’s rule: if the wood looks so gnarled it would be hard to split with an axe, it’s probably good seat material 1. Softer seat woods such as white pine, basswood, or poplar carve fastest; Buchanan’s Democratic chair uses one of them (Capstone A).
His most practical tip: quartersawn seat stock is far easier to saddle than flat- or rift-sawn wood, even in oak or hickory 1. It costs more and saves a lot of time.
Carve after the joinery
Schwarz saddles only after every mortise in the seat and arm is cut, so he doesn’t invest hours carving a seat that a joinery mistake could still send to the firewood pile 1. Flat faces and square edges are also the references for layout, clamping, and boring; some makers leave the seat blank rectangular until the joinery is done precisely so its corners can be clamped 1.
Quick check
Flat faces and square edges are the datums for layout, clamping, and boring.
Lay out the saddle
Draw the parts in pencil and keep redrawing as they smudge 1:
- Spindle deck: the flat border where the back sticks enter. The saddle typically starts about 2 inches in from the perimeter, with the back mortises about 1 inch from the edge. Planes and other flat-soled tools work outside the line; scooping tools stay inside it.
- Bowl: the deepest part, between the back of the saddle and the pommel.
- Pommel: the raised ridge at the front center.
- Cups: a hollow on each side of the pommel running off the front edge, about 3/4 inch deep on Schwarz’s chairs.
Some makers cut a shallow rabbet, about 1/8 to 3/16 inch deep, with a router and template to give a crisp shadow line around the deck. It looks modern and makes smoothing near the line a chore, so it’s a design choice 1. A seat can also skip the pommel and cups entirely and simply scoop to a center seam from both sides. If you’re building from a plan, use its seat pattern; Buchanan’s Democratic chair plan includes a contour map of the seat carving 2.
Hold the seat
The simplest holding method Schwarz has found, credited to Don Weber: screw a 2×4 to the underside of the seat with two screws and clamp the 2×4 in a face vise 1. Whatever you use, the seat must not be able to shift or spin under a pulling tool. Keep both hands behind cutting edges, and change tools or direction when grain reversal makes a cut grab.
Rough out with the scorp
Remove most of the waste with a coarse tool: a scorp (also called an inshave), an adze, or an aggressive rotary cutter in an angle grinder with full protection. Schwarz prefers the scorp because it cuts like a plane, with the bevel nearly parallel to the work 1.
In the bowl, the scorp mostly cuts across the grain, like traversing a board with a jack plane. Skew the tool in the direction the grain runs (for grain running left to right, skew a little to the right) while pulling it straight toward you. Start at the back of the saddle line and pull toward the front: light at first, deeper through the bowl, and light again as you come off the front edge, with evenly spaced strokes and the pommel left alone 1. Cut the back of the bowl right to its line so it gets a crisp edge.
The cups are cut with the grain: from the outer end of each cup down to its bottom, then from the pommel down to the bottom. A drawknife or round-bottomed spokeshave also works there 1.
Before putting the scorp away, lay a yardstick across the spindle deck and sight the depth and consistency of the bowl. Do as much as you can with the scorp; a couple of quick scorp cuts can replace twenty with a travisher 1. Galbert devotes a chapter each to the tools for seat carving and to carving the seat itself 3.
Playback is optional. If the player is unavailable, open the video at its source.
Quick check
Cutting across the grain takes a big bite without diving too deep, like traversing a board with a jack plane.
Smooth with the travisher
A travisher is a chairmaker’s curved smoothing plane. It has no depth knob: its bite comes from how far you tilt it as you start the cut. Tilt it forward and the cut is light; rock it back and the cut gets aggressive; tilt it well forward to stop cutting. Don’t grab the handles; pinch the body and push with your thumbs, without bearing down. Work mostly across the grain, pushing from high areas down to low ones, and as the surface evens out the shavings get longer 1.
Warm up in the bowl and cups, shave down the back of the pommel, then gingerly trim the transitions. Plane the spindle deck clean and tune the line between deck and saddle with the travisher or a smoothing plane. Don’t expect a glassy surface in tough woods like oak, hickory, or elm; scraping and sanding come next 1.
Quick check
Pinch the body, push with your thumbs, and let the tilt set the bite.
When you cross the line
It’s easy to cut into the spindle deck while learning. Schwarz’s three ways out 1:
- Redraw the deck line a little narrower.
- Plane the deck down until the overcut disappears, then redraw.
- Blend deck and saddle into a soft transition; many vernacular chairs have rolling hills instead of a crisp line anyway.
Never carve into the no-carve zone around a mortise to hide a mistake. The wall around the joint is structure.
Sand, scrape, and edge
A few minutes of sanding, Schwarz uses #80 grit with a small random-orbit sander for six or seven minutes per seat, blends the scorp and travisher surfaces quickly; then scrape 1. Shape the seat’s edges last, once you can judge where hands and thighs travel; Buchanan’s series gives separate episodes to carving the seat’s edge 2.
Keep the scorp and travisher sharp. Schwarz sharpens his scorp after every seat so it’s ready next time, even if it doesn’t seem to need it 1, and Buchanan’s free sharpening series covers chairmaking edge tools 4.
Try it
Before carving a real seat, saddle a scrap of the same species clamped to a 2×4. Lay out a deck, bowl, pommel, and cups, rough with whatever coarse tool you have, check with a straightedge, and smooth. Stop at about 1/2 inch deep, set it on a sturdy bench, sit on it, and decide whether you’d want it deeper or shallower.
Lesson complete
Nice work.
Sources for this lesson
- 1Christopher Schwarz. The Stick Chair Book. 2nd revised ed. Lost Art Press. verifiedPublisher page with the complete book available as a free PDF. Cited at: Saddle the Seat; Make & Shape the Seat; Tool Kit for Stick Chairs.
- 2Video series: How to make a democratic side chair. Curtis Buchanan Chairmaker. verifiedMaker's official index to the 20-part free build series and current plan options. Cited at: plan description; series episodes.
- 3Peter Galbert. Chairmaker's Notebook. Lost Art Press. 2015. verifiedDetailed chairmaking reference for drilling, reaming, sightlines, and compound geometry. Cited at: ch. 18–19.
- 4Video series: How to sharpen chairmaking tools. Curtis Buchanan Chairmaker. verifiedMaker's free 18-video series showing how he sharpens 17 chairmaking tools, including the drawknife, wooden-bodied spokeshave, and taper reamer. Cited at: series scope.