Setting Up and Using Bench Planes
Fore, jointer, and smoothing planes and what each does; the parts of a bench plane and how to set the iron, cap iron, and mouth; and the sequence for flattening, edging, and smoothing a board by hand.
- 5 min
- 6 steps
- 3 questions
- Lesson 29 of 160
In this lesson
- The three planes
- Parts of a bench plane
- Setting the plane
- Using a plane
- Flattening a board by hand
- What to take from this
Picking up where you left off.
The three planes
Hand planing has three jobs, and pre-industrial shops used a plane for each 1:
.jpg)
| Job | Plane | Length | Iron |
|---|---|---|---|
| Remove stock fast | Fore or jack (No. 5) | 14 to 18 in. | Strongly cambered (curved) edge for deep, narrow cuts |
| Make it straight and flat | Jointer or try (No. 7, 8) | 22 to 24 in. | Nearly straight, slight camber at the corners |
| Make it smooth | Smoother (No. 3, 4, 4½) | 9 to 10 in. | Straight with eased corners, very fine cut |
A long sole bridges the low spots, so a jointer only cuts the high spots until a surface is straight. A short smoother follows the surface and only refines it. Add a block plane for end grain and chamfers, and you have the core planing kit.
Wooden planes (the traditional form) and metal planes do the same work; most beginners start with metal Bailey-pattern planes, new or restored.
Quick check
A long sole rides on the high spots and only cuts them until the surface is straight. Fore (jack) planes hog material; smoothers finish.
Parts of a bench plane
On a bevel-down metal plane 1:
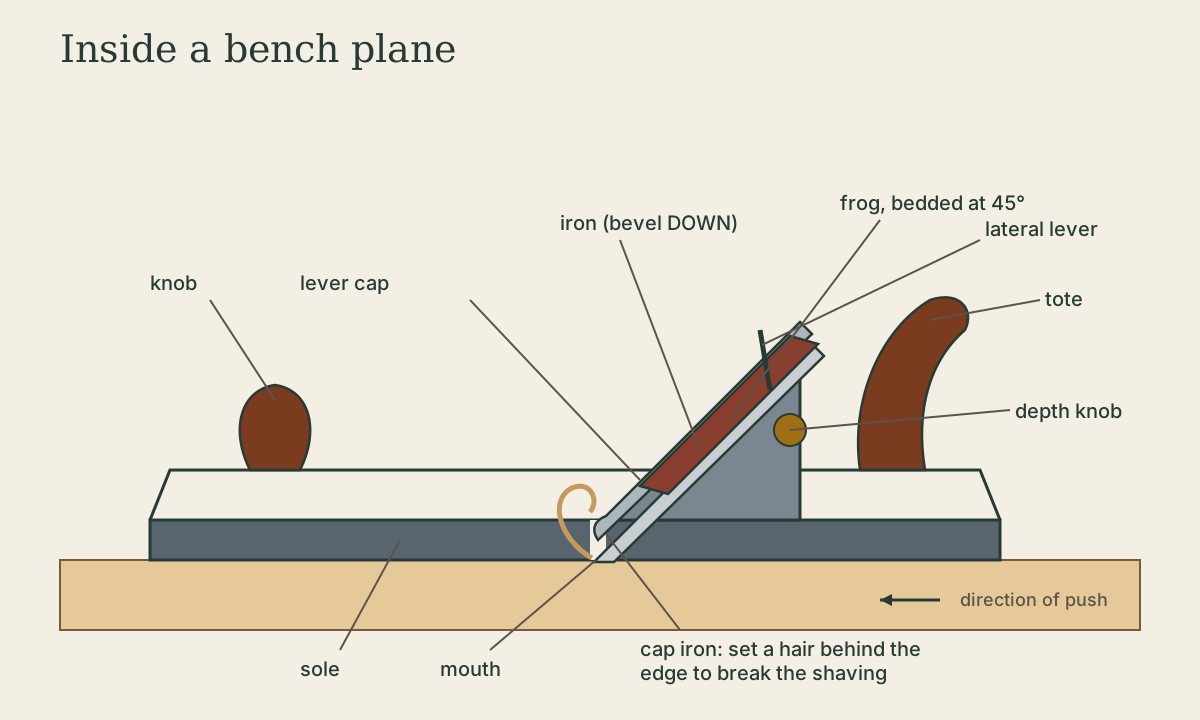
- Sole and mouth: the flat bottom and the opening the iron projects through.
- Frog: the wedge the iron rests on, usually at 45° (“common pitch”), which sets the cutting angle.
- Iron (blade), bevel down.
- Cap iron (chipbreaker): screwed to the iron’s face, it curls and breaks the shaving.
- Lever cap: clamps the iron assembly to the frog.
- Depth knob and lateral lever: set the depth of cut and square the edge to the mouth.
Setting the plane
- Sharpen the iron 2.
- Set the cap iron: for coarse work about 1/16 in. back from the edge; for smoothing, very close - a hair’s width (a few hundredths of an inch). A close cap iron is the most effective cure for tearout.
- Set the mouth (by moving the frog on Bailey planes): wider for heavy cuts, narrow for fine smoothing.
- Install and adjust: sight down the sole from the front toward a light, advance the iron until a sliver shows, and use the lateral lever until the projection is even side to side.
- Test on a scrap: the shaving should be even across its width, and as thin as you want.
Quick check
A cap iron set close behind the edge bends and breaks the shaving before it can lever fibers up ahead of the cut. A fine cut and tight mouth help too.
Using a plane
- Stance: feet apart, push from the legs and hips, not the arms.
- Pressure: on the front knob at the start of the stroke, even through the middle, on the tote at the end, so you don’t round the ends.
- Read the grain and plane with it (see Reading Grain and Figure).
- Wax the sole with paraffin; it glides far more easily.
- Rest the plane on its side, or on a strip, so the edge isn’t on the bench.
Playback is optional. If the player is unavailable, open the video at its source.
Flattening a board by hand
The classic sequence for rough stock 3:
- Assess: sight across the board with winding sticks (two straight strips laid across each end) to see twist; check for cup with a straightedge.
- Fore plane: work across the grain or diagonally on the face, taking down high corners and the hump of a cup until the face is roughly flat. The cambered iron leaves scalloped tracks.
- Jointer: plane along the grain until the winding sticks sit parallel and a straightedge shows no gaps.
- Edge: joint one edge straight and square to the face, checked with a try square.
- Gauge the thickness and width from those reference surfaces with a marking or panel gauge, and plane down to the lines.
- Smooth the show surfaces last.
Mark the first face and edge with face and edge marks; every measurement and joint is laid out from them.
What to take from this
Fore planes (cambered) remove stock, jointers make surfaces straight, smoothers make them smooth. A bevel-down plane cuts at the frog’s 45°; set the cap iron very close and the mouth tight for smoothing, sight the iron even, and push from the legs with shifting pressure. Flatten rough stock by fore planing across, jointing along, checking with winding sticks, then gauging thickness and width from marked reference surfaces.
Practice
Rough flattening comes first with a cambered fore plane working across or diagonally, then the jointer trues the face, then the smoother finishes.
Lesson complete
Nice work.
Sources for this lesson
- 1Christopher Schwarz. The Anarchist's Tool Chest. Lost Art Press. 2011. verifiedArgues a kit of fewer than 50 good hand tools can build almost anything; explains how to choose each tool, new or antique, and how to build a chest to hold them. Free PDF from the publisher.
- 2Asa Christiana. How to Use a Honing Guide. Fine Woodworking. 2012. verifiedPrimary bevel 25°, honed secondary bevel 27-28°; work through 1,000, 4,000, and 8,000 grit; flatten and polish the back once; remove the burr on the finest stone.
- 3Joshua A. Klein. The Foundations Course (Apprenticeship Series). Mortise & Tenon Magazine. verifiedHand-tool furniture making from pre-industrial originals - tool selection, sharpening, lumber processing, mortise and tenon, through and half-blind dovetails, nailed rabbets, dados, and shellac and milk paint finishes.