Proportion and Form Language
How chairs look the way they do: stance, line, section and visual weight, rhythm of repeated parts, negative space, transitions between parts, practical ratios stepped off with dividers, and overlays for analyzing your own design.
- 7 min
- 10 steps
- 3 questions
- Lesson 122 of 160
In this lesson
- Stance: the whole-body gesture
- Line: where the eye can travel
- Section and visual weight
- Rhythm: repeated parts and changing intervals
- Negative space: draw the holes
- Transition: how one part becomes another
- Proportion without a magic number
- A thirty-minute analysis exercise
- Apply the language to your design
Picking up where you left off.
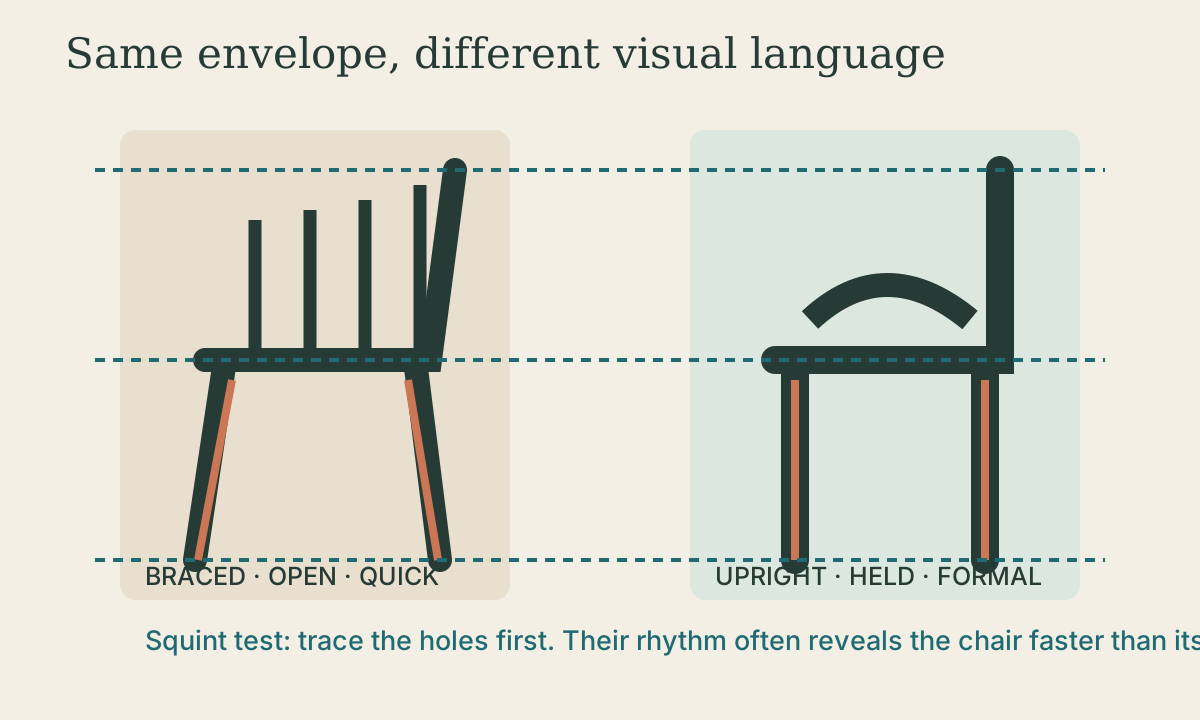
Two chairs can share seat height, width, depth, and back angle yet speak differently. One crouches; one stands at attention. One appears to gather the sitter; another keeps a formal distance. These are not mystical impressions. They arise from observable relationships: stance, line, section, rhythm, negative space, and transition.
Read them in order, from large gesture to small detail: stance, line, section, rhythm, negative space, transition.
Stance: the whole-body gesture
Begin with the feet and overall lean. Splayed legs widen the base and can make a chair look braced or relaxed. Near-vertical legs make it look formal, compact, or even precarious depending on section. A strongly raked back may suggest motion before anyone sits.
Describe stance with evidence:
“The front legs splay outward about the same visual amount as the rear legs rake backward, so the footprint reads as a balanced trapezoid.”
This is better than “dynamic.” The adjective becomes useful only after the geometry that produces it is named.
Line: where the eye can travel
Continuous lines create visual paths. A crest may complete the rising line of rear posts. An arm may run uninterrupted from one hand to the other. A hard transition at a joint can deliberately stop the eye.
Trace three lines on a photograph:
- the structural line from foot through joint to back;
- the contact line along seat, arm, and crest where the body meets the chair;
- the silhouette line against the room.
When all three cooperate, a chair often feels resolved. When they conflict, decide whether the tension is deliberate or accidental.
Section and visual weight
Part thickness is read relative to adjacent parts and empty space. A 1-inch leg can look heavy under a delicate woven seat and light under a broad upholstered shell.
Taper is the chairmaker’s most useful visual and structural tool. It can preserve material near a joint and remove it toward a low-stress end. Use a controlled taper rather than thinning by eye alone.
If a 1 1/2-inch square leg tapers to 1 inch over 18 inches, each side moves inward by
The taper rate is
At 9 inches, the offset is about 1/8 inch per side. Plotting this midpoint gives a quick check that the taper is straight rather than hollow or bulged.
Do not taper through a mortise wall or below the section required by Lesson 3.4. Elegance belongs between structural zones.
Quick check
Taper removes material where stress is lower; elegance belongs between structural zones.
Rhythm: repeated parts and changing intervals
Back sticks, ladder slats, turnings, and cord create rhythm. Equal spacing feels regular; a gradual change can make a back appear to open or close; one odd interval can look like an error unless it marks a structural center.
Three spacing systems:
- Equal centers: best when parts have equal width and the frame is regular.
- Equal gaps: best when part widths vary but the negative spaces should match.
- Proportional progression: gaps or parts change by a deliberate ratio toward the center or edges.
For \(n\) equal-width sticks of width \(w\) across clear span \(S\), with equal edge and internal gaps, there are \(n+1\) gaps:
Across 16 inches, five 5/8-inch sticks leave
That is a layout starting point. A human back may prefer a different central rhythm; mock it up.
Quick check
g = (S - nw) / (n + 1) = (16 - 3.125) / 6 ≈ 2.15 in.
Negative space: draw the holes
A chair is mostly air. Fill the spaces between legs, beneath arms, and among back members as black shapes. Ignore the wood for a minute.
Ask:
- Are left and right spaces intentionally mirrored?
- Does one hole become pinched near a joint?
- Do back openings support or fight the crest curve?
- Does the void beneath the seat look stable, top-heavy, or collapsed?
The squint test works because blur removes detail and leaves major mass and void. Photograph the chair square-on, increase contrast, and compare only silhouettes. This is analysis, not a claim that one negative-space pattern is universally beautiful.
Transition: how one part becomes another
Transitions reveal making. A turned leg may meet a square rail through a crisp shoulder. A sculpted arm may flow into a post through several diminishing facets. A shell may end in a rolled edge that adds stiffness and protects the hand.
Classify each transition:
- Stop: a shoulder or reveal states that parts are separate.
- Blend: profiles merge continuously.
- Overlap: one part visibly passes another.
- Float: a gap separates body-support surface from frame.
Repeat the chosen grammar. One accidental blend among otherwise crisp stopped joints looks unfinished.
Quick check
Stop, blend, overlap, float - choose a grammar and repeat it consistently.
Proportion without a magic number
Walker and Tolpin document practical design with simple ratios such as 1:2, 3:5, and 4:5, transferred with dividers rather than imposed through one universal formula 1. This is useful because related dimensions can scale together.
Start with a functional module—perhaps seat width. Derive candidates:
- back height as 4:5 of seat width;
- clear depth as 3:4;
- crest width equal to or slightly less than seat width;
- stretcher height as a simple division of leg length.
Then test. Ratios organize choices; bodies and structures accept or reject them. Avoid retrofitting a famous ratio after the fact and calling it a cause.
Divider method
- Draw the functional dimension full size.
- Divide it into three, four, or five equal parts geometrically.
- Step those parts onto adjacent dimensions.
- Compare at least two simple ratios.
- Choose the one that supports fit and the intended gesture.
The goal is relatedness, not numerology.
A thirty-minute analysis exercise
Choose one chair you love and one you distrust. Use square-on images with minimal perspective.
For each:
- Draw its bounding rectangle.
- Trace foot points and main stance axes.
- Trace three continuous lines.
- Mark thickest and thinnest sections.
- Fill negative spaces.
- Measure two major ratios.
- Name every transition as stop, blend, overlap, or float.
- Write one sentence of observation and one sentence of interpretation.
Example:
Observation: rear posts lean, front legs remain nearly vertical, and the trapezoidal side void narrows toward the back. Interpretation: the chair appears to brace itself against a backward-moving sitter.
The distinction keeps visual criticism honest.
Apply the language to your design
Create three overlays on your full-size elevation:
- red for structural axes and joints;
- blue for body-contact lines;
- gray for negative spaces.
If the structural line needs thickness but the silhouette should look light, taper outside the joint. If a back rhythm looks crowded, change gaps before randomly slimming sticks. If one transition cannot follow the chosen grammar, make it a deliberate focal exception.
Read Stance, Line, Section, Rhythm, Negative space, Transition from far to near. Proportion is not a decorative formula added after engineering. It is the practice of making every visible relationship agree—or disagree on purpose.
Lesson complete
Nice work.
Sources for this lesson
- 1George R. Walker, Jim Tolpin. By Hand & Eye. Lost Art Press. 2013. verifiedProportional design using simple ratios and dividers rather than a single universal formula. Cited at: proportion and divider exercises.
Further reading
- Christopher Schwarz. The Stick Chair Book. 2nd revised ed. Lost Art Press. verifiedPublisher page with the complete book available as a free PDF.