Edge Joints and Glue-Ups
Making wide panels from narrow boards: arranging boards for grain and movement, planing a spring joint, choosing between PVA and hide glue, and clamping without bowing the panel.
- 4 min
- 7 steps
- 3 questions
- Lesson 37 of 160
In this lesson
- Why glue up panels
- Arrange the boards
- Plane the joint
- Glue
- Clamp
- Flatten the panel
- What to take from this
Picking up where you left off.
Why glue up panels
Wide, flat, stable boards are rare and expensive. Tabletops, chest sides, and panels are usually made by edge-gluing narrower boards. A well-made edge joint is stronger than the wood around it, because long grain glued to long grain is the strongest glue bond there is.
Arrange the boards
- Mill each board flat and to thickness, leaving it slightly wide and long.
- Lay them out and shuffle them for the best match of color and grain. Avoid putting a dramatic cathedral next to a straight-grained board.
- Consider growth rings: alternating the heart side up and down is a common rule to keep a panel’s overall cup small, though many makers prefer to arrange for appearance and accept it. Narrower, quartersawn boards make the most stable panels 1.
- Mark a triangle across all the boards so they go back in the same order and orientation.
Quick check
Alternating rings can limit the size of any one cup, but appearance and flat-sawn versus quartersawn stock matter more; mark the arrangement before gluing.
Plane the joint
By hand, with a jointer plane:
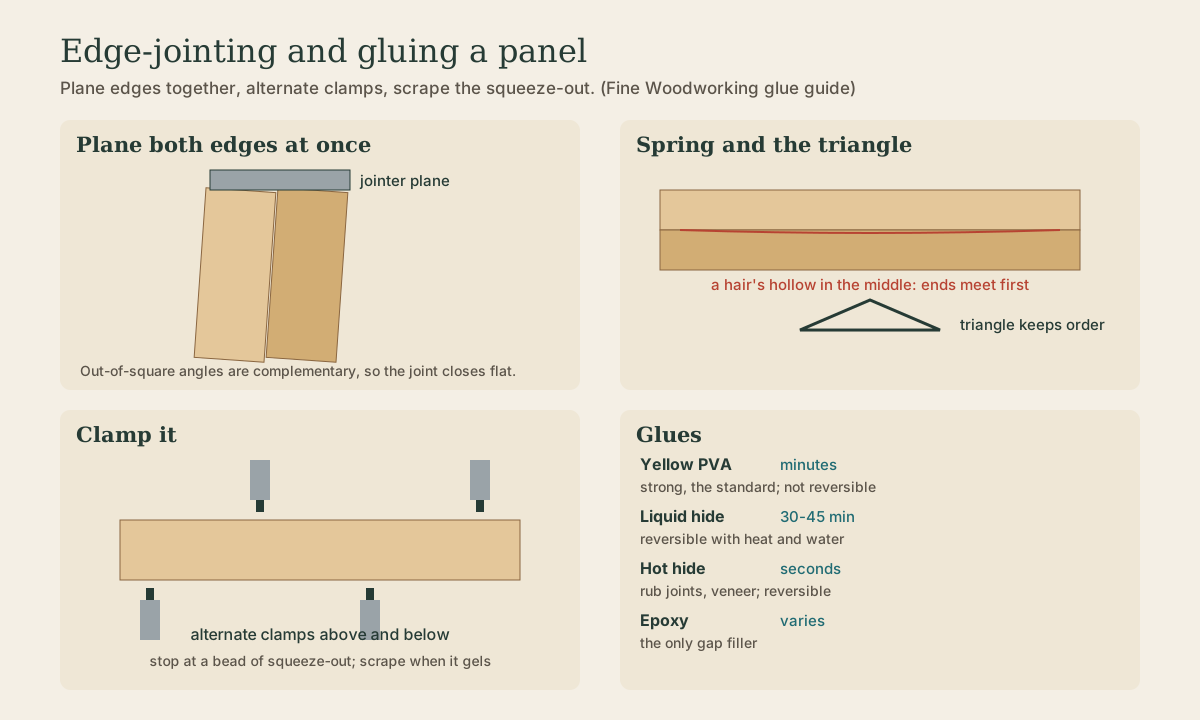
- Clamp the two boards back to back in the vise with the faces out and edges flush, and plane both edges at once. Any error in squareness cancels out when the boards are opened, because the angles are complementary.
- Plane until a full-length shaving comes off both.
- Plane a slight spring - a hollow of a hair’s thickness in the middle - by taking a stopped shaving from the center. The ends meet first and a single clamp closes the middle.
- Test: stand one board on the other. It shouldn’t rock, and a light gap should show only in the middle.
On a jointer, joint both edges with one face against the fence, then flip one board so complementary angles cancel the same way.
Quick check
A hair-thin gap in the middle closes with modest clamp pressure and keeps the ends, which dry fastest, under compression.
Glue
The main choices 2:
| Glue | Working time | Notes |
|---|---|---|
| Yellow PVA (aliphatic resin) | Short: a few minutes | Strong, easy cleanup, the shop standard. Water-resistant versions exist. Not reversible. |
| Liquid hide glue | 30 to 45 minutes | Slips during assembly; reversible with heat and moisture; ideal for complex glue-ups and future repair |
| Hot hide glue | Seconds, gels as it cools | Traditional; good for rub joints and veneer; reversible |
| Epoxy | Varies | Only real gap-filling glue; outdoor work and repairs |
For a simple panel, PVA is fine if you’re organized. Hide glue is the traditional furniture glue and the one a future repairer will thank you for.
Quick check
Yellow glue grabs in minutes. Hide glue’s long open time and reversibility suit complex assemblies and future repair.
Clamp
- Dry run with all clamps and cauls before glue.
- Spread a thin, even coat on one or both edges.
- Alternate clamps above and below the panel to balance the pressure, so it doesn’t bow.
- Use cauls (straight battens clamped across the ends) to keep boards flush.
- Tighten just until a bead of squeeze-out appears along the joint. Excessive pressure starves the joint and bows the panel.
- Let squeeze-out gel, then scrape it off (wiping wet PVA pushes it into the pores, where it blocks finish).
Leave the panel clamped at least an hour for PVA, and let it cure overnight before planing; planing a fresh joint can leave a sunken glue line when the swollen wood dries.
Flatten the panel
After curing, flatten the panel: plane across the grain with a fore plane, then diagonally and along the grain with a jointer, and smooth. A panel that went together flush needs little work.
What to take from this
Arrange boards for appearance and stability and mark a triangle. Plane mating edges back to back so angles cancel, with a slight spring in the middle. Use PVA for speed or hide glue for long open time and reversibility. Dry-run, clamp alternately above and below with cauls, stop at an even bead of squeeze-out, and let it cure before flattening.
Lesson complete
Nice work.
Sources for this lesson
- 1Samuel V. Glass, Samuel L. Zelinka. Moisture Relations and Physical Properties of Wood (Wood Handbook, Chapter 4). USDA Forest Service, Forest Products Laboratory, FPL-GTR-282. 2021. verifiedFree and bound water, fiber saturation (~30%), EMC table (Table 4-2), green moisture by species (Table 4-1), shrinkage by species (Table 4-3), and the shrinkage equation.
- 2Bob Van Dyke. Woodworker's Guide to Glue. Fine Woodworking. 2022. verifiedYellow PVA sets fast with short working time; liquid hide glue gives 30-45 minutes and is reversible with heat; hot hide glue gels as it cools; epoxy is the gap filler.