A Plank-Top Table with Breadboard Ends
A hand-tool table in the pre-industrial manner: reference faces and an efficient workflow, drawbored apron-to-leg joints, tapering legs, gluing up a top, breadboard ends that allow movement, and leveling the feet.
- 5 min
- 8 steps
- 3 questions
- Lesson 60 of 160
In this lesson
- Workflow
- Legs
- Aprons and drawbores
- The top
- Breadboard ends
- Leveling the feet
- Try it
- What to take from this
Picking up where you left off.
Workflow
Joshua Klein’s guide to pre-industrial table construction in Mortise & Tenon Magazine covers reference faces, rough stock prep, drawbored mortise and tenon joints, tapering legs, assembly, tops, breadboard ends, and leveling the feet, all with hand tools 1. His main point: the greatest inefficiency in furniture making has nothing to do with hand tools versus machines, and everything to do with ill-considered workflow 1.
In practice:
- Rough out everything first: fore-plane all parts close to size (see Coarse, Medium, Fine) 2.
- Choose reference faces: true one face and one edge on each part with the jointer and mark them. All layout comes from them.
- Gauge from the references: thickness, width, and joinery all measured from those faces, so parts agree even if they aren’t perfectly square everywhere.
- Smooth only show surfaces, last.
Quick check
Plan from reference faces and do each operation once.
Legs
- Mill four legs square, mark their reference faces to the inside or outside consistently, and lay out the mortises with a story stick.
- Mortises for the aprons near the top, chopped before tapering, while the leg is square.
- Taper only the two inside faces, from just below the apron to the foot: the leg looks lighter while the outside faces stay straight and flush with the aprons. Saw or fore-plane to lines, then clean up with the jointer.
Quick check
Inside tapers read as a lighter leg from every angle.
Aprons and drawbores
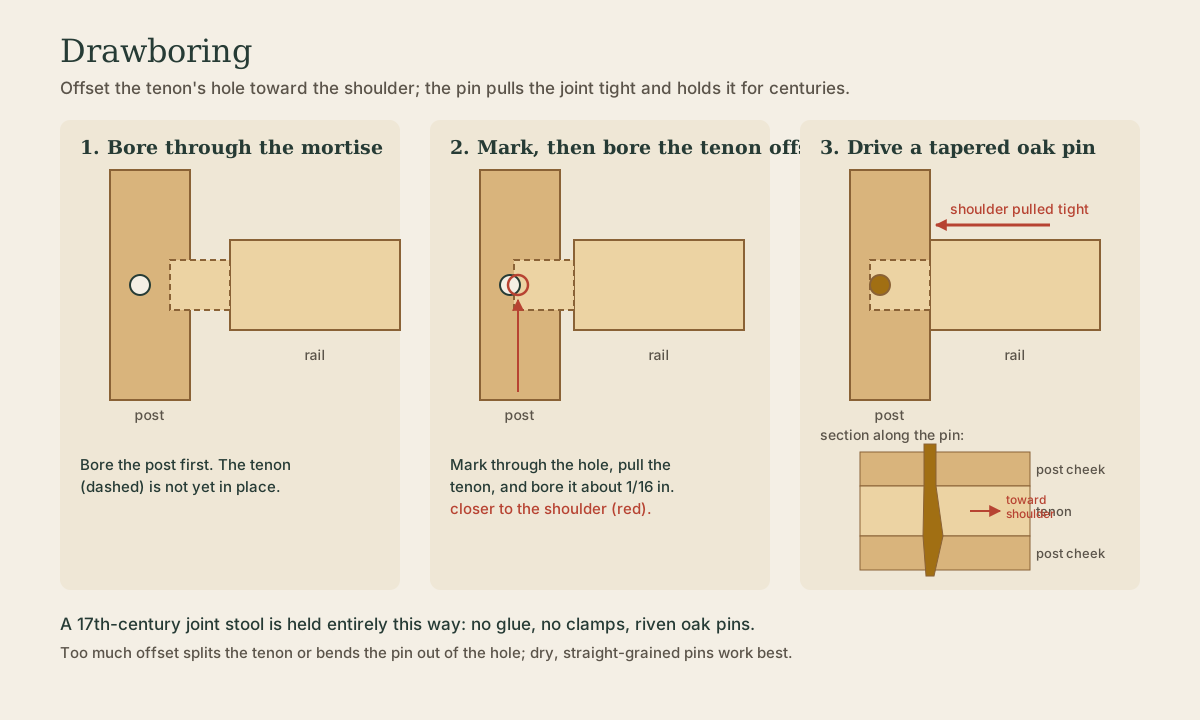
The aprons are tenoned into the legs and drawbored, the same joint as the joint stool 3: bore the mortise cheeks, mark the tenon, offset its hole about 1/16 in. toward the shoulder, and drive tapered riven pins. The joint pulls tight with no clamps, and glue becomes optional.
The top
- Boards: two to four wide boards, edges jointed and glued (a rubbed joint with hide glue works for short boards; see Hide Glue).
- Flatten: traverse with the fore plane, then true with the jointer across, along, and diagonally, as Moxon describes for tabletops 2. Smooth the top face; leave the underside fore-planed.
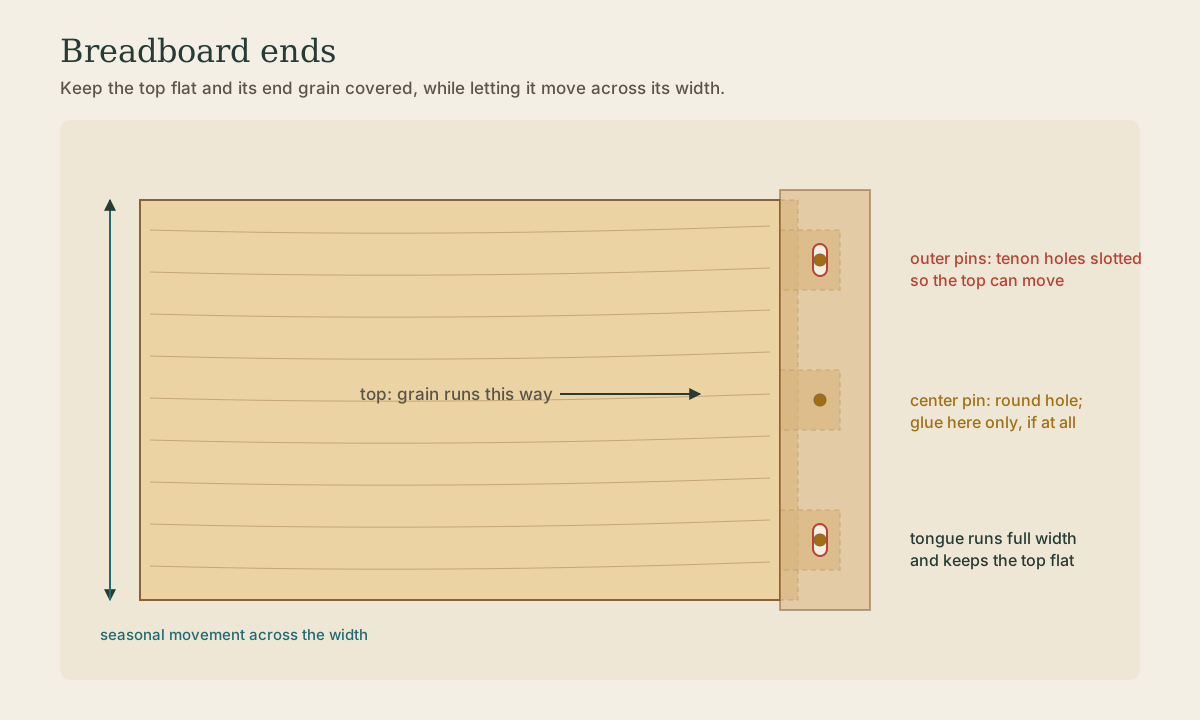
- Fastening to the base: the top must move across its width. Use buttons in grooves, slotted cleats, or pins through elongated holes at the outer edges, never glue along the aprons.
Breadboard ends
A breadboard end is a cross-grain board on each end of the top. It keeps the top flat, covers the end grain, and hides the joint, but it has to let the top move 1:
- Cut a full-width tongue on the top’s end, with three or more longer tenons at intervals.
- Groove and mortise the breadboard to match, with the outer mortises a little wider than their tenons.
- Bore the pin holes. The center tenon’s hole is round and tight; the outer tenon holes are slotted toward the edges (drawbore the outer pins only slightly, if at all).
- Glue only the center tenon, or no glue at all. Pin it.
- Make the breadboard a little long; in a dry season the top will be narrower than the breadboard, and in a humid season wider.
Quick check
Glue, if any, goes only at the center, where the top’s movement is zero.
Leveling the feet
Set the table on a flat floor or bench, shim until the top is level, then scribe all four feet with a block and pencil held at a constant height and saw to the lines 1. Chamfer the foot edges so they don’t splinter.
Try it
Build a small side table about 28 in. high with a pine or oak top of two boards and breadboard ends. Work from marked reference faces, drawbore the aprons, taper the inside faces of the legs, pin the breadboards with slotted outer holes, and level the feet.
What to take from this
Efficient hand work comes from workflow: rough everything out, true reference faces, gauge from them, and smooth only what shows. Drawbore the aprons to the legs, taper the inside faces of the legs, flatten the top by traversing and truing, attach it so it can move, and fit breadboard ends pinned tight at the center and slotted at the edges. Level the feet last by scribing.
Lesson complete
Nice work.
Sources for this lesson
- 1Joshua A. Klein. Issue Four: The Artisan's Guide to Pre-industrial Table Construction. Mortise & Tenon Magazine. 2018. verifiedReference faces, rough stock prep, drawbore mortise and tenon, tapering legs, assembly, tops, breadboard ends, leveling feet; inefficiency comes from ill-considered workflow.
- 2Joseph Moxon, Christopher Schwarz. The Art of Joinery (2nd ed.). Lost Art Press. 2013. verifiedMoxon's 1678/1703 Mechanick Exercises joinery section with commentary. Fore plane with cambered iron set rank (shilling-thick shavings, about 0.04 in.), jointer set to a hair, smoothing plane set very fine; traversing; holdfast and planing stop; use the coarsest tool as long as possible.
- 3Jennie Alexander, Peter Follansbee. Make a Joint Stool from a Tree: An Introduction to 17th-Century Joinery. Lost Art Press. 2012. verifiedRiven (not sawn) oak, turned and angled legs, drawbored mortise and tenon joints without glue, pegged seat, scratch-stock mouldings, pigment and linseed oil paint; over two decades of research from written sources, tool marks, and experiment.