Build a Westport Plank Chair
Building Bunnell's plank chair from wide boards: setting seat tilt and back recline on a full-size mock-up, the included-angle check, a parts list from the 1905 patent, making wide parts from narrower boards with battens, assembly with exterior screws and bolts, and wood and finish choices.
- 5 min
- 8 steps
- 3 questions
- Lesson 87 of 160
In this lesson
- The plan
- Set the geometry on a mock-up
- Parts
- Wide parts from narrow boards
- Assembly
- Wood and finish
- Try it
- What to take from this
Picking up where you left off.
The plan
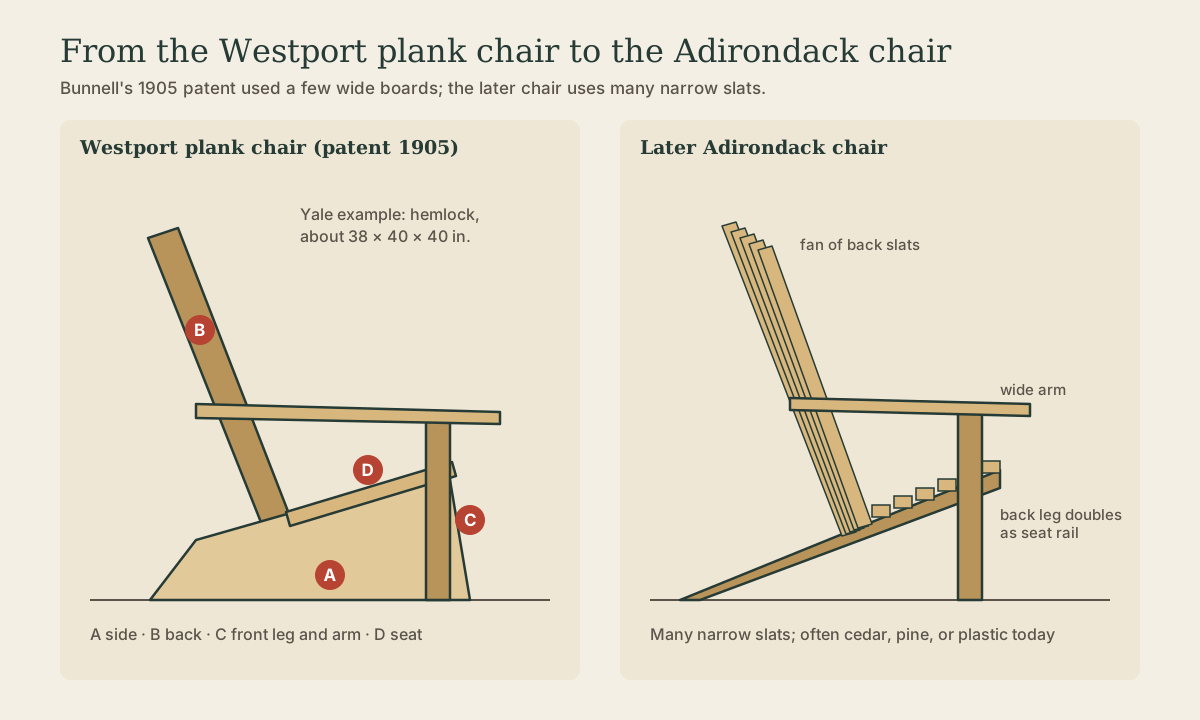
The Westport chair is a few wide boards 1:
- A, two sides: solid boards with a straight base, an angled front edge, and a top edge sloping down toward the back.
- B, the back: one wide board running up and back between the sides.
- C, two front legs carrying broad, flat arms.
- D, the seat, resting on the forward top edges of the sides.
Bunnell added a hinged foot-rest, cushions, and a compartment under the seat 1; skip those for a first chair. Aim for about the Yale chair’s overall size, roughly 38 in. high, 40 in. wide, and 40 in. deep 2.
Set the geometry on a mock-up
The patent doesn’t give angles, so you set them by sitting. Use the cardboard side from The Westport Plank Chair, or screw scraps together into a rough side frame, with a board for the seat and one for the back.
Starting points to test (a low lounge chair, not a dining chair):
- Seat front height: about 14 to 15 in.
- Seat tilt: about 10 to 15 degrees down toward the back.
- Back recline: about 25 to 35 degrees behind vertical.
- Arm height: so your forearms rest without lifting your shoulders.
Check the included angle between seat and back: 90 + back recline − seat tilt. Twelve degrees of tilt and 30 of recline give 90 + 30 − 12 = 108 degrees. If you slide forward, add seat tilt or reduce recline (see The Geometry of Sitting in the Chairs course).
Sit for ten minutes, adjust, and repeat. Then trace the final side outline onto hardboard as a pattern.
Quick check
Included angle = 90 + back recline - seat tilt.
Parts
For 7/8-in. boards (adjust widths to your mock-up):
| Part | Qty | Approximate size |
|---|---|---|
| Sides (A) | 2 | 7/8 × 16 × 36 in., each from 2 boards |
| Back (B) | 1 | 7/8 × 20 × 36 in., made from 2-3 boards |
| Seat (D) | 1 | 7/8 × 20 × 18 in., made from 2 boards |
| Front legs (C) | 2 | 7/8 × 5-1/2 × 22 in. |
| Arms | 2 | 7/8 × 7-1/4 × 34 in. |
| Battens | 3-4 | 7/8 × 2-1/2 in., cut to fit |
| Front rail | 1 | 7/8 × 3-1/2 × 20 in. |
Wide parts from narrow boards
Few lumberyards sell clear 20-in. boards. Make the back and seat from two or three boards:
- Edge-joint the boards so they meet without gaps (or leave 1/8-in. gaps in the seat for drainage).
- Screw battens across the underside of the seat and the back of the back board, one near each end and one in the middle.
- Drill slotted holes in the battens, except at the center screw, so the boards can swell and shrink across their width without splitting. Wood moves across the grain, hardly at all along it 3.
Quick check
Cross-grain battens hold the boards flat; slotted holes let the panel swell and shrink across its width.
Assembly
- Cut the sides from the pattern; clamp them together and plane the edges so they match.
- Join the sides with the front rail and the seat battens, keeping them parallel and the chair square. Check the diagonals.
- Fit the back between the sides at the angle from the mock-up, screwed through the sides into its battens.
- Lay the seat on the forward top edges of the sides and screw it down through its battens.
- Front legs outside the sides at the front, through-bolted with 3/8-in. galvanized carriage bolts.
- Arms across the tops of the front legs and back to the back board, screwed down; round all edges and the front corners.
Use exterior screws (stainless or coated) and galvanized bolts; ordinary steel stains the wood black where it rusts. Pre-drill near every end.
Wood and finish
The Yale chair is hemlock 2. Northern white cedar, white pine, and white oak work well. Cedar and white oak heartwood resist decay much better than pine sapwood 3. Leave it bare to weather gray, paint it, or oil it yearly. Keep the base off wet ground: the sides sit flat, so their bottom edges take water first. A pair of hardwood glides or a coat of pine tar on the bottom edges helps.
Quick check
Local softwood; cedar, white pine, or white oak also work.
Try it
Build the mock-up this week, even before buying lumber. Sit in it reading for an hour. Write down the seat front height, tilt, and recline that you ended with; those three numbers are your chair.
What to take from this
Build the Westport chair from Bunnell’s parts: two diamond-outlined sides, one back, a seat on the sides’ forward edges, and front legs with broad arms, about 38 by 40 by 40 in. overall. Set seat tilt and back recline on a mock-up and check the included angle (90 + recline − tilt). Make wide parts from narrower boards with battens and slotted screw holes. Assemble with exterior screws and galvanized bolts, round the edges, and use hemlock, cedar, pine, or white oak.
Lesson complete
Nice work.
Sources for this lesson
- 1Harry C. Bunnell. Chair (US Patent 794,777). United States Patent Office. 1905. verifiedFiled April 1, 1904, granted July 18, 1905, Westport, New York. A bungalow chair for porches, lawns, and camps: solid side pieces of irregular diamond outline, a single wide back board, a seat on the forward upper edges of the sides, front legs carrying arms, a hinged seat over a compartment, convertible to an invalid's chair.
- 2Harry C. Bunnell. Westport Chair (Yale University Art Gallery 2002.77.1). Yale University Art Gallery, via SAPFM Museum Furniture Collection. 1905. verifiedHemlock, about 38.4 x 39.5 x 40 in.; designed by Thomas Lee and made by Bunnell, who patented it; made in Westport on Lake Champlain from about 1904; sold to the convalescent market of the wilderness cure.
- 3Robert J. Ross. Wood Handbook: Wood as an Engineering Material. Revised 2021 ed. USDA Forest Service, Forest Products Laboratory. 2021. verifiedOfficial chapters on wood structure, moisture, mechanical properties, fastenings, composites, drying, and finishing.