A Workbench
The first real project in a hand-tool shop: a heavy, rigid bench at the right height with a leg vise, a planing stop, and holdfasts. Design principles, Schwarz's free Anarchist's Workbench plan, and a build sequence from construction lumber.
- 4 min
- 6 steps
- 3 questions
- Lesson 46 of 160
In this lesson
- Why a workbench first
- Design principles
- Workholding
- A plan to build from
- Build sequence
- What to take from this
Picking up where you left off.
Why a workbench first
Every hand-tool operation - planing, sawing, chopping, paring - depends on holding the work still against heavy force. The bench is the most important tool in the shop, and building it teaches milling, big joinery, and flattening at a scale that forgives small errors 1.
Design principles
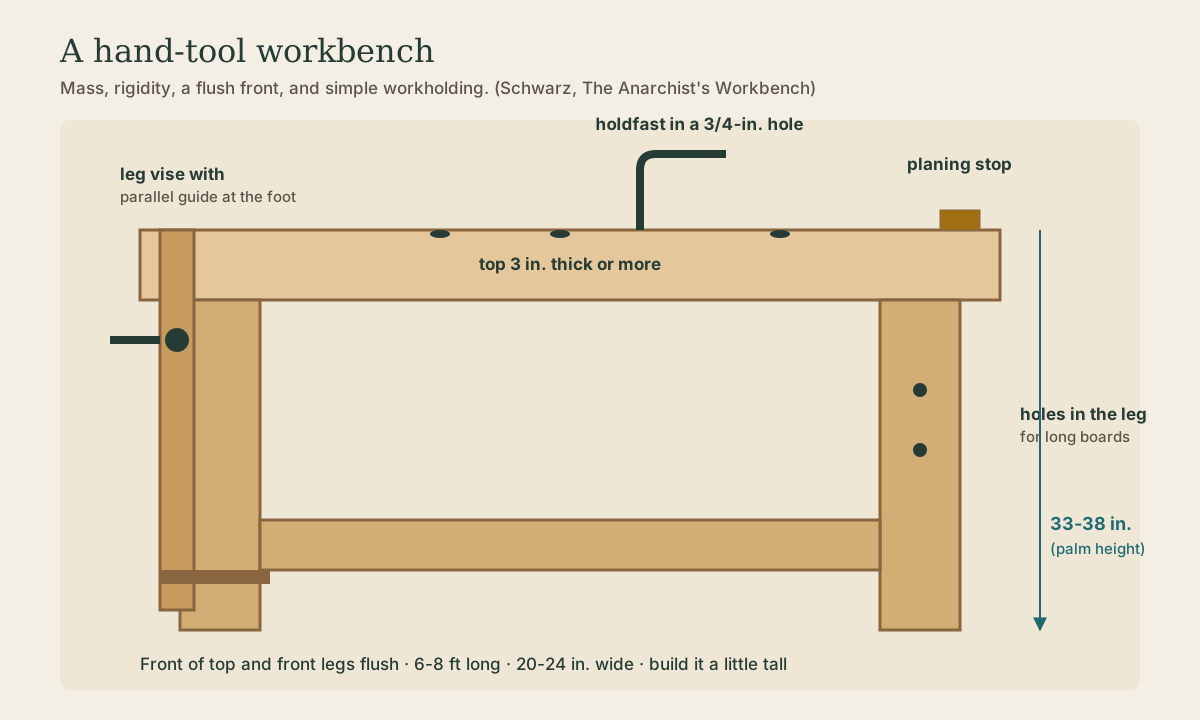
Good hand-tool benches share a few traits 2:
- Mass: a thick, heavy top (3 inches or more) doesn’t bounce or slide when you plane.
- Rigidity: stout legs joined with mortise and tenon or drawbored joints, so the bench doesn’t rack.
- Height: low enough to plane with body weight over the tool. A starting point is the height of your palm with your arm hanging relaxed, commonly 33 to 38 inches. Build it a little tall; legs can be shortened.
- Front flush: the front edge of the top and the front legs in one plane, so long boards can be clamped to the bench front for edge planing.
- Length: long enough to plane your longest boards, typically 6 to 8 feet.
- Width: about 20 to 24 inches - enough to work on, narrow enough to reach across.
Quick check
Hand planing works best low enough to put body weight over the plane. Make it a bit tall; you can always cut the legs.
Quick check
A light bench walks across the floor under a jointer plane. Thick tops and stout, well-joined legs fix that.
Workholding
Simple, traditional workholding does nearly everything 2:
- Leg vise: a wooden chop on a screw at the front leg, with a parallel guide at the bottom. Holds boards on edge for jointing and dovetailing, with huge clamping power.
- Planing stop: a block that rises above the top at one end. Push the board against it to plane faces; no clamping needed.
- Holdfasts: bent iron rods dropped into 3/4-inch holes in the top. A mallet tap wedges them tight against the work; a tap on the back releases them.
- Holes in the front legs with a peg or holdfast to support long boards held in the vise.
- Doe’s foot or batten: a notched batten held by a holdfast to stop thin boards from swinging.
A tail or wagon vise adds convenience but isn’t essential.
Quick check
A tap sets them; a tap on the back releases them. With a planing stop and leg vise, they hold almost any work.
A plan to build from
Christopher Schwarz’s The Anarchist’s Workbench is a free PDF from Lost Art Press, released under a noncommercial Creative Commons license 2. It’s a chunky yellow-pine bench built from 2×12 construction lumber, with a leg vise, planing stop, and holdfasts - the distillation of two decades of building historical benches 2. Download it and use its dimensions and sequence; this lesson is the overview.
Build sequence
- Buy and acclimate the lumber: the straightest, clearest 2×12s you can find, stickered indoors for a few weeks. Construction lumber is wet and moves as it dries.
- Rip and glue up the top from strips, edge-glued face to face, in sections you can handle.
- Make the legs: laminate from 2× stock if needed, mill square.
- Cut the joints: big mortises in the top or legs and tenons on the stretchers, often drawbored so the bench pulls itself tight without glue or clamps.
- Assemble the base, then fit the top to it.
- Flatten the top: traverse with a fore plane, check with winding sticks and a straightedge, then jointer and smooth.
- Install workholding: the leg vise, planing stop, and holdfast holes.
- Finish lightly or not at all; a little boiled linseed oil keeps glue drips from sticking.
Many people build the bench with only a few hand tools and a circular saw, flattening on sawhorses until the bench can hold its own work.
What to take from this
A hand-tool bench needs mass, rigidity, a flush front, and a height around 33 to 38 inches (build it slightly tall). A leg vise, planing stop, and holdfasts hold nearly everything. Schwarz’s free Anarchist’s Workbench plan builds a heavy pine bench from 2×12s; acclimate the lumber, laminate the top and legs, drawbore the base, flatten the top, and add workholding.
Lesson complete
Nice work.
Sources for this lesson
- 1Joshua A. Klein. The Foundations Course (Apprenticeship Series). Mortise & Tenon Magazine. verifiedHand-tool furniture making from pre-industrial originals - tool selection, sharpening, lumber processing, mortise and tenon, through and half-blind dovetails, nailed rabbets, dados, and shellac and milk paint finishes.
- 2Christopher Schwarz. The Anarchist's Workbench. Lost Art Press. 2020. verifiedA thick, heavy yellow-pine workbench from 2x12 construction lumber with a leg vise, planing stop, and holdfasts; free PDF under a noncommercial Creative Commons license.
Further reading
- Christopher Schwarz. The Anarchist's Tool Chest. Lost Art Press. 2011. verifiedArgues a kit of fewer than 50 good hand tools can build almost anything; explains how to choose each tool, new or antique, and how to build a chest to hold them. Free PDF from the publisher.