The Muslin Cover
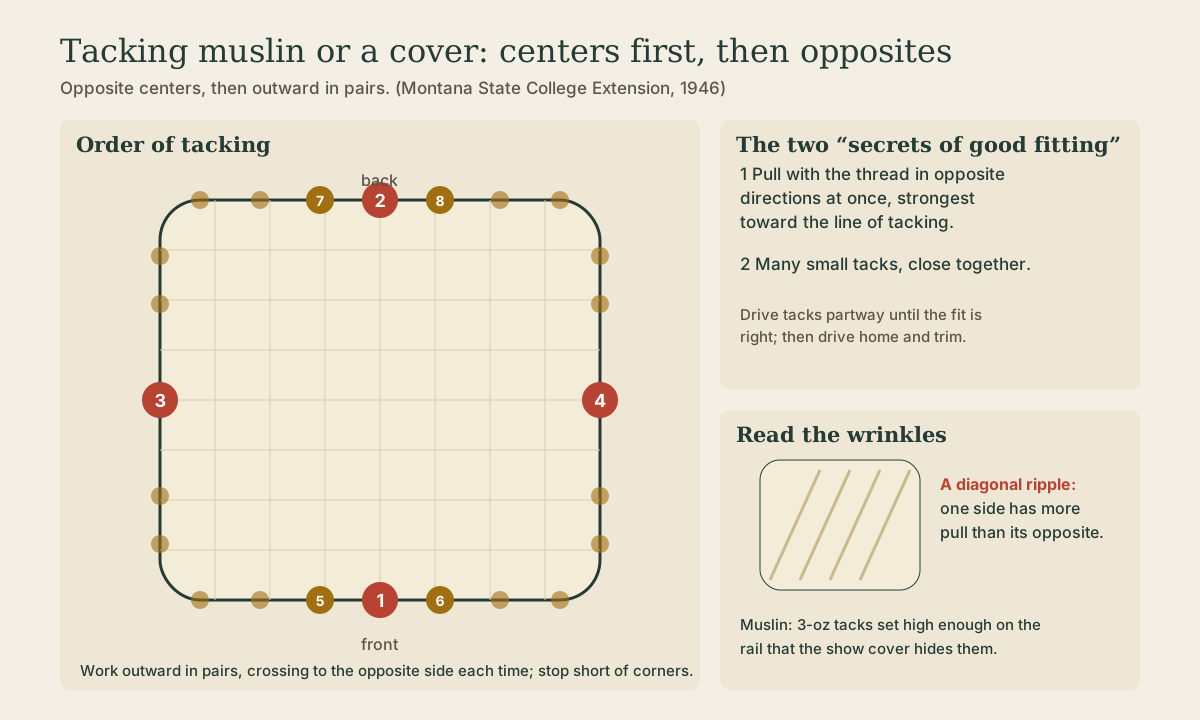
The inner cover that shapes the seat: tacking from the centers out with the grain straight, pulling opposite directions at once, using many small tacks, and working out the fullness at corners.
- 3 min
- 5 steps
- 3 questions
- Lesson 152 of 160
In this lesson
- Why muslin
- Fitting the muslin
- Corners
- Checking the shape
- What to take from this
Picking up where you left off.
Why muslin
In traditional work, a cover of firm unbleached muslin goes on before the show fabric 1. It does the structural work: compressing and shaping the stuffing into a smooth, tailored form. The show cover then goes over a finished shape and only has to look good, which means less strain on expensive fabric and a crisper result.
Fitting the muslin
Following the Montana bulletin 1:
- Cut the muslin generously - enough to reach under the rail edges with something to grip.
- Lay it over the cotton with the threads running straight with the lines of the seat.
- Tack with 3-ounce tacks, first at the middle of each side, then working out toward the corners 1.
- Place tacks high enough on the rail that the show cover will hide them 1.
- Drive tacks only partway at first, so you can pull them and readjust 1.
- Pull out all the fullness at the corners to a smooth, rounded contour 1.
- When the fit is right, drive all tacks home and trim the muslin evenly below them.
The two “secrets of good fitting,” as the bulletin puts it 1:
- Pull with the thread in opposite directions at the same time, the strongest pull toward the line of tacking.
- Use many small tacks placed fairly close together.
Draw the muslin quite tight: a loose muslin gives a lumpy show cover 1.
Quick check
Centers first, then out in both directions, keeps tension even and the threads straight.
Quick check
Balanced, straight-grain pulls and closely spaced small tacks give a smooth, tailored surface.
Quick check
Temporary tacking lets you adjust; drive tacks home when the fit is right, then trim below them.
Corners
Corners are where fullness collects:
- Pull the muslin diagonally over the corner first and tack it.
- Work the excess on each side into the corner, cutting away bulk underneath where it would make lumps.
- On square corners, form a neat pleat; on rounded corners, gather small even pleats under the rail.
- Use the regulator to move stuffing into any hollow before closing the corner.
Checking the shape
Run your hand over the muslin: it should feel firm and even, with no hollows, lumps, or hard ridges at the edge roll. Sight across it in raking light. Fix problems now - pull tacks, add or move stuffing with the regulator, and re-tack. It’s much harder after the show cover is on.
What to take from this
Muslin shapes the seat so the show cover doesn’t have to. Lay it with the grain straight, tack centers first with 3-ounce tacks placed where the cover will hide them, drive them partway until the fit is right, pull with the grain in opposite directions using many small tacks, work out corner fullness, and trim below the tacks once it’s smooth.
Lesson complete
Nice work.
Sources for this lesson
- 1Margaret Huston Tuller. Simple Upholstery Methods (Bulletin 198, revised). Montana Extension Service, Montana State College. 1946. verifiedA sprung footstool step by step - webbing stretcher, 3-, 8-, and 12-ounce tacks, 3 1/2-inch webbing interlaced, springs sewn at intersections, 8-way tying with clove hitches, burlap, edge roll, hair and cotton padding, muslin, cover, welt, cambric; plus retying 'broken springs' and renewing webbing.