Sharpening: Edges, Angles, and Stones
A sharp edge is two flat, polished surfaces meeting at a line. Flatten the back once, grind a 25-degree bevel, hone a slightly steeper microbevel through fine grits, raise and remove a burr - and keep it sharp with a minute at the stones.
- 5 min
- 7 steps
- 3 questions
- Lesson 28 of 160
In this lesson
- What sharp means
- Angles
- Abrasives
- The routine
- Testing and keeping sharp
- At the bench
- What to take from this
Picking up where you left off.
What sharp means
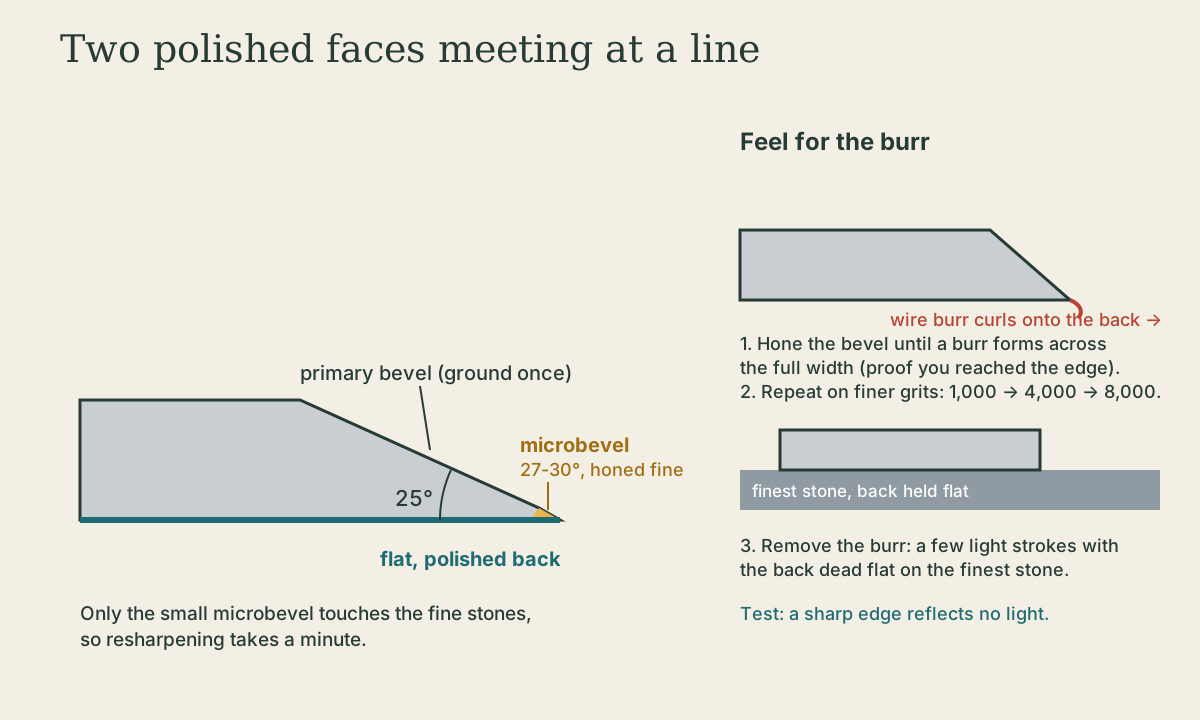
A cutting edge is the line where two surfaces meet: the back (flat face) and the bevel. Sharpness depends on how small that intersection is, which means both surfaces must be flat and polished right to the edge. Scratches from a coarse stone leave a serrated edge that dulls fast and tears wood.
So sharpening has two parts:
- Flatten and polish the back near the edge. You do this once, when you first get a blade, working through your stones until the last inch or so is flat and mirror-polished 1.
- Grind and hone the bevel, each time it dulls.
Quick check
The edge is where back and bevel meet; both must be polished. Once the back is flat, each sharpening touches it only to remove the burr.
Angles
For bench chisels and bevel-down plane irons, a common setup is 1:
- Primary bevel: 25°, ground on a grinder or coarse stone.
- Secondary bevel (microbevel): 27 to 28°, honed on fine stones; higher (30° or more) for chisels used for heavy chopping or for some bevel-up plane irons.
Lower angles cut more easily but chip; higher angles last longer in hard woods and under a mallet. Mortise chisels often take 30 to 35°.
For bevel-down bench planes, the bevel angle doesn’t change the cutting angle; the frog sets that (usually 45°). The bevel just needs clearance. For bevel-up planes, the bevel angle adds to the bed angle and sets the cutting angle.
Abrasives
Any flat abrasive works if you use a progression:
- Water stones: fast, need periodic flattening; common grits 1,000, 4,000, 8,000 1.
- Diamond plates: stay flat, cut steel fast; good for flattening backs and for stones.
- Oil stones: traditional, slower, very durable.
- Sandpaper on glass or granite (“scary sharp”): cheap to start, expensive over time.
- Strop with honing compound on leather or wood: polishes the final edge.
The routine
With a honing guide 1:
- Set the angle in the guide by a fixed projection, so it’s the same every time.
- Grind the primary bevel if it’s damaged or the microbevel has grown wide.
- Hone the microbevel on 1,000 grit until you can feel a burr - a thin wire of metal - across the full width of the back.
- Move to 4,000, then 8,000, a handful of strokes each; the burr gets finer.
- Remove the burr: take the blade out of the guide and rub the back flat on the finest stone a few strokes 1. Strop if you like.
Freehand sharpening works too, and many hand-tool workers prefer it for speed: brace the bevel on the stone, feel it seat, and lock your wrists. A slightly rounded (convex) bevel from freehand work cuts fine.
Playback is optional. If the player is unavailable, open the video at its source.
Quick check
A burr forms when metal is removed all the way to the edge. Feel for it across the full width, then move to the next grit or remove it.
Testing and keeping sharp
- A sharp edge reflects no light when you look straight at it; a dull edge shows a bright line.
- It pares end grain of soft pine cleanly without crushing.
- It shaves arm hair (crudely).
Sharpen often. A minute at the stones when a tool starts to feel heavy beats an hour of restoring a ruined edge, and hand-tool work is only pleasant with sharp tools. Pre-industrial and modern hand-tool shops alike treat sharpening as part of every work session, not a separate chore 2.
At the bench
Take a chisel and flatten its back on your coarsest stone until the scratch pattern reaches the edge across its width, then polish through your finer grits. Grind or hone a 25° bevel, add a microbevel, feel for the burr at each grit, remove it, and pare end grain on pine. Do it again in a week and time it.
What to take from this
Sharp is two polished, flat surfaces meeting at a line. Flatten and polish the back once; grind a 25° primary bevel and hone a 27 to 30° microbevel through 1,000, 4,000, and 8,000 grit, raising a burr at each and removing it on the finest stone with the back flat. Test by reflected light and paring end grain, and sharpen early and often.
Practice
Grind the primary bevel at 25 degrees once; hone just the edge at 27-30 degrees. Resharpening takes seconds until the microbevel grows large.
Lesson complete
Nice work.
Sources for this lesson
- 1Asa Christiana. How to Use a Honing Guide. Fine Woodworking. 2012. verifiedPrimary bevel 25°, honed secondary bevel 27-28°; work through 1,000, 4,000, and 8,000 grit; flatten and polish the back once; remove the burr on the finest stone.
- 2Joshua A. Klein. The Foundations Course (Apprenticeship Series). Mortise & Tenon Magazine. verifiedHand-tool furniture making from pre-industrial originals - tool selection, sharpening, lumber processing, mortise and tenon, through and half-blind dovetails, nailed rabbets, dados, and shellac and milk paint finishes.
Previous: Buying Lumber: Grades, Board Feet, and Rough Stock