Chisels and Paring
Bench, paring, and mortise chisels; chopping with a mallet versus paring by hand; grip and body position for control; and the paring cuts behind clean joinery - end grain, across the grain, and to a knife line.
- 4 min
- 6 steps
- 3 questions
- Lesson 31 of 160
In this lesson
- Kinds of chisels
- Chopping
- Paring
- Care
- At the bench
- What to take from this
Picking up where you left off.
Kinds of chisels
A small set covers most work 1:

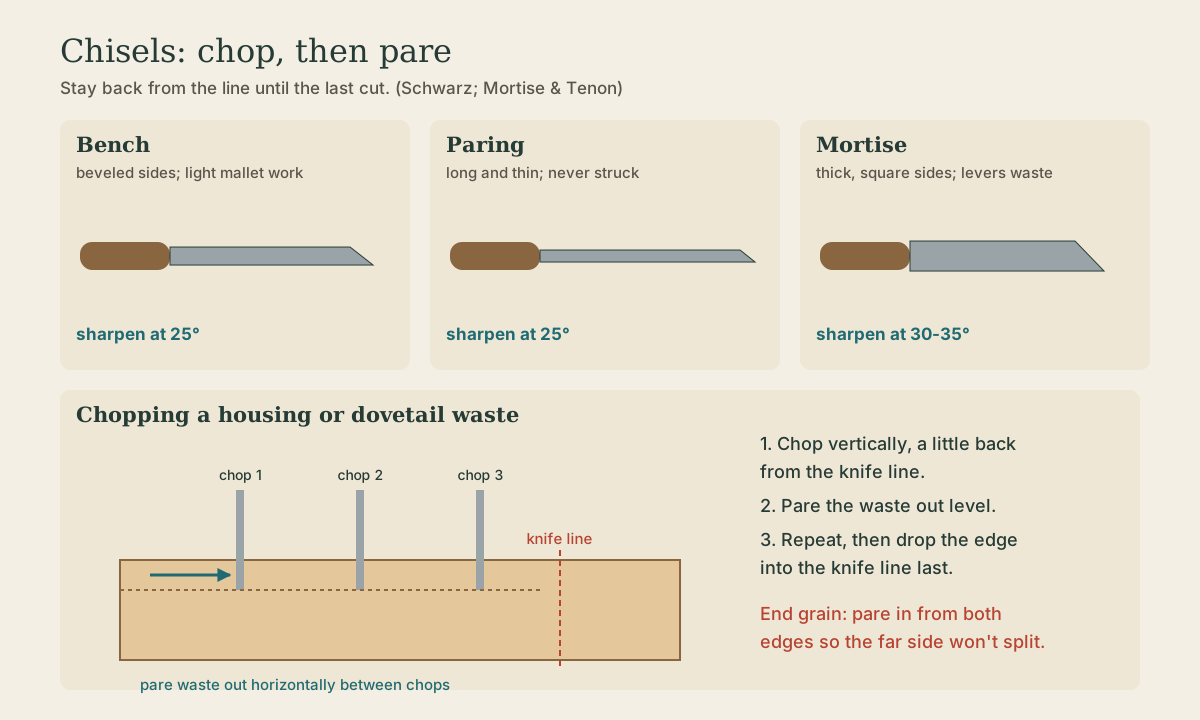
- Bench chisels: the everyday tool, beveled sides to reach into corners, strong enough for light mallet work. A set of four or five (1/4, 3/8, 1/2, 3/4, 1 in.) is plenty to start.
- Paring chisels: long, thin, and never struck; for fine trimming of tenons, housings, and dovetails.
- Mortise chisels: thick, heavy, square-sided, for chopping mortises with a mallet and levering out waste; usually 1/4, 5/16, and 3/8 in.
- Firmer chisels: square-sided, sturdy, general purpose; the traditional pattern.
- Gouges: curved for hollows and carving.
Sharpen bench and paring chisels at 25° with a microbevel; give mortise chisels 30 to 35° (see Sharpening).
Quick check
Mortise chisels take heavy mallet blows and levering to clear waste. Bevels of 30-35° keep the edge from chipping.
Chopping
Chopping drives the chisel with a mallet, across or into the grain:
- Strike with a wooden or rawhide mallet, not a steel hammer (unless the chisel has a steel-hooped handle meant for it).
- Chop vertically to a knife line, then pare horizontally to remove the waste, in alternating steps.
- When chopping dovetail or mortise waste, stay a little back from the final line and pare to it last; the wedge of the bevel pushes the chisel back past the line if you start right on it.
- Keep the chisel plumb: sight from the front and side, or use a square block as a guide.
Paring
Paring removes thin shavings with hand pressure alone. It’s how joints are fit exactly.
Body and grip:
- Clamp the work. Both hands stay behind the edge: one pushes the handle (often with the shoulder or body weight behind it), the other holds the blade near the edge, guiding and braking.
- For vertical paring, put your shoulder over the handle and use body weight, with the guiding hand’s fingers resting on the work.
Cuts:
- Across the grain (trimming a tenon cheek or the floor of a housing): pare from both edges toward the middle, so the far edge doesn’t split off.
- End grain: take very thin slices with a razor-sharp chisel, slightly skewed or with a slicing motion; never pare off the far edge without support.
- To a knife line: drop the chisel edge into the knifed line - you’ll feel it click in - and the line registers the cut exactly. This “knife wall” is the basis of accurate hand joinery (see Marking, Measuring, and Layout).
- Long grain: watch the grain direction; paring against the grain makes the chisel dive and split the wood.
Quick check
End grain needs a very sharp chisel and fine cuts. Pushing straight off an edge breaks out fibers, so cut partway from each side or clamp a backing block.
Care
- Keep edges covered (a canvas tool roll or rack), never loose in a drawer.
- Don’t use chisels to open cans or scrape glue.
- Hone often; a few strokes on the finest stone and a strop restore a lightly dull edge.
At the bench
Knife a line around a pine board 1 in. from the end. Pare the end grain down to the line in thin slices, working from both edges. Then knife a 3/4 in. wide, 1/4 in. deep housing across a board, saw the walls, chop and pare the waste, and check the floor with the edge of the chisel and a square.
What to take from this
Bench chisels do most work; paring chisels trim and are never struck; mortise chisels are thick and steep-beveled for chopping and levering. Chop vertically to a line with a mallet and pare away waste in steps, staying back from the final line until the end. Pare with the work clamped and both hands behind the edge, from both edges inward, in thin slices, and drop the edge into knife lines for exact registration.
Practice
Clamp the work and keep both hands behind the edge. Chisel cuts to the hand are a common, serious shop injury.
Lesson complete
Nice work.
Sources for this lesson
- 1Christopher Schwarz. The Anarchist's Tool Chest. Lost Art Press. 2011. verifiedArgues a kit of fewer than 50 good hand tools can build almost anything; explains how to choose each tool, new or antique, and how to build a chest to hold them. Free PDF from the publisher.
Further reading
- Joshua A. Klein. The Foundations Course (Apprenticeship Series). Mortise & Tenon Magazine. verifiedHand-tool furniture making from pre-industrial originals - tool selection, sharpening, lumber processing, mortise and tenon, through and half-blind dovetails, nailed rabbets, dados, and shellac and milk paint finishes.