Repairing Chairs
Fixing the chairs you make and the ones you inherit: diagnosing why a joint loosened before regluing it, why hide glue makes chairs repairable, releasing old joints with heat, moisture, or alcohol, dismantling versus injecting glue into a pegged joint, shimming crushed tenons, plating a split seat, replacing a broken tenon, reseating, and documenting the repair.
- 7 min
- 9 steps
- 3 questions
- Lesson 134 of 160
In this lesson
- Diagnose before you glue
- Glue that lets you repair
- Dismantle or inject
- Restore the fit
- Split seats and broken parts
- Reseating
- After the repair
- Try it
Picking up where you left off.
Every chair this course builds is designed to be repairable: replaceable seats, legible joints, renewable finishes (Lesson 1.4). This lesson is where that promise is kept. Loose chair joints are, as one furniture conservator puts it, bread-and-butter work: chairs take racking every time they’re dragged from a table or rocked onto two legs, and the leg-to-seat-frame joints suffer most 1.
Diagnose before you glue
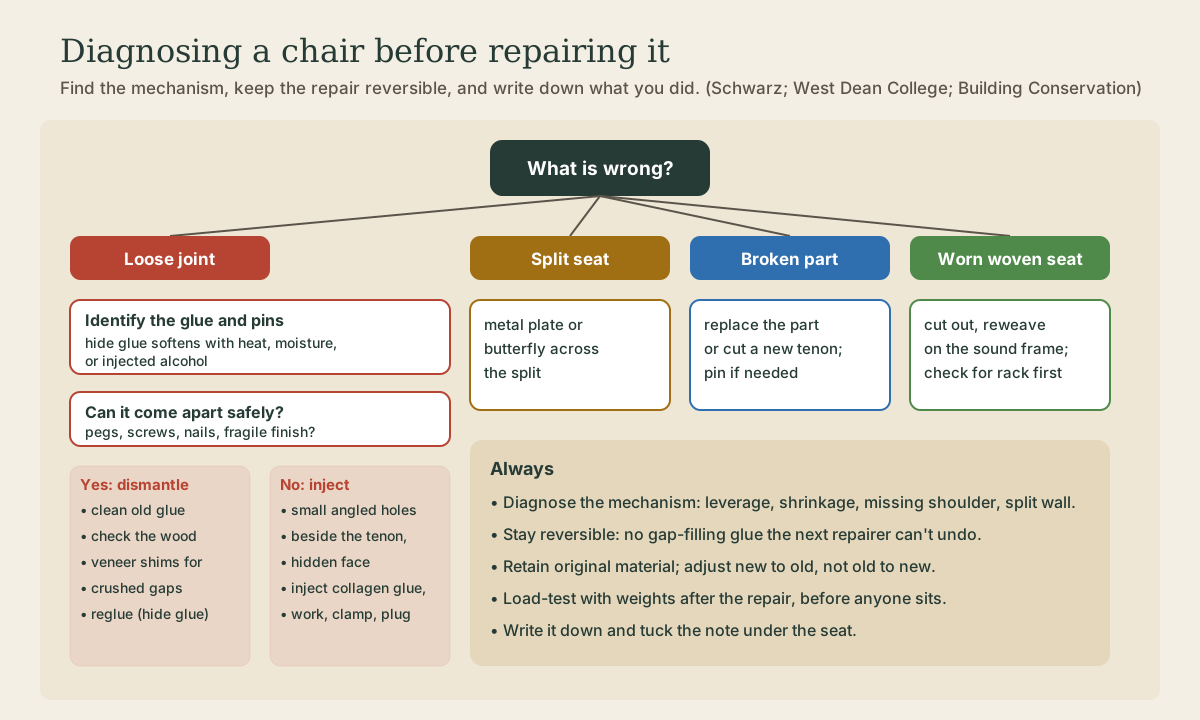
A loose joint is a symptom. Before reaching for glue, find the mechanism (Lesson 3.4): Is a long lever working on it? Did the post shrink away from the tenon, or the tenon shrink inside it? Is a shoulder missing, so the joint has no bearing? Has the mortise wall split? Does the frame rack because one particular rectangle lost its brace?
Then find what is holding the joint now: glue, pegs, wedges, screws, nails, or hidden dowels. Schwarz once set out to reglue a solid-looking Arts & Crafts Morris chair’s mortise-and-tenon joints with hide glue; when he injected alcohol and it popped apart, he found it had been assembled with a few dowels all along 2. Look before you pry.
Glue that lets you repair
For chairs, the most important property of a glue may be that it can be undone. Schwarz builds his chairs with hide glue because it’s reversible, invisible under traditional finishes, and cleans up with water even after curing. If an assembly goes wrong, he heats the joints and takes everything apart 2 2. Liquid hide glue gives him about 20 minutes of assembly time, versus about 10 for yellow glue; hot hide glue can set in a minute or two, too fast for complex chair assemblies 2. He makes one exception: the edge joint in a glued-up seat blank, which will never have to come apart, can take PVA 2.
Conservator Norbert Gutowski describes hide glues as immensely strong and reversible, able to be re-treated with moisture, but with poor gap-filling properties and a tendency to become brittle over time 3. Two consequences for repair:
- A joint glued with hide glue can usually be released with heat and moisture (or injected alcohol) and reglued.
- Hide glue won’t rescue a sloppy fit. The wood has to touch again.
Conservators’ principles are worth borrowing for any chair: retain as much original material as possible, adjust the new to the old rather than the old to the new, and choose repairs that minimize the treatments the object will need in future 3.
Quick check
Hide glue is strong but a poor gap filler; its great virtue for chairs is that the next repair is possible.
Dismantle or inject
The standard repair for a loose joint is to take it apart, clean out the degraded glue, check the surrounding wood, and reglue 1. Strut-leg chairs without stretchers are the easiest to repair this way: remove the loose or cracked leg, fix it, and reinsert it. Stretchers make a stronger undercarriage, but repairing a stretcher chair means loosening several joints at once 2. Through-tenons also come apart more readily than blind ones: heat the joint to soften the glue, pry out the wedge, and the joint separates 2.
But dismantling isn’t always the best answer. It can disturb sound joints next door, damage fragile surfaces, or break wood when pegs, screws, or nails are holding a joint along with the glue 1. Conservators at West Dean College found exactly that on a set of six mid-19th-century oak rush-seated chairs: drilling out the oak pegs to dismantle the first chair took great effort and damaged one joint. For the other five, they drilled small holes at 45 degrees into the underside of the seat frame, beside the cheeks of each tenon, injected cold-setting fish (collagen) glue with a syringe, worked each joint back and forth to spread the glue, clamped it, and plugged the holes with oak 1. The chairs were never taken apart.
Quick check
West Dean conservators found dismantling the pegged joints did damage; injection fixed the rest without taking them apart.
Restore the fit
Joints loosen partly because wood crushes. When a dismantled joint shows compressed fibers or gaps, conservators glue thin strips of veneer into the joint to make up the loss before regluing 1. Shim with long grain matching the part, size it so the joint closes with firm hand pressure, and reglue.
For a round tenon that has gone oval or undersized, a shim can work; so can cutting a fresh tenon if the part has length to spare. A broken tenon needs new wood: a replacement part, or a new tenon let into the old part. Gutowski’s case study pinned a broken chair-leg tenon with carbon-fibre rods, using animal glue as a barrier layer under the epoxy filler so the repair could be distinguished and reversed later 3.
Never “fix” a loose joint by flooding it with gap-filling glue, driving nails, or adding screws across a split. Those hide the mechanism, make the next repair harder, and rarely restore shoulder contact.
Quick check
Hide glue doesn’t fill gaps; the joint needs wood-to-wood contact again.
Split seats and broken parts
Seats check and split, during construction or decades later. Schwarz’s preferred repair is the historical one: a metal plate across the split. Under the seat, he uses a hardware-store mending plate with its zinc stripped off (citric acid or vinegar works) and screws it in place; on a show surface he has a blacksmith make one. A wooden butterfly key is the alternative 2. Lesson 2.2 explains what a butterfly key does and doesn’t do mechanically.
A cracked spindle or rung in a through-mortise is easiest to replace: drill or pare out the broken end, make a new part to the original diameter from straight-grained stock, and refit it.
Reseating
A worn rush, splint, tape, or cord seat is not a failure of the chair; it’s the renewable skin wearing out as designed (Lesson 4.8). Before cutting the old seat out, photograph and record the underside, count the courses, and note the pattern and fastenings. Check the frame for rack and repair loose joints first, since weaving a tight new seat into a racked frame locks the error in. The Caner’s Handbook covers patterns and repair for rush, splint, tape, cord, and related seats 4.
After the repair
Let the glue cure fully. Then do what you’d do for a new chair: check it stands without rocking on a flat surface, inspect every joint, and load-test it with weights in steps before anyone sits, stopping at any movement, crack, or tick.
Finally, write it down: what was wrong, what glue you used, what you replaced. Tuck the note under the seat or in the chair log. The next repairer, possibly you, will know exactly what they’re dealing with.
Try it
Take one wobbly chair in the house and diagnose it without any tools: which joint moves, in what direction, and what’s holding it? Then decide on paper: dismantle, inject, shim, or replace? Only then pick up a tool.
Lesson complete
Nice work.
Sources for this lesson
- 1A gentler approach to fixing your wobbly legs. West Dean College of Arts and Conservation. verifiedLoose chair joints are bread-and-butter conservation work; seat-frame-to-leg joints suffer most from racking and pulling chairs from tables. The usual fix is to dismantle, clean degraded glue, check the wood, add thin veneer strips for compression gaps, and reglue. Dismantling is not the only option: on a set of pegged, rush-seated country chairs, small holes drilled at 45 degrees from the underside beside the tenon cheeks let cold-setting fish (collagen) glue be injected by syringe; joints were worked, clamped, and the holes plugged with oak. Cited at: introduction; treatment options; revised treatment.
- 2Christopher Schwarz. The Stick Chair Book. 2nd revised ed. Lost Art Press. verifiedPublisher page with the complete book available as a free PDF. Cited at: Chairs & the Cwtch; Tool Kit for Stick Chairs; Gluing Tools; Make & Shape the Seat; Make the Stretchers.
- 3Norbert Gutowski. Adhesives for the Conservation of Fine Furniture. The Building Conservation Directory. 2017. verifiedHide glues are strong and reversible/re-treatable with moisture, but poor at gap filling and can become brittle over time. Glue failures come from poor preparation, design flaws, glue starvation, environment, or pests. Conservation principles: retain as much original material as possible; adjust new to old, not old to new; minimize future treatments. Case study: a broken chair tenon pinned with carbon-fibre rods, animal glue as a barrier layer before epoxy filler. Cited at: Characteristics; Glue and conservation; case study.
- 4Jim Widess, Bruce W. Miller III. The Caner's Handbook: Restoring Cane, Rush, Splint, Danish Cord, Rawhide, and Wicker Furniture. Schiffer Publishing. verifiedCurrent publisher page for the updated illustrated handbook covering rush, splint, Danish cord, rawhide, wicker, repair, and maintenance. Cited at: scope.
Further reading
- Forest Products Laboratory. Wood Handbook: Wood as an Engineering Material. Revised 2021 ed. U.S. Department of Agriculture, Forest Service. 2021. verifiedOfficial engineering reference; chapters 4, 10, 13, 16, and 19 cover moisture, adhesives, drying, finishing, and plasticizing/bending.