Riving and Shaving Chair Parts
Making green-wood chair parts from a log: why split parts can be thinner and stronger than sawn ones, choosing and opening a log, assigning wedges to legs, posts, rungs, spindles, and crest, keeping growth-ring orientation, shaving square to octagon to round on a shaving horse, sizing to gauges, drying before final joinery, and keeping the edges sharp.
- 7 min
- 8 steps
- 3 questions
- Lesson 128 of 160
In this lesson
- Why split parts
- Choose and open the log
- Assign the wedges
- Shave square, octagon, round
- Dry before you size
- Keep the edges keen
- Try it
Picking up where you left off.
Both capstone chairs start as a log, not a board. Lesson 1.3 explained why riven stock is structurally special. This lesson is the bench side: turning a section of tree into labeled, gauged legs, posts, rungs, spindles, and a crest blank. For the basic riving and drawknife technique in more depth, the Green Woodworking & Sloyd course has dedicated lessons on riving with froe and wedges and on the shaving horse and drawknife; here the focus is what chair parts specifically demand.
Why split parts
Peter Galbert, whose Chairmaker’s Notebook devotes five chapters to splitting tools, splitting parts from the log, the drawknife, and shaving and shaping, puts the case plainly: parts split and shaved along their long fibers retain the strength of the tree, which lets them be made unexpectedly thin, giving a Windsor its lightness and flex. Working split wood also speeds hand-tool work, because the cutting direction always runs toward the thinner portion of the fibers, so every face can be shaved without stopping for reversing grain 1. Splitting a chair “isn’t a romantic gesture,” he writes, but a way to get qualities in a chair that would be impractical by other means 1.
The ring-porous hardwoods, oak, hickory, and ash, split easily and make the bent parts and spindles 1. Curtis Buchanan’s Democratic chair parts come from just such a short section of strong, easily split wood, and he shows that it can come from a log yard’s firewood pile 2.
There is another path. Christopher Schwarz builds his stick chairs mostly with cabinetmaking tools, jack and block planes and a spokeshave at a joiner’s bench, from sawn stock, and says he doesn’t use a drawknife, adze, or shaving horse at all 3. That works because he culls sawn stock carefully for straight grain. Riving and sawing are two routes to the same goal: continuous fibers in slender parts.
Quick check
Galbert calls riven wood a structural material, not a romantic gesture; continuous fibers let parts be unexpectedly thin.
Choose and open the log
Look for a straight, clear section with no twist, knots, or spiral grain, long enough for your longest part plus waste at both ends. Split it as soon as practical; green wood splits and shaves far more easily than dry, and the ends begin checking right away.
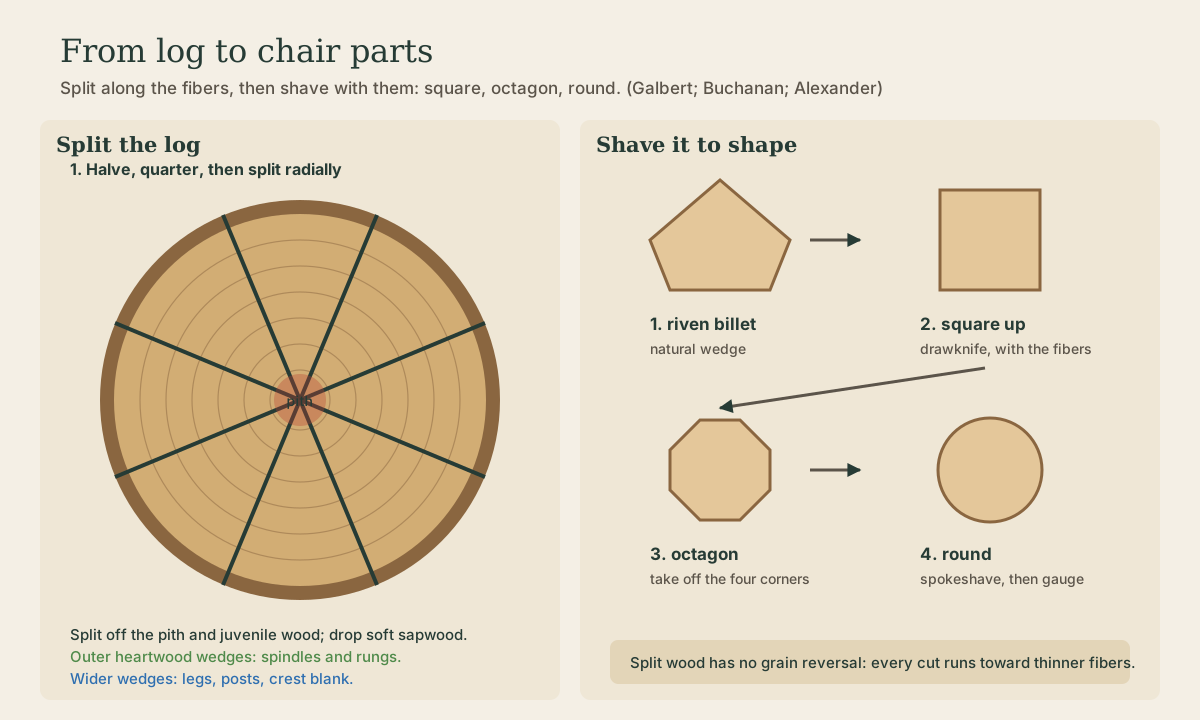
Open the log by halving it through the pith, then halve the halves, and keep splitting along radial lines toward wedges. Halving each piece keeps the split centered and straight; an off-center split tends to run out toward the thin side. Then trim each wedge: split off the pith and the brittle juvenile wood near it, and drop soft sapwood or bark where they would weaken a part.
Assign the wedges
Treat the log like a cut list. Split oversize, read how each billet followed the tree, and only then assign it 4:
- Rear posts and crest blank: the straightest, cleanest billets, because they will be bent and carry the most leverage.
- Legs: wide, straight wedges from sound heartwood.
- Rungs and spindles: the long thin wedges from the outer heartwood.
- Wedges and pins: short offcuts with straight grain.
Mark every billet immediately with an ID that survives shaving, a tag plus pencil marks in a planned waste area. Keep left and right posts as pairs from the same part of the log.
For a post-and-rung chair, growth-ring orientation is not cosmetic. Wood shrinks more tangentially than radially, so how the rings run in a rung tenon relative to the post’s mortise changes how the joint tightens as the post dries 5. Jennie Alexander’s book specifies that orientation; follow her diagrams rather than intuition 4.
Stop gate: every structural blank follows the fiber, its role and orientation are marked, and no check, knot, or abrupt runout enters a joint or bend zone.
Shave square, octagon, round
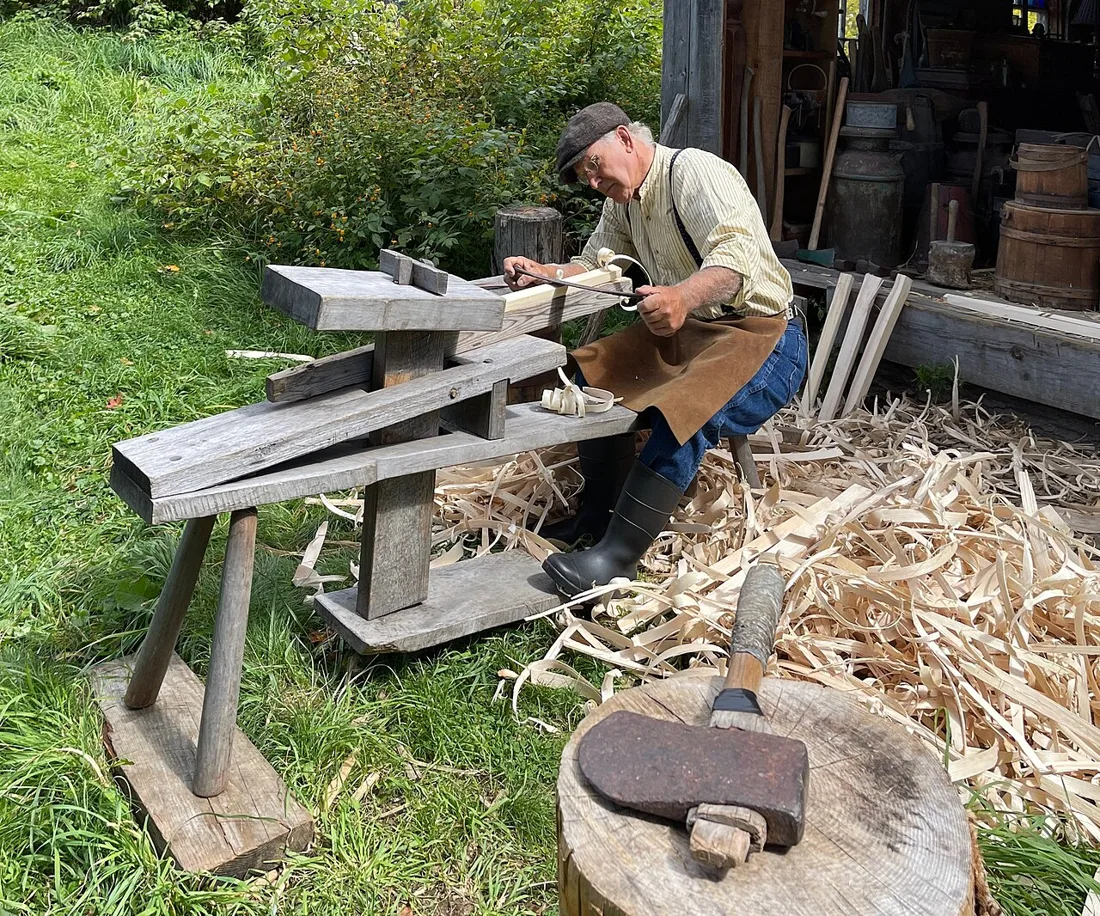
At the shaving horse, the foot clamps the part and both hands work the drawknife. Galbert gives the shavehorse its own appendix in his book 1.

Work in stages:
- Square up. Establish two flat, square reference faces, then the other two, bringing the section close to the plan’s largest size. Take shavings with the fibers, toward the thinner end of the billet.
- Octagon. Take the four corners off evenly. An octagon is already close to round, and it’s easy to judge by eye: eight equal facets. Buchanan’s Democratic chair plan includes a page devoted to its octagonal parts 2.
- Round, if the plan calls for it. A spokeshave takes the octagon’s corners to sixteen and then to round.
Keep hands behind the drawknife’s edge and stroke in a controlled pull. If a cut starts diving into the part, the fibers are running out in that direction: turn the part end for end and shave from the other way.
Use a story stick for lengths and stations, and the plan’s gauges for diameters. A shaved rung doesn’t need to look lathe-perfect, but its tenon zones and critical diameters must agree from part to part. Return every part to the same template, never to the previous part, so error can’t drift through the set.
Playback is optional. If the player is unavailable, open the video at its source.
Quick check
You can work all faces without stopping to read changing grain direction.
Dry before you size
Green wood shrinks as it dries, and unevenly: a round green spindle generally becomes slightly oval because tangential shrinkage exceeds radial 5. So rough the parts green, leave material at the tenons, and let them dry to the condition the controlling plan specifies before cutting final joints. Stack parts supported and labeled, with air around them. Post-and-rung builds deliberately dry rung tenons further than the posts to create the shrink joint; Lesson 4.2 covers that system.
Record each part’s billet, date split, and drying location. When four legs were shaved on different days in different moisture states, their agreement at the shaving horse is temporary.
Quick check
Rough the part green, let it dry to the condition the plan specifies, then size critical joints.
Keep the edges keen
A dull drawknife tears, wanders, and tires you; a sharp one follows a line. Buchanan publishes a free series showing how he sharpens seventeen chairmaking tools, including the drawknife, the wooden-bodied spokeshave, and the taper reamer 6. Sharpen before a riving session, not when the tool has already started fighting you.
Try it
Before your capstone, split one short oak, ash, or hickory log into billets and shave a single rung: square, octagon, round. Leave one end octagonal and one end round, dry it, and then check how far the round end has gone out of round. That one stick will teach you more about green wood than a page of rules.
Lesson complete
Nice work.
Sources for this lesson
- 1Peter Galbert. Chairmaker's Notebook. Lost Art Press. 2015. verifiedDetailed chairmaking reference for drilling, reaming, sightlines, and compound geometry. Cited at: ch. 1 and chapters 7–11; ch. 1; Appendix B.
- 2Video series: How to make a democratic side chair. Curtis Buchanan Chairmaker. verifiedMaker's official index to the 20-part free build series and current plan options. Cited at: episode 3; plan description.
- 3Christopher Schwarz. The Stick Chair Book. 2nd revised ed. Lost Art Press. verifiedPublisher page with the complete book available as a free PDF. Cited at: Introduction.
- 4Jennie Alexander. Make a Chair from a Tree: Third Edition. Lost Art Press. 2021. verifiedPublisher contents and excerpts for post-and-rung construction, moisture management, bending, assembly, and hickory-bark seating. Cited at: splitting chapters; ch. 2 and 8–11.
- 5Robert J. Ross. Wood Handbook: Wood as an Engineering Material. Revised 2021 ed. USDA Forest Service, Forest Products Laboratory. 2021. verifiedOfficial chapters on wood structure, moisture, mechanical properties, fastenings, composites, drying, and finishing. Cited at: ch. 4.
- 6Video series: How to sharpen chairmaking tools. Curtis Buchanan Chairmaker. verifiedMaker's free 18-video series showing how he sharpens 17 chairmaking tools, including the drawknife, wooden-bodied spokeshave, and taper reamer. Cited at: series scope.