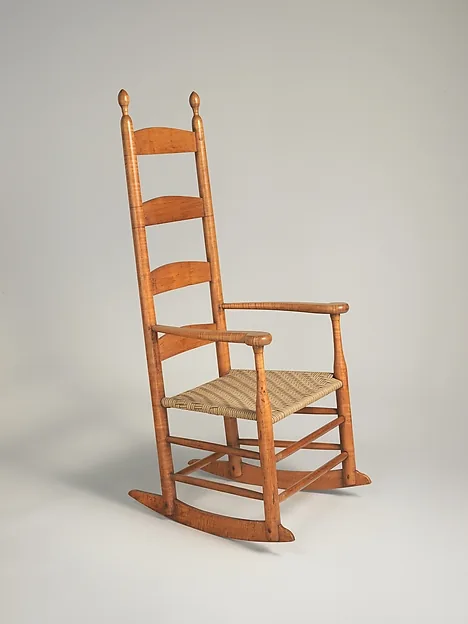
Capstone B: The Post-and-Rung Ladderback
The frame-chair capstone, a post-and-rung ladderback: a drying calendar, riving and shaving, bending rear posts and slats, super-drying rung tenons, mortising and assembling side frames, joining them, fitting slats, weaving a hickory bark or tape seat, and leveling.
- 9 min
- 12 steps
- 3 questions
- Lesson 141 of 160
In this lesson
- Definition of done
- Build a moisture-centered project packet
- Stage 1: split and assign the log
- Stage 2: shave to controlled irregularity
- Stage 3: bend rear posts and slats
- Stage 4: form and super-dry rung tenons
- Stage 5: mortise and assemble side frames
- Stage 6: join the side frames
- Stage 7: fit the back slats
- Stage 8: weave the replaceable seat
- Level, finish, and prove
Open alongside this lesson
-
Make a Chair from a Tree: Third Edition (opens in a new tab)
Controls dimensions, moisture states, ring orientation, jigs, and assembly sequence.
-
Wood Handbook, Chapter 4: Moisture Relations and Physical Properties of Wood (opens in a new tab)
Engineering background for equilibrium moisture content, shrinkage, and swelling.
-
The Caner's Handbook: Restoring Cane, Rush, Splint, Danish Cord, Rawhide, and Wicker Furniture (opens in a new tab)
Pattern and repair guidance for rush, splint, tape, cord, rawhide, and related seats.
-
Side Chair, Shaker, 1840-1860 (opens in a new tab)
Use for structural observation and annotation; overall dimensions are not a shop plan.
Picking up where you left off.
The second capstone is the frame-chair answer to the first. Its geometry looks quieter than the Democratic chair’s compound leg field, but the build is less forgiving of sequence. Posts must be bent and mortised in a consistent relationship; rung tenons must reach the required dry condition; side frames become irreversible assemblies; the second assembly must connect them without splitting; and the woven seat adds sustained rail tension.
Jennie Alexander’s Make a Chair from a Tree, third edition, is the controlling build. The publisher’s contents run from wood and moisture through splitting, shaving, steam bending, rung tenons, post mortising, side-frame/final assembly, slats, finishing, and seating 1. Use its drawings, dimensions, moisture targets, ring orientation, jigs, and sequence directly. This lesson does not reproduce them.
Definition of done
The chair is complete when:
- the frame stands without damaging rock or twist on a verified flat surface;
- every rung shoulder or seating reference is closed according to the plan;
- posts and slats form the intended back without forced stress;
- the seat is evenly tensioned, correctly fastened, and free of abrasive edges;
- the stepped, weighted load test at the end of this lesson produces no joint movement, split, permanent set, or alarming sound; and
- the chair log preserves material, moisture, assembly, and weave records.
Lightness is not a score. Do not thin parts beyond the controlling design in pursuit of an impressive weight.
Build a moisture-centered project packet
In addition to plan, patterns, and part list, make a drying calendar. The active shop work and unattended moisture work are separate schedules.
Create a table with:
- part ID and role;
- species and billet;
- growth-ring orientation;
- date split and shaved;
- storage location;
- repeated condition/moisture observations;
- target operation; and
- assembly deadline.
The USDA Wood Handbook explains the foundation: wood exchanges moisture with its environment and shrinks differently in tangential and radial directions 2. Alexander turns that anisotropy into a particular chairmaking system. Do not replace her ring-orientation diagrams with intuition.
Mnemonic: posts retain, rungs refrain—posts retain the moisture condition called for; rungs refrain from returning to ordinary shop condition before assembly. The phrase remembers the direction only. The book supplies the numbers and handling.
Quick check
Track each part’s species, billet, ring orientation, and drying dates.
Stage 1: split and assign the log
Rive parts so fibers run continuously through slender posts and rungs. Split oversize, then read how the billet follows the tree. Cull checks, ring shake, rot, bark inclusions, knots, and severe runout.
Assign the best bending stock to rear posts and slats. Assign straight, consistent stock to rungs. Mark every billet immediately. When parts look alike, use an ID that survives shaving and drying—tag plus pencil marks in a planned waste area.
Keep left and right posts paired from the same stage. Growth-ring orientation is functional, not merely visual, and must match the book’s system.
Stop gate: all structural blanks follow fiber, assigned parts meet the plan’s oversize allowances, ring orientation is marked, and no defect enters a joint or bend zone.
Stage 2: shave to controlled irregularity
At the shavehorse, establish reference facets and bring parts toward the plan’s gauges. A hand-shaved rung need not look lathe-perfect; its tenon and critical diameters must be consistent.
Use a story stick for lengths and stations. Use the plan’s gauges for post and rung sections. Check along the part for grain runout exposed by shaping. If shaving reveals a hidden defect, reassign or reject the part rather than leaving a thin island around it.
Preserve extra length where the plan expects trimming after bending or assembly. Mark each tenon end with part ID before batches enter different drying conditions.
Stage 3: bend rear posts and slats
Build bending forms from the current patterns and verify print scale. Cold-rehearse clamping. Steam and bend according to the book’s stock and schedule, using heat protection and a clear transfer route.
After bending, hold parts in the specified form or drying fixture. Record springback only after a consistent conditioning period. Compare paired posts on a centerline board; do not stack them and decide by eye against an uneven bench.
For slats, preserve the book’s crown direction and mortise relationship. A slat installed backward can still enter both mortises while resisting the intended back shape.
Stop gate: paired posts agree at reference stations, slats match the intended curve and grain direction, and no tension split enters the final outline.
Stage 4: form and super-dry rung tenons
Use the book’s cutter, gauge, and surface method. Gauge blocks must be bored with the actual mortising bit. Test tenons around their circumference; fitting in one rotation indicates ovality or ridging.
Dry rungs in the published hot-box/kiln method. Treat the box as fire-safety equipment:
- use the specified heat source and controlled temperature range;
- keep combustibles and dust away;
- protect parts from direct contact with the heat source;
- provide intended airflow;
- monitor with a reliable thermometer; and
- do not leave an improvised setup running unattended.
Read multiple rungs. One dry sample does not prove the batch. When the target is reached, keep the parts in the controlled condition until assembly. Have every other component, tool, and sequence ready first.
Stop gate: each tenon fits its gauge, the whole rung batch has reached the book’s condition, posts remain in their intended condition, and side-frame assembly can begin immediately.
Quick check
Have every other component, tool, and the sequence ready before the rungs come out of the box.
Stage 5: mortise and assemble side frames
Use the plan’s jigs, reference facets, and boring sequence. Post surfaces are hand-shaped, so do not register a brace or drill casually against the highest bark-like bump. The controlling jigs establish direction.
Dry rehearsal must respect the moisture clock. Use sample parts or a loose setup where the book advises against fully seating the live shrink joint. Lay each side frame over a full-size reference. Check post pairing, rung order, and front/back before assembly.
Arrange mallet, glue if the method calls for it, spacers, square/reference board, and cleanup tools. Assemble in the specified order. Drive evenly and stop at seating references. If a post begins to split, stop; more force converts a fixable fit problem into a failed structural part.
After assembly, place side frames in matching jigs or on a common reference so they cure as a pair.
Stage 6: join the side frames
The front and back rungs convert two stable ladders into a chair. This is the moment cumulative error appears.
Before assembly:
- label every mortise and rung end;
- compare side frames for height and rung station;
- rehearse the opening movement without twisting posts;
- stage clamps or straps only if the controlling method uses them; and
- plan mallet access.
Bring the frames together progressively. Do not fully seat one corner while the opposite tenon is outside its mortise. Watch the posts for split initiation and the side frames for winding.
Check both diagonals and seat-rail plane immediately. Equal diagonals do not guarantee no twist, so use winding sticks or a reference surface as well.
Stop gate: all rungs reach their seating references, the seat opening is in one plane, the frame does not rack, and posts remain uncracked.
Quick check
Watch the posts for splits and check diagonals and winding immediately.
Stage 7: fit the back slats
Lay out and cut post mortises by the book. Slats should seat without forcing the rear posts farther apart or twisting their established bends. Preserve slat crown and orientation marks through trimming.
Dry-fit all slats together. If one is long, tight, or reversed, correct it before glue. A slat is not a spreader for fixing post geometry.
Stage 8: weave the replaceable seat
Choose the controlling seating chapter’s hickory bark method when suitable, ethically harvested material is available and correctly prepared. Otherwise use an approved alternative such as Shaker tape for the first chair. The dedicated Caner’s Handbook can supplement pattern and repair technique 3.
Inspect and finish rail surfaces before weaving as the chosen schedule requires. Calculate material from real course routes and buy allowance. Maintain even, moderate tension; over-tension can bow the frame. Pause every few courses to check square, course count, underside twists, and remaining space.
Keep splices and fastenings in the method’s designated underside zones. Photograph the underside before it disappears under the chair’s normal view.
Stop gate: the weave is square, rail tension has not racked the frame, all fastenings are secure and nonabrasive, and the chair still stands correctly on the reference floor.
Level, finish, and prove
Establish the intended seat attitude before scribing feet. Shim the chair, scribe all feet from one floor plane, trim outside the line, and creep up. Rotate the chair on the same surface to separate chair rock from floor error.
Apply the finish schedule to samples first and follow cure instructions. Then inspect every joint and weave turn, and load-test the chair with weights before anyone sits, watching for ticking, gaps, post splits, weave slip, or rock.
Set this chair beside the Democratic capstone. Follow the loads through each: thick seat as hub versus post-and-rung skeleton with replaceable infill. The course ends when you can explain why each chair stands, where each is likely to fail, and how a future repairer can renew it.
Lesson complete
Nice work.
Sources for this lesson
- 1Jennie Alexander. Make a Chair from a Tree: Third Edition. Lost Art Press. 2021. verifiedPublisher contents and excerpts for post-and-rung construction, moisture management, bending, assembly, and hickory-bark seating. Cited at: contents.
- 2Forest Products Laboratory. Wood Handbook: Wood as an Engineering Material. Revised 2021 ed. U.S. Department of Agriculture, Forest Service. 2021. verifiedOfficial engineering reference; chapters 4, 10, 13, 16, and 19 cover moisture, adhesives, drying, finishing, and plasticizing/bending. Cited at: chapters 4 and 13.
- 3Jim Widess, Bruce W. Miller III. The Caner's Handbook: Restoring Cane, Rush, Splint, Danish Cord, Rawhide, and Wicker Furniture. Schiffer Publishing. verifiedCurrent publisher page for the updated illustrated handbook covering rush, splint, Danish cord, rawhide, wicker, repair, and maintenance. Cited at: rush, splint, and woven-seat coverage.
Further reading
- Nicholas C. Vincent. Shaker Furniture. The Metropolitan Museum of Art. 2012. verifiedMuseum overview of Shaker post-and-rung chairs, ladder backs, and woven seats.
- Wood Handbook, Chapter 4: Moisture Relations and Physical Properties of Wood. USDA Forest Service, Forest Products Laboratory. 2021. verifiedPublic U.S. government chapter on hygroscopicity, equilibrium moisture content, fiber saturation, shrinkage, swelling, and species data.
- Side Chair, Shaker, 1840-1860. The Metropolitan Museum of Art. verifiedPublic Domain object record with four downloadable views, material, accession number 66.10.5, and overall dimensions. Those dimensions do not constitute a shop plan.