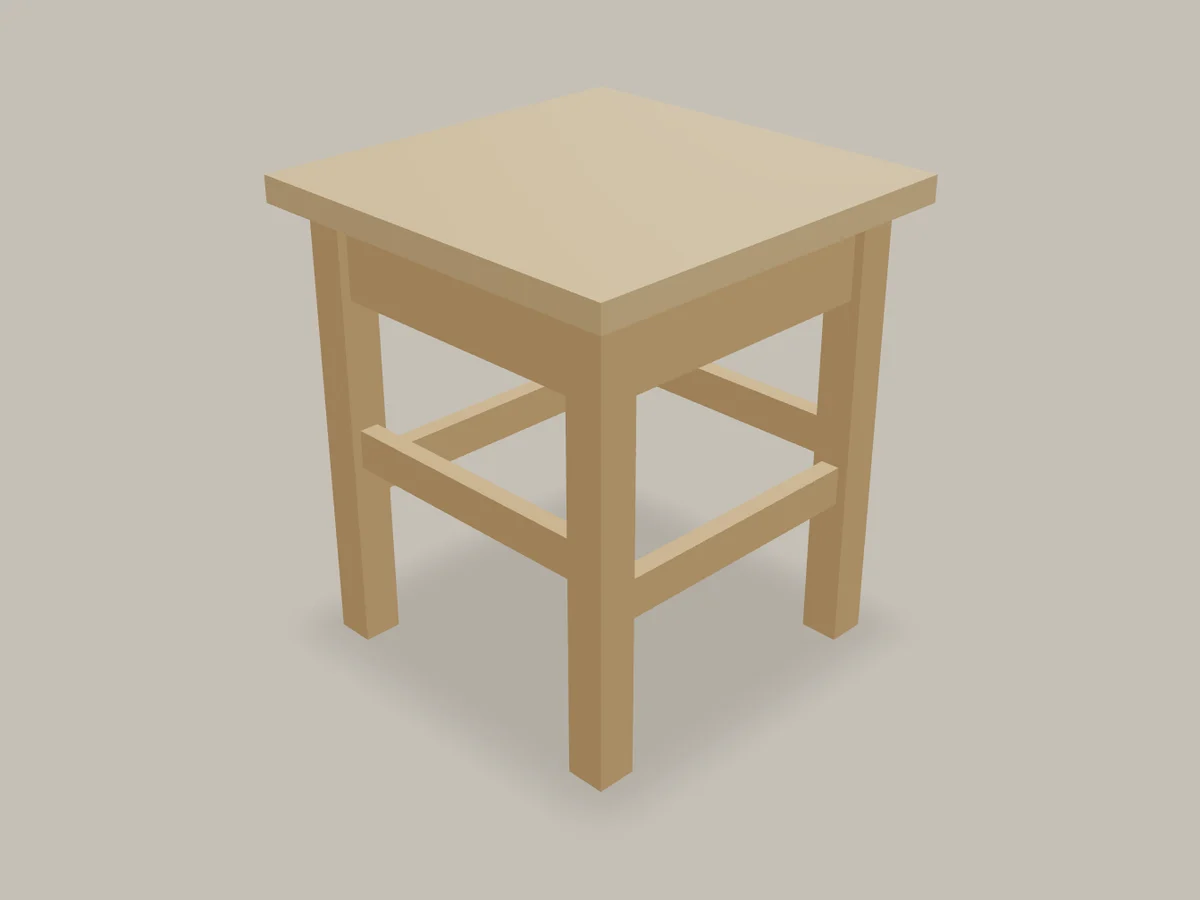
Complete Plan: The Four-Square Stool
A complete original plan for a 16-inch-square, 18-inch-high stool: governing dimensions, a cut list and board feet, mortise-and-tenon schedule with staggered stretchers, figure-eight seat fasteners for movement, a build sequence with stop gates, and a load test.
- 11 min
- 14 steps
- 3 questions
- Lesson 143 of 160
In this lesson
- Design brief and governing dimensions
- Complete cut list
- Material and tool list
- Joint schedule
- Build sequence with stop gates
- Errors to catch before they compound
- Definition of done and load test
Open alongside this lesson
-
Wood Handbook: Wood as an Engineering Material (opens in a new tab)
Official chapters on wood structure, moisture, mechanical properties, fastenings, composites, drying, and finishing.
-
ANSI/BIFMA X5.1-2017(R2022): General-Purpose Office Chairs — Tests (opens in a new tab)
Official scope summary for structural strength and durability testing of general-purpose seating.
Picking up where you left off.
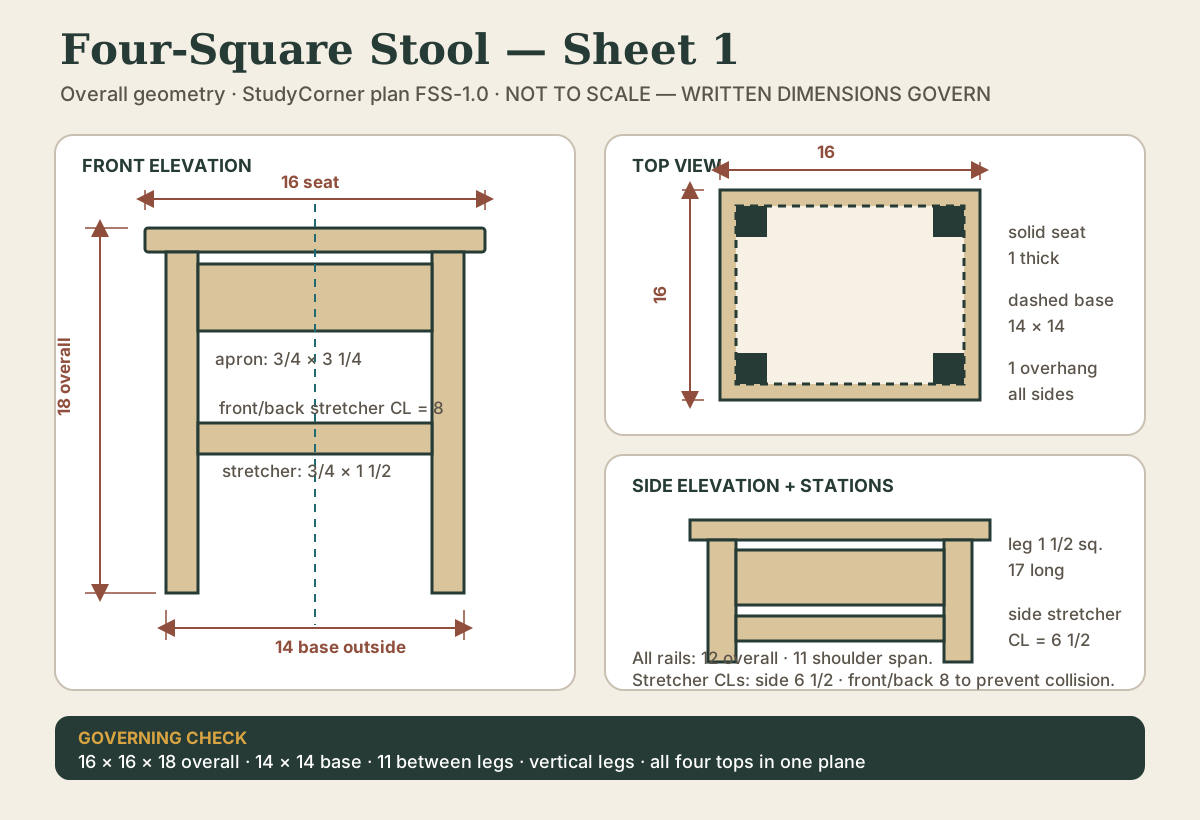
This is a complete, original StudyCorner plan for a compact adult-height stool. Its dimensions were selected as one coherent learning design; they were not scaled from a photograph or copied from a published cut list. Every governing number appears below. The diagrams organize those numbers but do not replace them.
The project teaches four-square milling, paired parts, shallow mortise-and-tenon joinery, staged glue-up, and solid-wood seat attachment. It is deliberately backless and has no upholstery or compound angles, so errors remain visible.
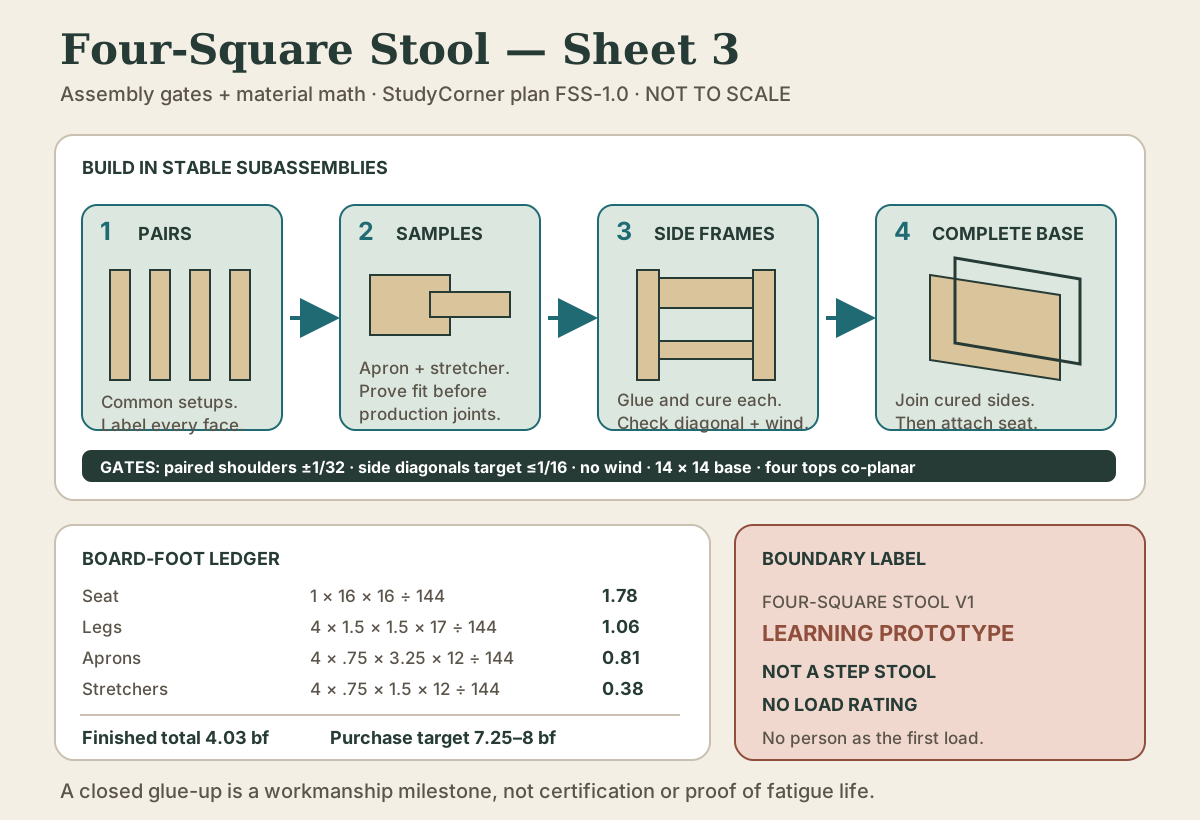
It’s a seat, not a step stool: never stand, climb, or balance on it.
Design brief and governing dimensions
Use inches throughout. Dimensions are finished sizes unless a row says rough or oversize.
| Feature | Governing value |
|---|---|
| Overall seat width and depth | 16 × 16 |
| Overall height | 18 |
| Seat thickness | 1 |
| Leg length below seat | 17 |
| Base outside width and depth | 14 × 14 |
| Seat overhang | 1 on every side |
| Leg section | 1 1/2 × 1 1/2 |
| Clear distance between adjacent legs | 11 |
| Apron height and thickness | 3 1/4 × 3/4 |
| Apron top | Flush with leg tops |
| Side-stretcher centerline | 6 1/2 above finished feet |
| Front/back-stretcher centerline | 8 above finished feet |
| Lower-stretcher section | 1 1/2 × 3/4 |
| Seat edge treatment | 3/8 maximum round-over |
The seat is square, the legs are vertical, and all four leg tops lie in one plane. There is no hidden splay. The lower stretchers are intentionally staggered: the left/right pair is lower than the front/back pair so adjacent mortises cannot collide inside a leg.
Study it in 3D before you mill
The same numbers, built as a 3D mock-up: 17-inch legs on a 14-inch square, aprons flush with the leg tops, and the lower stretchers at 6 1/2 inches on the sides and 8 inches front and back. Orbiting the base makes the purpose of the stagger obvious: the side and front mortises in each leg sit at different heights, so they never meet inside it. Use the mock-up to check your reading of the sheets, not as a substitute for them. Lesson 4.9 turns this same base into an upholstered stool with a drop-in slip seat.
Quick check
Mortises at one height would intersect within the 1 1/2-inch leg.
Complete cut list
Part letters should stay on the components through dry assembly.
| ID | Part | Qty. | Finished thickness | Finished width | Overall length | Notes |
|---|---|---|---|---|---|---|
| A | Seat | 1 | 1 | 16 | 16 | Grain may run left-to-right; attach mechanically |
| B | Legs | 4 | 1 1/2 | 1 1/2 | 17 | Mill as one matched batch |
| C | Aprons | 4 | 3/4 | 3 1/4 | 12 | Includes two 1/2-in. tenons |
| D | Lower stretchers | 4 | 3/4 | 1 1/2 | 12 | Includes two 1/2-in. tenons |
| E | Seat fasteners | 4 | — | — | — | Figure-eight tabletop fasteners or equivalent |
| F | Joint samples | 2 or more | Match B/C/D | Match B/C/D | 6 minimum | Use the actual stock and tooling |
Both rail families have an 11-inch shoulder-to-shoulder length. Do not add tenons to a 12-inch visible rail: the listed overall length already includes them.
Board-foot calculation
For rectangular stock measured in inches:
The finished rectangular envelopes are:
| Group | Calculation | Finished bf |
|---|---|---|
| Seat | 1 × 16 × 16 ÷ 144 |
1.78 |
| Four legs | 4 × 1.5 × 1.5 × 17 ÷ 144 |
1.06 |
| Four aprons | 4 × .75 × 3.25 × 12 ÷ 144 |
0.81 |
| Four stretchers | 4 × .75 × 1.5 × 12 ÷ 144 |
0.38 |
| Total finished envelope | 4.03 |
That is not the purchase quantity. One plausible rough-stock worksheet is:
- seat blank:
1.25 × 17 × 17 ÷ 144 = 2.51 bf; - four leg blanks:
4 × 1.75 × 1.75 × 18 ÷ 144 = 1.53 bf; and - rough rail blanks: four at 7/8 × 3 1/2 × 13 inches for the aprons plus four at 7/8 × 1 3/4 × 13 inches for the stretchers, or
1.66 bfbefore defects and board-layout losses.
The theoretical rough rectangles total about 5.70 bf. Plan to buy 7.25 to 8 bf so there is room for saw kerf, checking, milling, grain selection, and at least one rejected structural part. A practical allocation is 2.75 bf of 5/4 seat stock, 2.25 bf of 8/4 leg stock, and 2.25–3 bf of 4/4 rail stock. Board feet measure volume, not usable yield.
Material and tool list
Use dry, sound furniture stock. Maple, ash, oak, beech, cherry, or clear poplar can work for this exercise when the actual boards are suitable. Reject checks, loose knots, decay, severe twist, and grain that exits through a tenon or narrow leg section. Wood exchanges moisture with its environment and changes dimension primarily across the grain; let stock approach stable shop conditions before final milling 1.
You need:
- milling tools capable of producing flat faces, straight edges, and square sections;
- marking knife or sharp pencil, square, mortise gauge, story stick, and labels;
- a controlled mortising method for 1/4-inch-wide mortises;
- a tenoning saw, router setup, or other guarded method that can repeat shoulders;
- clamps, cauls, and a verified flat reference surface;
- drill and recessing method approved by the seat-fastener manufacturer;
- edge tools or abrasives for the 3/8-inch round-over; and
- the actual glue and finish, used according to their instructions.
Machine method is not prescribed. Keep manufacturer guards and dust collection in place. Clamp narrow work; do not hold a leg near a powered cutter. Never crosscut a short rail trapped between a fence and blade. Make setup samples before production parts.
Joint schedule
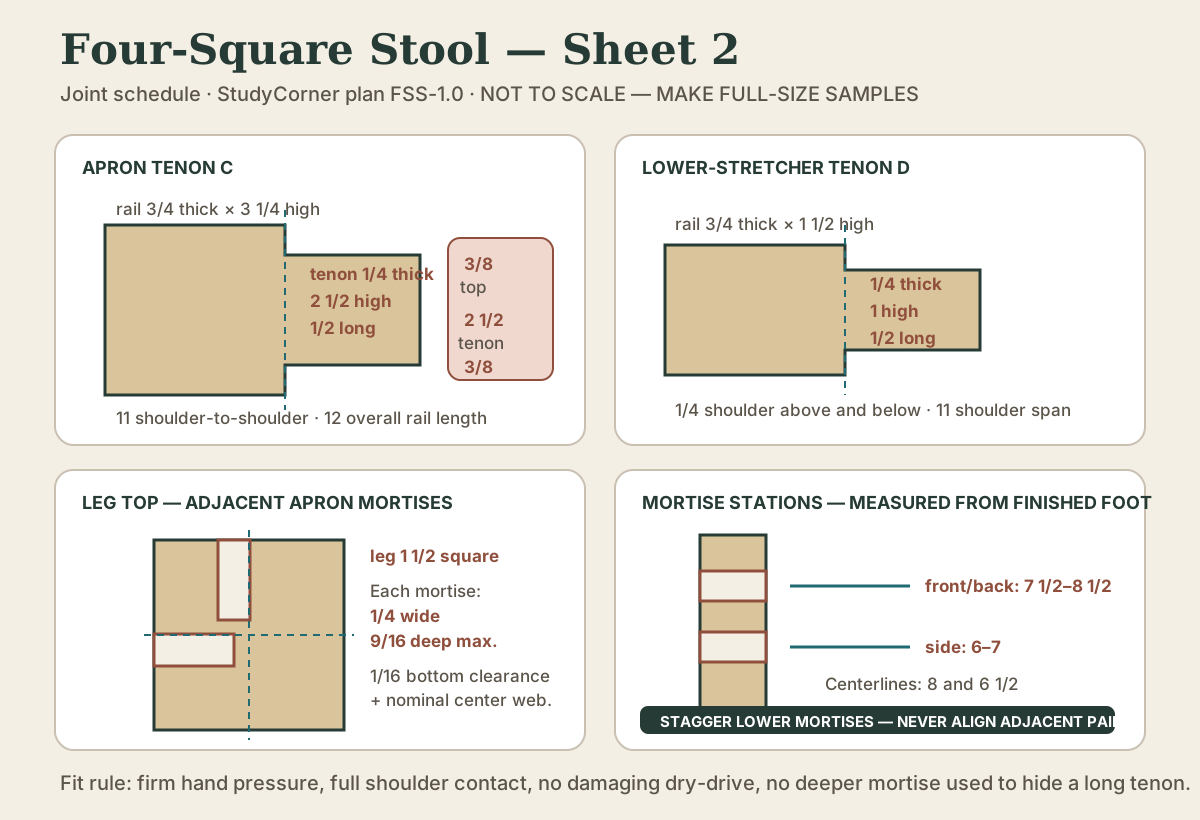
Aprons C into legs B
- Tenon: 1/4 thick × 2 1/2 high × 1/2 long.
- The tenon is centered in the 3/4-inch apron thickness.
- Leave 3/8-inch shoulders above and below the tenon.
- Mortise: 1/4 wide × 2 1/2 high × 9/16 deep, centered across the leg face.
- The apron top is flush with the leg top. Therefore, measured down from the leg top, the mortise begins at 3/8 and ends at 2 7/8.
Adjacent apron mortises approach the leg center from perpendicular faces. Do not make either deeper than 9/16 inch. The 1/2-inch tenon leaves 1/16 inch of bottom clearance for glue and debris; the two perpendicular mortises also retain a nominal 1/16-inch web at the leg center. Lightly chamfer each tenon tip and dry-fit both rails in one leg to confirm the tips do not interfere.
Lower stretchers D into legs B
- Tenon: 1/4 thick × 1 high × 1/2 long.
- Leave 1/4-inch shoulders above and below.
- Mortise: 1/4 wide × 1 high × 9/16 deep, centered across the leg face. The 1/2-inch tenon leaves 1/16 inch of bottom clearance.
- Left/right mortises run from 6 to 7 inches above the finished foot.
- Front/back mortises run from 7 1/2 to 8 1/2 inches above the finished foot.
Mark every leg FL, FR, RL, or RR, then mark the face receiving each rail. The vertical stagger is structural information, not decoration.
Seat A to the base
Use four figure-eight fasteners or an equivalent solid-wood tabletop connector, one centered on each apron. Follow the hardware maker’s recess and screw requirements. Do not glue the seat to all four aprons and do not drive ordinary screws tightly through round holes; either can restrain seasonal movement.
Quick check
A tenon that bottoms out keeps the shoulder from seating.
Build sequence with stop gates
1. Mill a common vocabulary
Mill the four legs together. Mark one reference face and one reference edge on every part. Stack them and compare length, square, and twist. Mill all apron stock together and all stretcher stock together before cutting individual rails.
Cut paired rails with one stop setup. Confirm an 11-inch shoulder span and 12-inch overall length on a sample before cutting the batch.
Stop gate: legs agree in finished length within 1/32 inch, paired rails agree shoulder-to-shoulder within 1/32 inch, and every part retains readable reference marks.
2. Prove the joint on scrap
Cut a full apron joint in matching leg and rail scraps. The tenon should enter with firm hand pressure and close its shoulders without crushing the mortise. It should not fall out under its own weight, require damaging mallet force, or depend on glue to fill a visible gap.
Repeat for the smaller stretcher joint. Use the samples to confirm gauge settings, cutter width, mortise depth, and actual glue behavior.
Stop gate: both samples close fully, remain aligned, and show no split or bruised mortise wall.
3. Lay out from one story stick
Put all four legs in final orientation. Transfer apron stations and both lower-stretcher levels from one story stick. Mark mortises from reference faces, not from whichever face happens to be upward.
Cut mortises before tenons so each tenon can be fitted to a real opening. Rout or chop to the stated 9/16-inch depth without levering against the narrow mortise walls.
4. Fit and dry-build two side frames
Each side frame contains two legs, one apron, and one lower side stretcher centered 6 1/2 inches above the eventual floor. Fit each joint to its numbered location. Place the dry frame on a flat surface, compare diagonals, and use winding sticks across the leg tops.
Stop gate: shoulder lines close, the diagonal difference targets no more than 1/16 inch, and the four bearing points lie without detectable wind. Equal diagonals alone do not prove the frame is untwisted.
5. Glue the side frames
Rehearse clamp order before opening the adhesive. Apply glue consistently, assemble to the shoulder lines, and use only enough clamp force to close proven joints. Recheck diagonal and winding immediately. Allow the adhesive’s stated cure before handling the frames as finished units.
6. Join the side frames
Connect the cured side frames with front and rear aprons and the higher front/back stretchers centered at 8 inches. Bring all four joints together progressively; do not fully seat one corner while another tenon is outside its mortise.
Check front and rear widths at the leg tops, both base diagonals, and winding across all four tops. A clamp may correct a small glue-up drift; it must not force a misdirected mortise to pretend it is square.
Stop gate: the base is 14 × 14 inches outside the legs, diagonal difference targets no more than 1/16 inch, and all four leg tops share a common bearing plane.
7. Attach the seat
After cure, center the 16-inch seat for a one-inch overhang on every side. Ease the exposed edges to no more than the stated 3/8-inch radius. Recess and install the selected fasteners without stripping screws or pulling the seat out of center.
Finish and cure the base and seat according to product instructions. “Dry to touch” is not necessarily cured for contact or loading.
Errors to catch before they compound
- 12 inches between shoulders: the base becomes 15 inches wide. Recut the rail; the shoulder span remains 11 inches.
- All lower mortises at one height: adjacent joints can intersect. Preserve the 6 1/2- and 8-inch centerlines.
- A 3/4-inch-deep apron mortise: perpendicular joints overlap. The governing depth is 9/16 inch.
- Rails used to pull twisted legs straight: stored stress and open shoulders remain. Remill or reject the part.
- Seat glued to the complete frame: seasonal movement becomes restrained. Use the specified mechanical fasteners.
- Rock diagnosed on an unknown floor: rotate the stool on one verified flat reference before trimming a foot.
- Extra screws added after a poor glue-up: fasteners do not repair a split mortise wall or missing shoulder contact.
Quick check
Gluing the seat to the frame restrains movement and invites cracks.
Definition of done and load test
Version 1 is complete when every joint is closed and documented, the base does not rock on a verified reference surface, the seat is centered and can move seasonally, exposed edges are free of splinters, and the finish has fully cured.
Inspect from all sides and photograph the four faces, underside, and every joint. Record species, rough-stock dimensions, moisture observations, tooling, deviations, adhesive, finish, and cure dates.
Before anyone sits on it, load the seat with sandbags or weights in steps, standing clear. Unload and inspect after each step, and stop to diagnose if anything moves, cracks, ticks, or stays bent. It’s a stool, not a step stool: don’t stand on it.
Lesson complete
Nice work.
Sources for this lesson
- 1Robert J. Ross. Wood Handbook: Wood as an Engineering Material. Revised 2021 ed. USDA Forest Service, Forest Products Laboratory. 2021. verifiedOfficial chapters on wood structure, moisture, mechanical properties, fastenings, composites, drying, and finishing. Cited at: chapters 3–5 and 13.
Further reading
- ANSI/BIFMA X5.1-2017(R2022): General-Purpose Office Chairs — Tests. Business and Institutional Furniture Manufacturers Association. verifiedOfficial scope summary for structural strength and durability testing of general-purpose seating.