Carving a Spoon
An eating or cooking spoon from a green branch: choosing a crook, splitting and orienting the blank, axing the top and side profiles, knife work on the back, neck, and handle, hollowing with a hook knife, drying, and finishing cuts.
- 4 min
- 7 steps
- 3 questions
- Lesson 68 of 160
In this lesson
- Choosing the wood
- Layout
- Axe work
- Knife work
- Hollowing the bowl
- Drying and finishing
- What to take from this
Picking up where you left off.
Choosing the wood
Fresh-cut, fine-grained, non-toxic hardwood: birch (the Nordic standard), cherry, maple, alder, apple, or other fruitwoods 1. A branch or small trunk 8-15 cm thick is ideal.

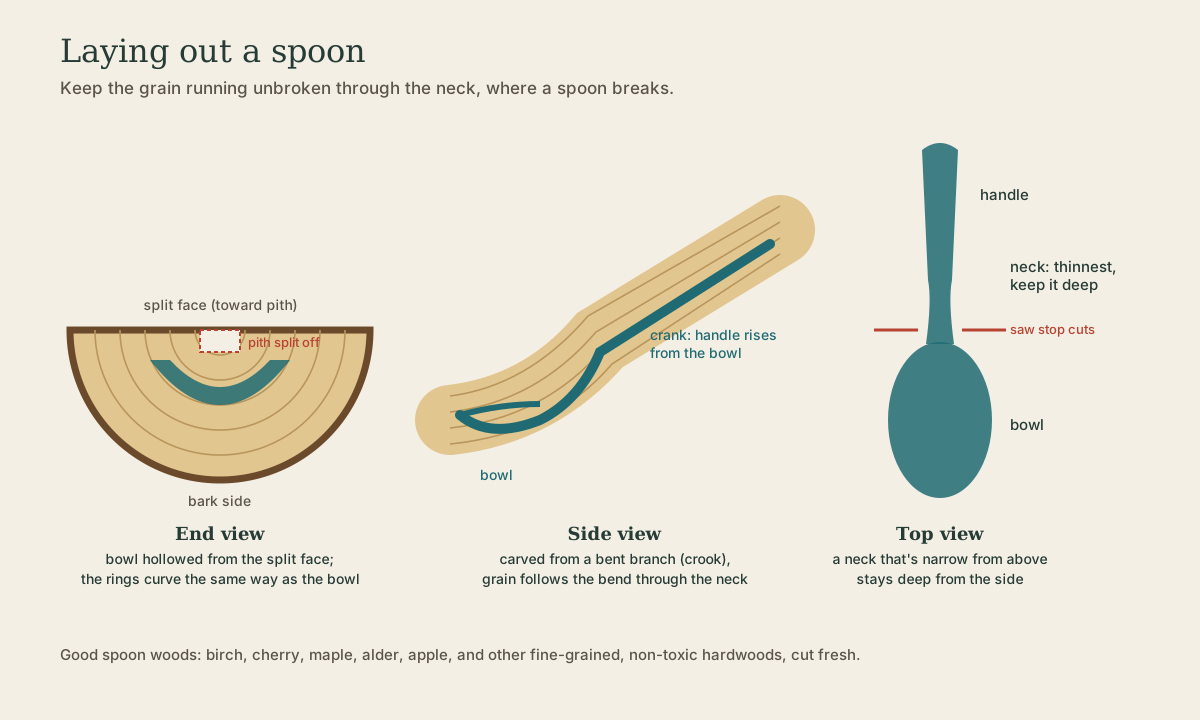
For a cooking spoon or ladle, look for a crook - a gentle bend. A spoon cut so the bend becomes its crank (the angle between bowl and handle) has grain following the curve through its weakest point 2. Cut a strong crank from straight wood and the fibers run out across the neck.
Quick check
Cut a crank from straight wood and the grain runs out across it.
Layout
- Split the branch in half through the pith and remove the pith.
- Orientation: most carvers hollow the bowl from the split face with the spoon’s back toward the bark, so the growth rings curve the same way as the bowl.
- Draw the top view on the split face: bowl, neck, handle. The neck is where spoons break; it can be narrow seen from above as long as it stays deep seen from the side 1.
Quick check
Short grain through a thin neck is the classic failure.
Axe work
On the chopping block (see Axes and Hatchets):
- Saw stop cuts at the neck on both sides, down to the drawn line.
- Axe the top-view outline: the sides of the handle down to the stop cuts, then the sides of the bowl.
- Axe the side profile: thin the handle, define the crank, and rough the back of the bowl into a curve, leaving the bowl’s top flat for now.
Barn the Spoon gets a spoon most of the way to shape with the axe; time spent with a sharp axe saves an hour with the knife 1.
Knife work
With the sloyd knife and the grips from the knife lesson 2:
- Back of the bowl: reinforced and chest-lever cuts, shaping a fair curve from rim to keel.
- Neck: thumb-push and pull strokes; the grain changes direction here, so cut downhill from both sides into the neck.
- Handle: forehand cuts to thickness, then pull strokes to round and refine; a slight taper, a gentle swell for the hand.
- Rim: thin it evenly, about 3 mm for an eating spoon.
Hollowing the bowl
The hook knife (spoon knife) is a curved blade for the hollow.
- Cut across the grain or diagonally, from the rim toward the center, and work each half downhill. Cutting straight along the bowl tears into end grain at the tip and heel.
- Use a thumb-on-the-back grip, rolling the wrist, or brace the spoon against the chest and pull the knife toward you with the edge facing away from your body’s core.
- Keep the walls even: check thickness between finger and thumb.
- A tighter-curved hook for deep bowls; an open curve for shallow eating spoons.
Playback is optional. If the player is unavailable, open the video at its source.
Quick check
Cutting across or diagonally prevents tearing into the end grain at the bowl’s ends.
Drying and finishing
Dry slowly for a few days to a week, in a paper bag or under shavings at first, away from stoves. Rapid drying cracks the bowl. Then make finishing cuts with freshly stropped knives: crisp facets on the back and handle, a smooth sweep in the bowl. Oil with a food-safe drying oil (raw linseed or walnut), wipe off thoroughly, and let cure. Eating spoons can be washed by hand; keep them out of the dishwasher.
Playback is optional. If the player is unavailable, open the video at its source.
What to take from this
Pick fresh birch or fruitwood, ideally a crook for a cranked spoon. Split through the pith, hollow from the split face, and draw a neck that’s narrow from above but deep from the side. Saw stop cuts and axe the top and side profiles, refine with the knife cutting downhill into the neck, and hollow across the grain with a hook knife. Dry slowly, then finish with clean cuts and food-safe oil.
Lesson complete
Nice work.
Sources for this lesson
- 1Barn the Spoon. Spoon: A Guide to Spoon Carving and the New Wood Culture. Scribner. 2017. verifiedAxe and knife technique, sharpening, and spoon design from a London spoon carver.
- 2Wille Sundqvist. Swedish Carving Techniques. Taunton Press (reissued by Abrams). 1990. verifiedAxe and knife grips, sharpening, and household woodenware such as butter paddles, spoons, ladles, and dough bowls.
Further reading
- Jögge Sundqvist. Slöjd in Wood. Lost Art Press. 2018. verifiedPublisher excerpt (PDF) of the English translation of the Swedish classic; butter knife, spoons, bowls, sheath, hooks, and painted decoration in the Västerbotten tradition.