Build a Bent Willow Chair
A nailed bent willow armchair from fresh-cut willow: the 1 : 2 : 1.5 proportion that sizes the frame, cutting list for three sizes, the build order from side frames to arches and infill, keeping it square, and a linseed oil and turpentine finish.
- 5 min
- 7 steps
- 3 questions
- Lesson 85 of 160
In this lesson
- The proportion
- Materials
- The build
- Keeping it right
- Finish and care
- Try it
- What to take from this
Picking up where you left off.
The proportion
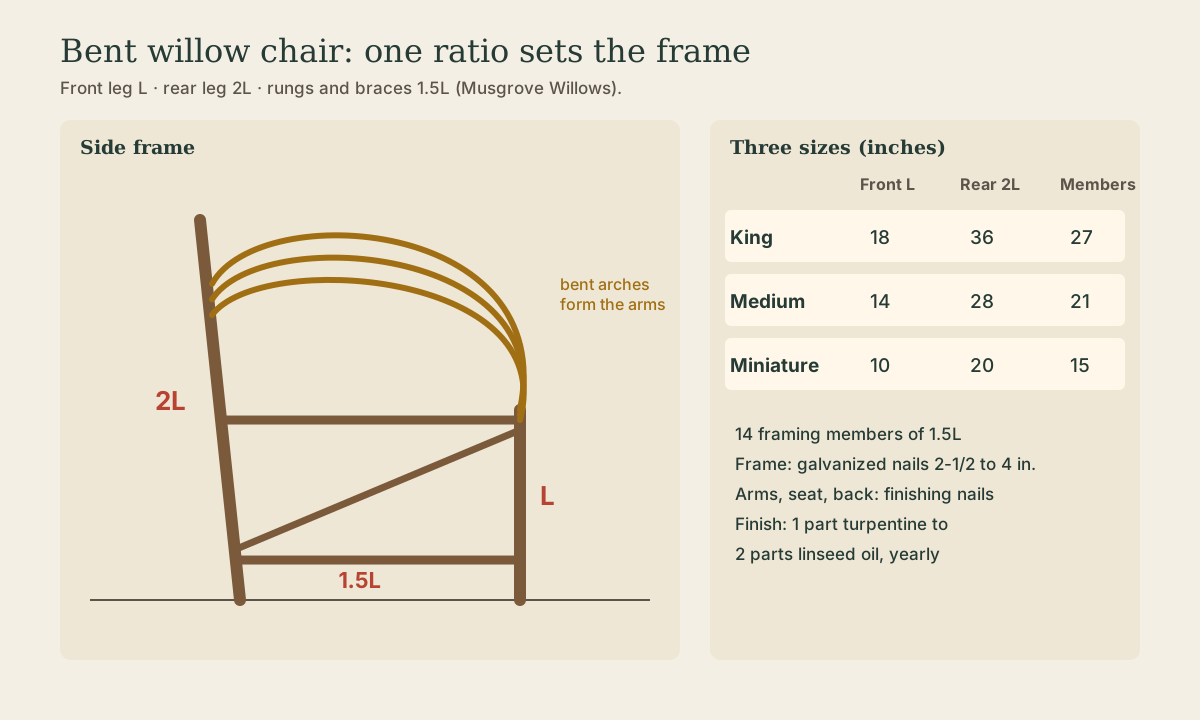
Musgrove Willows sizes a bent willow chair from one number: the length of the front legs, L 1.
- Rear legs and the two horizontal back-rest supports: 2L.
- Everything else (rungs, braces, seat rails, crosspieces): 1.5L, halfway between.
| Size | Front legs | Rear legs | Other members |
|---|---|---|---|
| King | 18 in. | 36 in. | 27 in. (14 pieces) |
| Medium | 14 in. | 28 in. | 21 in. (14 pieces) |
| Miniature | 10 in. | 20 in. | 15 in. (14 pieces) |
Quick check
Rear legs and the back-rest supports are 2L; the other members are 1.5L, here 21 in.
Materials
- Frame: willow poles about 1-1/2 to 2 in. thick, as straight as you can find.
- Arches and infill: long, fresh willow rods, 1/2 to 1 in. at the butt and 6 to 10 ft long. Cut more than you think you need.
- Fasteners: galvanized framing nails, 2-1/2 to 4 in., for the frame; finishing nails, 1 in. and 1-5/8 in., for arms, seat, and back 1.
- Tools: bow saw, pruning shears, hammer, cordless drill with bits for pre-drilling, rasp, tape 1.
Use the frame poles fresh or partly dry, but the bending rods fresh: willow loses its flexibility as it dries 2. Basketry willow is cut dormant, November to March 3; for furniture rods, any season works if you use them quickly.
The build
Musgrove’s order 1:
- Side frames: for each side, nail a front leg and a rear leg to two 1.5L rails, one low and one at seat height. Lay both sides on the ground and build them as mirror images.
- Front and rear beams: stand the sides up and join them with 1.5L crosspieces front and back.
- Headrest: a 2L back-rest support across the top of the rear legs, with the second one lower down.
- Stretcher and side braces: a stretcher low between the sides and a diagonal brace in each side frame. Nailed joints act like hinges; triangles stop the frame from racking.
- Seat beams: rails to carry the seat, sloped down toward the back. Popular Woodworking’s child’s chair tilts the seat frame 5 to 10 degrees 2.
- Armrests: bent rods from the front leg up and back to the rear leg, several side by side.
- Headrest hoops: bent rods arching over the back.
- Infill: seat and back sticks, spaced evenly, about 3/4 in. apart in the Popular Woodworking chair 2.
Playback is optional. If the player is unavailable, open the video at its source.
Quick check
A rectangle of nailed poles folds into a parallelogram; a brace stops it.
Keeping it right
- Pre-drill every nail near an end. Willow splits less than most woods, but the end of a pole splits easily.
- Check for twist before adding braces: set the chair on a flat floor and see that all four legs touch. Fix it now; it’s set once the braces go on.
- Pre-bend the butt of every arch rod so the curve is even (see Bent Wood and Nails).
- Trim the legs last, with the chair on a flat surface, to level it and set the seat slope.
- Sit on it often while building, and adjust the seat slope and back before the infill hides everything.
Finish and care
Musgrove finishes with 1 part turpentine to 2 parts linseed oil, brushed on and renewed every year 1. Store the chair under cover in winter. As the willow dries over the first months, tighten any nails that loosen, and expect a little shrinkage in the seat infill.
Quick check
The thin oil soaks into the bark and cut ends and is easy to renew.
Try it
Build the miniature size first (10-in. front legs, 20-in. rear, 15-in. members) as a plant stand or a child’s chair. It uses the same steps, takes an afternoon, and shows you how willow behaves before you cut stock for a full-size chair.
What to take from this
A bent willow chair is sized from the front-leg length L: rear legs and back supports 2L, everything else 1.5L. Build the side frames as mirror images, join them, add the back supports, then stretcher and diagonal braces to stop racking, seat rails sloped back 5-10 degrees, bent arms, hoops, and infill about 3/4 in. apart. Use galvanized nails and pre-drill. Finish with 1 part turpentine to 2 parts linseed oil each year.
Lesson complete
Nice work.
Sources for this lesson
- 1Mitch Ison. How to Build a Bent Willow Chair. Low Impact (Musgrove Willows). 2021. verifiedRear legs and back-rest supports twice the front-leg length; other members halfway between; king 18/36/27 in., medium 14/28/21, miniature 10/20/15; galvanized framing nails 2-1/2 to 4 in. and finishing nails; build order sides, front and rear beams, headrest, stretcher, braces, seat beams, arms, hoops, infill; 1 part turpentine to 2 parts linseed oil yearly.
- 2Jonathan Benson. Rustic Chair. Popular Woodworking. 2023. verifiedChild's chair of willow and Osage-orange saplings about 1 in. thick; use cut stock right away; willow bends easily, holds its bend, and keeps its bark; pre-bend the thick end; galvanized nails in pre-drilled holes; seat 12 in. high, 15 by 15 in.; seat frame sloped 5 to 10 degrees; seat and back sticks about 3/4 in. apart.
- 3Marilee Williams. Willow, A New Old Crop. Cornell Small Farms Program. 2013. verifiedBasketry willows with long, pliant shoots and little pith; harvest in dormancy, November through March; bundle by variety and dry upright with good air flow; soak about a day per foot.