Build a Park Picnic Table
A 1930s-style park picnic table designed from Albert Good's numbers: 29-in. top, 17-in. seats, 1/4-in. open joints, rounded edges, a cut list for a 6-ft table in 2x6 stock or split slabs, bolted A-frame ends, and keeping the legs off the ground so it lasts.
- 5 min
- 6 steps
- 3 questions
- Lesson 86 of 160
In this lesson
- The numbers
- Design and cut list
- Building it
- Making it last
- Try it
- What to take from this
Picking up where you left off.
The numbers
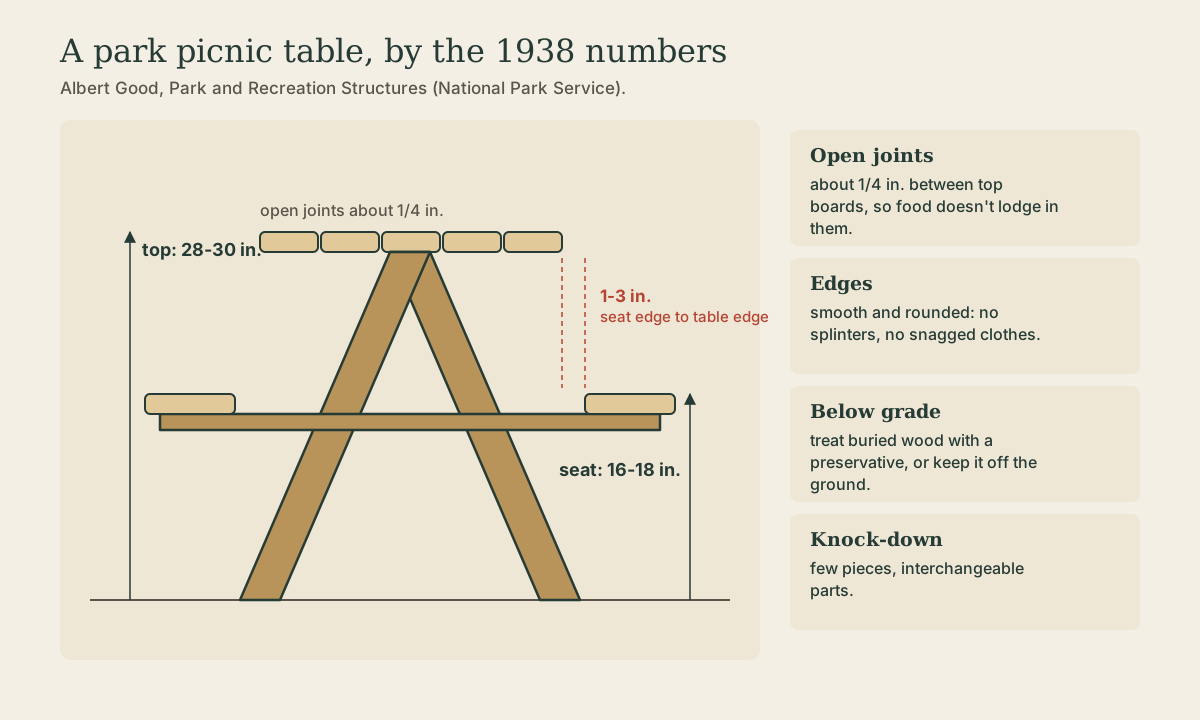
Albert Good’s Park and Recreation Structures (1938) gives the dimensions the Park Service’s builders settled on 1:
- Seat height: 16 to 18 in.
- Table height: 28 to 30 in.
- Seat edge: the front edge of the seat 1 to 3 in. from the edge of the table.
- Top boards with open joints about 1/4 in. wide, so food doesn’t lodge in them.
- Smooth, rounded edges that don’t splinter or catch clothing.
- Preservative on wood below grade.
- For knock-down tables, few pieces and interchangeable parts.
Good also wanted park furniture simple and suited to its place, rustic without being grotesque 2. A picnic table should look like it was built by someone with an axe, a saw, and good sense.
Quick check
The seat’s front edge sits 1 to 3 in. from the table edge.
Design and cut list
This version is a 6-ft table seating six, with attached seats and bolted A-frame ends. Pick heights inside Good’s ranges: top at 29 in., seats at 17 in. That 12-in. difference is the knee room.
Top: five boards, 2x6 (actual 1-1/2 by 5-1/2 in.), with four 1/4-in. gaps: 5 × 5-1/2 + 4 × 1/4 = 28-1/2 in. wide.
Seats: two 2x6 boards each with a 1/4-in. gap, 11-1/4 in. deep. Set them so the seat’s front edge is about 2 in. from the table edge, inside Good’s 1-3 in. range.
| Part | Qty | Stock | Length |
|---|---|---|---|
| Top boards | 5 | 2x6 | 72 in. |
| Seat boards | 4 | 2x6 | 72 in. |
| Legs | 4 | 2x6 | about 32 in., ends cut to the splay angle |
| Top cleats | 3 | 2x4 | 28 in. |
| Seat supports | 2 | 2x6 | about 58 in. |
| Diagonal braces | 2 | 2x4 | cut to fit |
Lay out one end full size on a sheet of plywood or the shop floor: ground line, top at 29 in., seat at 17 in., and the legs splayed so their feet land just inside the seat edges. Measure leg length and angles from the drawing rather than from a formula.
Rustic version: use split or sawn half-log slabs 2-1/2 to 3 in. thick for seats and top, flattened with an adze or a chainsaw mill and planed or drawknifed smooth on top. Keep the bark off: it holds water and harbors insects.
Wood: decay-resistant heartwood (white cedar or white oak, or black locust if you can find it) lasts far longer outdoors than sapwood or pine 3.
Quick check
5 x 5-1/2 = 27-1/2, plus 4 gaps x 1/4 = 1 in.
Building it
- Ends first. Bolt each pair of legs to a top cleat and a seat support with 3/8-in. galvanized carriage bolts, two per joint, checked against the full-size drawing.
- Stand the ends up and screw on the two outer top boards to tie them together; check the diagonals of the top for square.
- Space the other top boards with 1/4-in. spacers (a pair of plywood scraps works) and fasten them to the cleats; add the middle cleat.
- Seat boards onto the seat supports, also with 1/4-in. gaps.
- Braces from the middle cleat down to the seat supports, so the table can’t rack lengthwise.
- Round every edge with a block plane or rasp, and break the corners of every board end. Good’s point about clothing and splinters is a good test: run a hand along every edge.
Making it last
- Off the ground. Set the feet on flat stones, pavers, or concrete pads. End grain in wet soil rots first; Good called for preservative on wood below grade 1, and keeping wood out of the soil is simpler.
- Gaps drain. The 1/4-in. joints let rain through as well as crumbs.
- Finish with pine tar and linseed oil or penetrating oil, renewed every year or two (see Traditional Paints and Finishes), or leave cedar and oak to gray.
- Move it. Good noted that stone tables last but can’t be shifted when the ground around them wears out 1. A wood table can.
Quick check
Good called for preservative on any wood below grade; keeping wood out of the ground is the simpler fix.
Try it
Before buying lumber, set a board across two sawhorses at 29 in. and a plank on blocks at 17 in., and sit at it. Move the plank in and out until the seat edge sits comfortably 1 to 3 in. from the table edge, and measure. Build to your numbers.
What to take from this
Use the 1938 Park Service numbers: seat 16-18 in., top 28-30 in., seat edge 1-3 in. from the table edge, 1/4-in. open joints, and rounded edges. Five 2x6s with four 1/4-in. gaps make a 28-1/2-in. top. Draw one end full size, bolt the A-frame ends, space the boards, and brace lengthwise. Use decay-resistant heartwood, keep the feet off the soil, and round every edge.
Lesson complete
Nice work.
Sources for this lesson
- 1Albert H. Good. Park and Recreation Structures, Part II: Picnic Tables. National Park Service. 1938. verifiedSeat 16 to 18 in. and table 28 to 30 in. off the ground; front edge of the seat 1 to 3 in. from the edge of the table; open joints about 1/4 in. between top boards; smooth, rounded edges; preservative on wood below grade; knock-down tables with few, interchangeable parts; stone tables durable but immovable.
- 2Albert H. Good. Park and Recreation Structures, Part III: Furniture and Furnishings. National Park Service. 1938. verifiedPublic-domain U.S. government publication with eight plates of rustic furniture precedents. It is a historical design source, not a current accessibility or seating-load standard.
- 3Robert J. Ross. Wood Handbook: Wood as an Engineering Material. Revised 2021 ed. USDA Forest Service, Forest Products Laboratory. 2021. verifiedOfficial chapters on wood structure, moisture, mechanical properties, fastenings, composites, drying, and finishing.