Why Boards Warp and Crack
Unequal shrinkage between tangential and radial directions sets how each piece distorts, and the shell drying before the core sets up stresses that check surfaces, crack interiors, and leave casehardening.
- 5 min
- 6 steps
- 3 questions
- Lesson 5 of 160
In this lesson
- Two causes of trouble
- Ring orientation sets the shape
- The shell dries first
- The stresses reverse
- Casehardening
- What to take from this
Picking up where you left off.
Two causes of trouble
Drying defects that aren’t stains come from shrinkage, and shrinkage causes trouble in two ways 1:
- Different shrinkage in different directions within a piece. This decides how each piece distorts: cup, bow, twist, diamonding.
- Different shrinkage in different parts of a piece, because the outside dries before the inside. This sets up internal stresses that crack surfaces, crack interiors, and lock in tension.
Ring orientation sets the shape
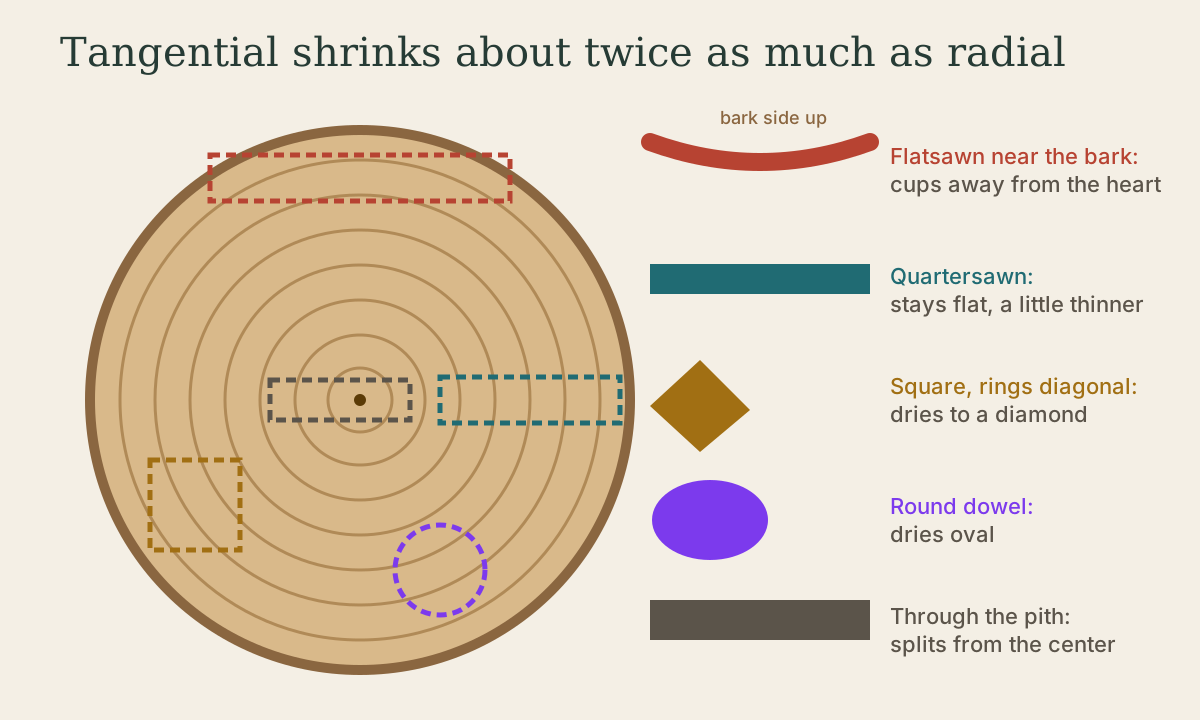
Because tangential shrinkage is about twice radial, a piece’s final shape depends on how the growth rings cross it 2:
- A flatsawn board from near the bark cups away from the heart. Its bark-side face is more nearly tangential than its heart-side face and shrinks more, so the edges curl toward the bark. Fresh-cut boards from the outside of the log cup the most.
- A quartersawn board has rings running through its thickness. Its width shrinks radially, both faces shrink equally, and it stays flat, getting a little thinner.
- A square whose rings run diagonally shrinks more along one diagonal than the other and becomes a diamond. Squares with rings parallel to two faces stay square but get rectangular.
- A round dowel or turned leg dries oval, narrower in the tangential direction.
- A piece containing the pith almost always splits, because tangential shrinkage around the rings is far greater than radial, and the circle of rings can’t shrink around itself without opening up.
Bow, crook, and twist come mostly from longitudinal shrinkage differences (reaction wood, juvenile wood, cross grain) and from spiral or interlocked grain 1. Good stacking with closely spaced, aligned stickers and weight on top restrains much of it; it can’t fix reaction wood.
Quick check
The bark-side face is more nearly tangential and shrinks more than the heart-side face, so the board cups with its concave side toward the bark.
The shell dries first
When a board starts drying, its surface quickly drops below fiber saturation and wants to shrink. The wet core, still above fiber saturation, doesn’t shrink and holds the surface stretched. So early in drying:
- the shell is in tension,
- the core is in compression.
If the drying is too severe, too dry or too fast, the shell’s tension exceeds its strength across the grain and it cracks. Those are surface checks, usually on the faces of flatsawn boards along the rays. End checks form the same way at board ends, which dry far faster than faces because water diffuses 10 to 15 times faster along the grain than across it 1.
There’s a twist. A stretched shell doesn’t just stay stretched; while it’s held in tension, it dries in a stretched condition and sets larger than it would have been if free to shrink. This is called tension set.
The stresses reverse
Later, the core finally drops below fiber saturation and starts to shrink. But it’s surrounded by a shell that has already set too large. Now the core wants to pull in and the shell resists. The stresses reverse:
- the shell goes into compression,
- the core goes into tension.
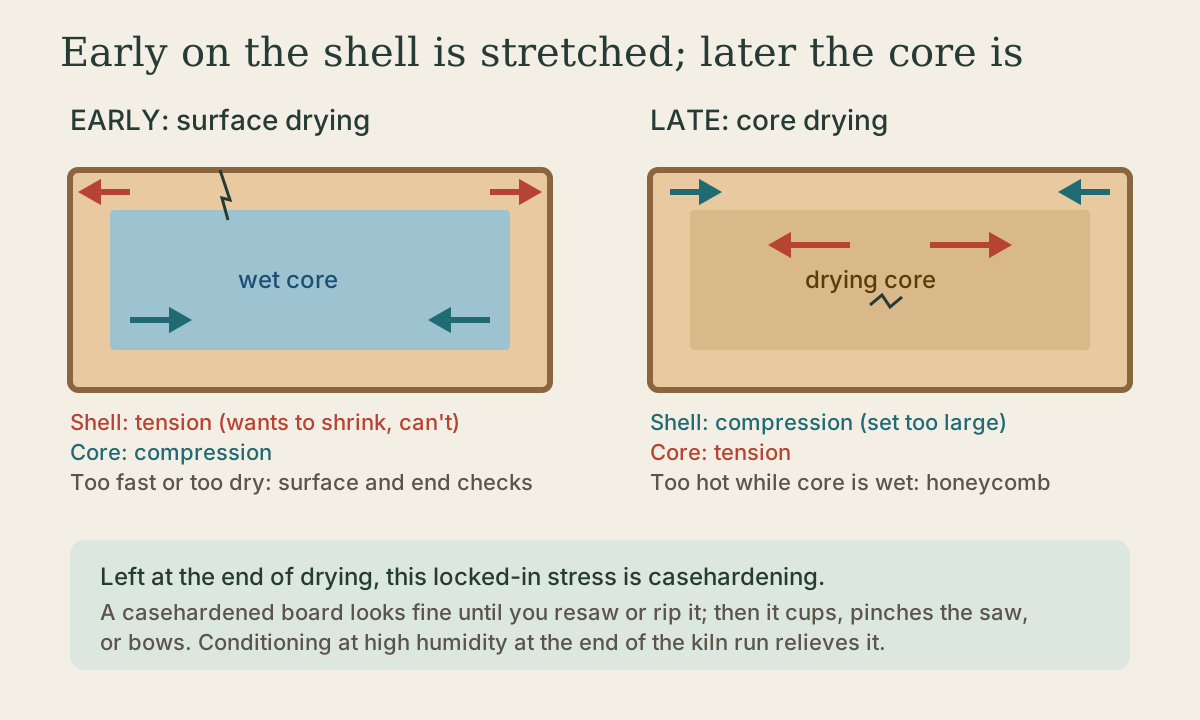
If the core is still fairly wet and the temperature is high, the core’s tension can split it internally. That’s honeycomb: cracks inside the board, often invisible until you cut or machine it. Too much heat while the core is wet can also cause collapse, where wet cells are crushed flat, showing as washboarding or excessive thickness shrinkage 1. Surface checks that opened early often close up when the stress reverses, so a board can hide checks until it’s planed.
Casehardening
If the drying ends with these reversed stresses still locked in, the board is casehardened. It may look flat and perfect. But cut it and you release the balance: a resawn casehardened board cups toward the cut face, a ripped one can bow apart or pinch the saw blade, and a board planed on one face may cup.
Kiln operators test for it with a prong test: cut a cross-section about an inch long from the board, saw out its center to leave two prongs, and watch. Prongs that pinch inward show casehardening; prongs that flare outward show reverse casehardening, from over-conditioning. Let the prongs sit in a warm room for several hours before reading them, because any moisture difference between shell and core can bend them on its own 3. The cure is conditioning: a short, very humid treatment at the end of kiln drying that lets the shell take up a little moisture, swell, and relieve the stress. That’s covered in the kiln module.
Air-dried lumber is rarely badly casehardened, because air drying is slow and the outdoor humidity cycles relieve stress naturally.
What to take from this
Unequal tangential and radial shrinkage sets how a piece distorts: flatsawn cups toward the bark, squares go diamond, rounds go oval, and the pith splits. Uneven drying sets up stresses: early on the shell is stretched and can check; later the stresses reverse, and a wet, hot core can honeycomb. Stress left at the end is casehardening, which shows up when you cut the board and is cured by conditioning.
Practice
Late in drying the core is in tension. If the core is still wet and hot, the weakened wood cracks internally.
Practice
Casehardening is residual stress from drying. It shows up when you cut the board and release it. Kiln conditioning relieves it.
Lesson complete
Nice work.
Sources for this lesson
- 1Richard Bergman. Drying and Control of Moisture Content and Dimensional Changes (Wood Handbook, Chapter 13). USDA Forest Service, Forest Products Laboratory, FPL-GTR-282. 2021. verifiedOven-dry and meter methods, outdoor EMC by city incl. Madison (Table 13-1), recommended MC (Table 13-2), kiln schedules (Table 13-3), drying defects, and dimensional change coefficients (Table 13-5). Cited at: Drying Stresses; Warp; Drying Mechanism; Fracture or Distortion.
- 2Samuel V. Glass, Samuel L. Zelinka. Moisture Relations and Physical Properties of Wood (Wood Handbook, Chapter 4). USDA Forest Service, Forest Products Laboratory, FPL-GTR-282. 2021. verifiedFree and bound water, fiber saturation (~30%), EMC table (Table 4-2), green moisture by species (Table 4-1), shrinkage by species (Table 4-3), and the shrinkage equation. Cited at: Figure 4-3.
- 3Joseph Denig, Eugene M. Wengert, William T. Simpson. Drying Hardwood Lumber. USDA Forest Service, Forest Products Laboratory, FPL-GTR-118. 2000. verifiedPredrying, kiln schedules, safe daily drying rates (Table 8.6), stress testing and conditioning, dehumidification kilns, the semi-greenhouse solar kiln, and storage. Cited at: Residual Tension Set (Casehardening).