A Wall Cabinet
A small hanging cabinet brings the course together: a dovetailed case, a shelf in dadoes, a back in rabbets, a frame-and-panel door, hinges, and a French cleat to hang it safely.
- 4 min
- 7 steps
- 3 questions
- Lesson 48 of 160
In this lesson
- The project
- Design
- The case
- The door
- Hardware
- Hanging it
- Finish
Picking up where you left off.
The project
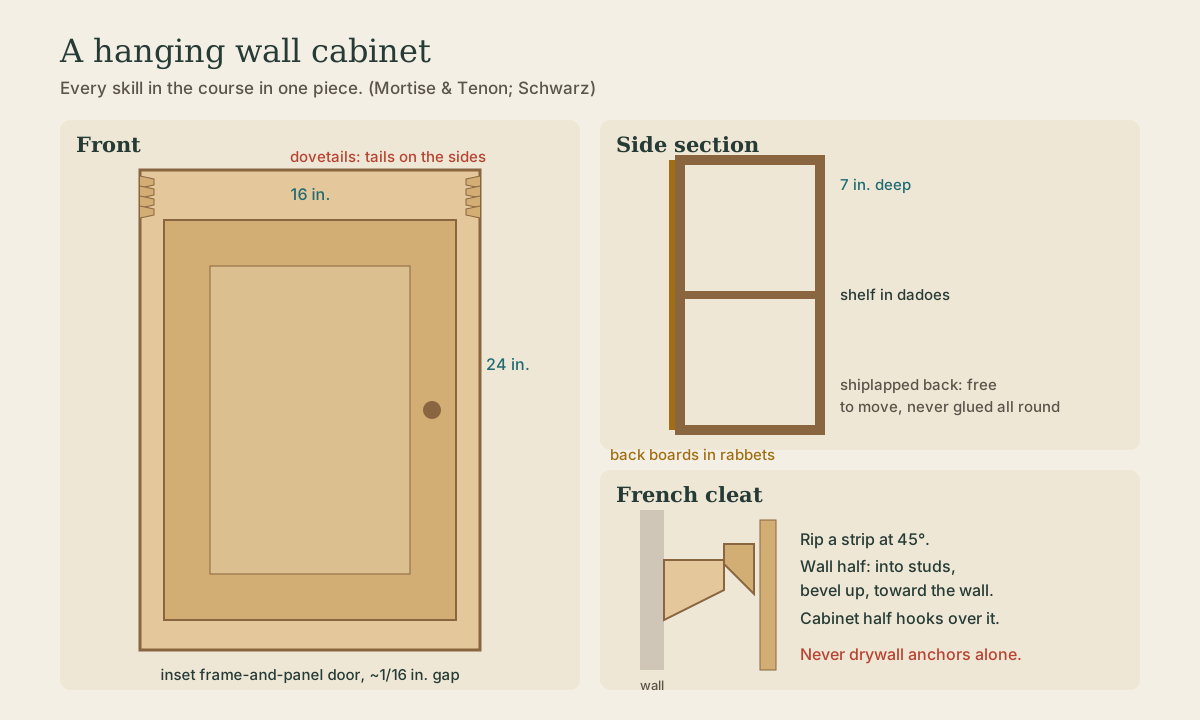
A small hanging wall cabinet - something like 24 inches tall, 16 wide, and 7 deep - is a classic capstone for a first hand-tool course. It uses nearly every skill in the course:
- Dovetailed case corners.
- A shelf in dadoes.
- A back in rabbets.
- A frame-and-panel door.
- Hinges, a catch, and a way to hang it safely.
Shaker and country cabinets of this kind are good models: simple, proportioned, with clean joinery and a single door 1.
Design
Draw a full-size front and side view (see the Chairs course’s plan lessons for drawing method). Decide:
- Overall size and shelf spacing for what you’ll store.
- Wood: pine, cherry, or walnut. Case parts about 5/8 to 3/4 inch; door frame about 3/4 inch.
- Door: inset (fits within the case opening, more demanding) or overlay (covers the front).
- Top and bottom: flush with the sides, or a projecting top with a molding.
The case
- Mill the sides, top, bottom, and shelf to thickness and width.
- Dovetail the corners. For a hanging cabinet, put the tails on the sides and pins on the top and bottom, so the weight hanging from the top can’t pull the joints apart (see Dovetails).
- Dado the sides for the shelf (see Dadoes, Rabbets, and Grooves).
- Rabbet the back edges of the sides, top, and bottom for the back.
- Glue up the case, checking diagonals for square.
- Back: shiplapped or tongue-and-groove boards nailed into the rabbets. Each board can move a little, yet together they square and stiffen the case. Don’t glue a solid back all around.
Quick check
Nail or screw shiplapped boards in the rabbet, each free to move slightly.
Quick check
Through or half-blind dovetails resist the pulling load, especially on the top, where the cabinet hangs.
The door
- Make a frame-and-panel door (see Frame and Panel): stiles and rails joined with mortise and tenon, grooved for a floating panel 2.
- Size an inset door to the opening with a small, even gap (about 1/16 inch) all around; plane it to fit after assembly.
- Finish the panel before assembly.
Hardware
- Hinges: butt hinges mortised into the case side and door stile with a chisel and router plane, or simple surface hinges. Lay out with a marking gauge set from the hinge leaf.
- Catch: a wooden turn button, a small brass catch, or a magnet.
- Knob: turned or carved, fixed with a through-tenon and wedge.
Hanging it
Use a French cleat: rip a strip at 45 degrees into two pieces. Screw one to the wall into studs with the bevel facing up and toward the wall, and fix the other to the cabinet back (or a hanging rail inside the top of the case) with the bevel facing down. Lift the cabinet onto it: its weight pulls the two bevels together. It’s strong, invisible, and lets you level and remove the cabinet easily.
Don’t hang a loaded cabinet from drywall anchors alone or from screws through a thin back panel.
Quick check
The cabinet’s weight pulls the bevels together. Screw the wall half into studs.
Finish
Shellac or oil-varnish for hardwoods, milk paint for pine (see Finishing). Finish the inside too, more lightly, so both faces exchange moisture evenly.
What to take from this
A small hanging cabinet combines dovetailed corners (tails on the sides), a dadoed shelf, a back of shiplapped boards in rabbets, and a frame-and-panel door with a finished, floating panel. Mortise hinges with a chisel and router plane, fit an inset door with an even gap, and hang the cabinet on a French cleat screwed into studs.
Lesson complete
Nice work.
Sources for this lesson
- 1Joshua A. Klein. The Foundations Course (Apprenticeship Series). Mortise & Tenon Magazine. verifiedHand-tool furniture making from pre-industrial originals - tool selection, sharpening, lumber processing, mortise and tenon, through and half-blind dovetails, nailed rabbets, dados, and shellac and milk paint finishes.
- 2Frame and panel. Wikipedia. verifiedThe panel floats unglued in grooves in the rails and stiles so seasonal movement doesn't distort the frame; about 1/4 inch of space at the groove bottom is typical.
Further reading
- Christopher Schwarz. The Anarchist's Tool Chest. Lost Art Press. 2011. verifiedArgues a kit of fewer than 50 good hand tools can build almost anything; explains how to choose each tool, new or antique, and how to build a chest to hold them. Free PDF from the publisher.