Saws: Rip, Crosscut, and Pull Saws
Why rip teeth are chisels and crosscut teeth are knives, the saws a hand-tool shop needs, how to start and steer a cut to a line, and what saw sharpening and set involve.
- 5 min
- 5 steps
- 3 questions
- Lesson 30 of 160
In this lesson
- Rip and crosscut teeth
- The saws you need
- Sawing to a line
- Sharpening and set
- What to take from this
Picking up where you left off.
Rip and crosscut teeth
Wood fibers are cut very differently along and across the grain, so Western saws have two tooth patterns 1:
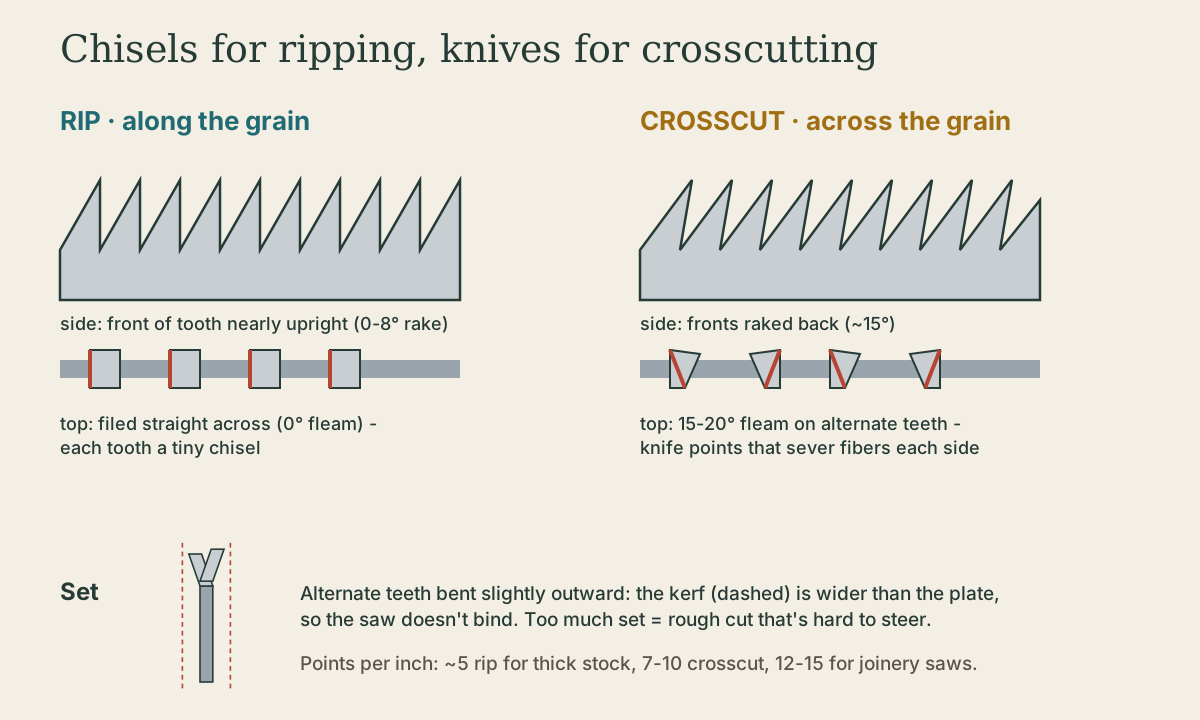
- Rip teeth cut along the grain. They’re filed straight across with 0° fleam and little rake (0 to about 8°), so each tooth is a tiny chisel chopping the fibers. Rip saws are easier to sharpen, since every tooth is filed the same way 1.
- Crosscut teeth cut across the grain. They’re filed with 15 to 20° of fleam on alternate sides and more rake, so each tooth is a knife point that severs fibers on each side of the kerf before the wood between crumbles out 1.
Set is the slight outward bend of alternate teeth, making the kerf wider than the saw plate so it doesn’t bind.
Teeth per inch (or points per inch, one more than TPI) sets speed versus finish: a 5½-point rip saw for thick stock, 7 to 8 points for crosscutting, 12 to 15 for joinery.
Quick check
Rip teeth (0° fleam) are chisel edges for cutting along fibers. Crosscut teeth have 15-20° fleam on alternate teeth, forming knife points that sever fibers across the grain.
The saws you need
A hand-tool shop can do almost everything with 2:
- Rip panel saw (about 5 to 7 ppi) for ripping boards.
- Crosscut panel saw (about 8 to 10 ppi) for cutting to length.
- Dovetail saw: small backsaw, fine rip teeth, for dovetails and small joinery.
- Carcase or tenon saw: larger backsaw for tenon cheeks, shoulders, and general joinery; crosscut or hybrid filing.
- Coping or bow saw for curves and removing dovetail waste.
Backsaws have a brass or steel spine stiffening a thin plate for accurate joinery.
Japanese pull saws (ryoba, dozuki) cut on the pull stroke, so the plate can be very thin. They cut fast and accurately, and the ryoba has rip teeth on one edge and crosscut on the other. Their hardened teeth usually can’t be resharpened, so you replace blades.
Sawing to a line
Accuracy comes from setup, not effort:
- Knife the line on the face and edges (a knife line beats a pencil line for joinery). Pare a small V-groove on the waste side to give the saw a starting wall.
- Saw on the waste side of the line, leaving the line.
- Stance: stand so your eye, shoulder, elbow, and the saw line up, with the forearm swinging like a pendulum.
- Grip lightly with the index finger pointing along the handle.
- Start at the far corner with light strokes, using a thumb knuckle against the plate as a guide, then lower the saw to cut across the face and down the near edge together.
- Let the saw cut: long, light strokes using most of the blade; don’t force it.
- Watch two lines: the face line and the line down the edge facing you.
Practice rips and crosscuts in pine, checking each cut with a square, until square cuts become habit.
Playback is optional. If the player is unavailable, open the video at its source.
Quick check
Heavier set or sharper teeth on one side pull the saw. Also check stance: align your eye, arm, and saw, and keep a relaxed grip.
Sharpening and set
A dull saw is slow and wanders. Sharpening a Western saw:
- Joint: run a flat file lightly along the tooth tips so all are the same height.
- Shape and sharpen: with a triangular saw file, file each gullet at the right rake (and fleam for crosscut), until the flat spots from jointing just disappear 1.
- Set: bend alternate teeth with a saw set, lightly.
- Side-dress: run a stone along each side to even out the set if the saw pulls.
A rip saw is the easiest place to learn. Many hand-tool workers file all their small joinery saws rip, since rip teeth also crosscut acceptably in fine sizes.
What to take from this
Rip teeth are chisels filed straight across (0° fleam); crosscut teeth are knives with 15 to 20° fleam on alternate teeth; set keeps the plate from binding. A rip panel saw, crosscut panel saw, dovetail saw, tenon or carcase saw, and a coping saw cover most work, or a Japanese ryoba and dozuki. Saw to a knifed line on the waste side, aligned and relaxed, letting the saw cut. Sharpen by jointing, filing, setting, and side-dressing.
Practice
Without set, the plate rubs in the kerf. Too much set makes a wide, rough, hard-to-steer cut.
Lesson complete
Nice work.
Sources for this lesson
- 1Samuel Colchamiro. Rip Saw Sharpening Techniques. Highland Woodworking. verifiedRip teeth are filed straight across (0° fleam) like chisels; crosscut teeth get 15-20° of fleam on alternate teeth, making knife points.
- 2Christopher Schwarz. The Anarchist's Tool Chest. Lost Art Press. 2011. verifiedArgues a kit of fewer than 50 good hand tools can build almost anything; explains how to choose each tool, new or antique, and how to build a chest to hold them. Free PDF from the publisher.